Indirect Tag Bindings in Vision
Binding Properties to a Dynamic Set of Tags
An Indirect Tag binding is very much like a standard Tag binding, except that you may introduce any number of indirection parameters to build a Tag path dynamically in the runtime. These parameters are numbered starting at one, and denoted by braces, for example, 1. The binding will be linked to the Tag represented by the Tag path after the indirection parameters have been replaced by the literal values they are bound to. An indirection parameter may represent a property on any component in the same window.
For example, instead of binding straight to a Tag's path, like
[TagProvider]MyPlant/EastArea/Valves/Valve4/FlowRate
or
[TagProvider]MyPlant/WestArea/Valves/Valve2/FlowRate
You can use other properties to make that path indirect. Suppose the "area" and "valve" number that we were looking at was passed into our window via parameter passing. Then we might use those parameters in the Tag path, like this:
[TagProvider]MyPlant/{1}/Valves/Valve{2}/FlowRate
{1}=Root Container.AreaName
{2}=Root Container.ValveNumber
Now our binding will change which Tag it is pointing to based on the values of those Root Container properties.
Creating an Indirect Tag Binding
When setting up an Indirect Tag Binding, there are a few tools in the binding window that help make it easier.
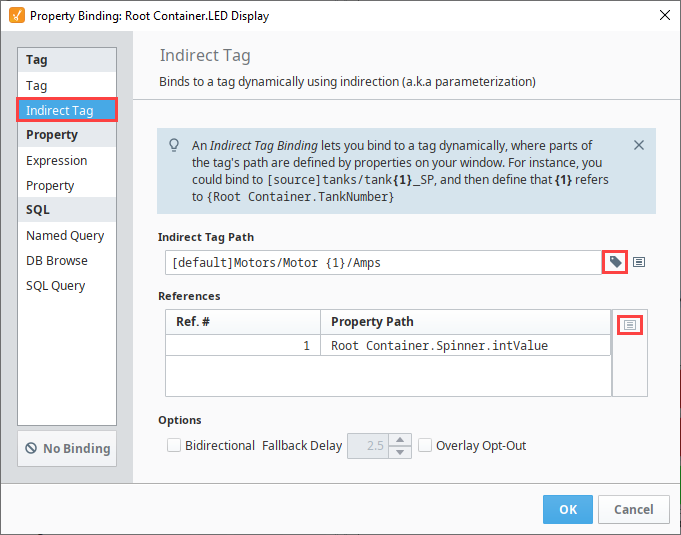
First there is the Indirect Tag Path. This field is where the Tag Path with parameters needs to be entered. Indirect Tag Bindings use numbered parameters at places in the Tag Path where indirection is going to occur. To the right of the Indirect Tag Path field are the Tag and Property reference helper buttons. The Tag button will enter the full Tag Path of the selected Tag into the Indirect Tag Path, while the Property button will add a new parameter reference to the Indirect Tag Path, and bind it to the selected property. The last area is the list of references, where each row in the list corresponds to a 1 parameter reference, and each row can be bound to property on the window. To bind a parameter reference to a property, simply select its corresponding row, and use the property selector to the right of the References list to select a property from the window.
Putting some thought into your Tag structure will make using the Tags indirectly much easier!
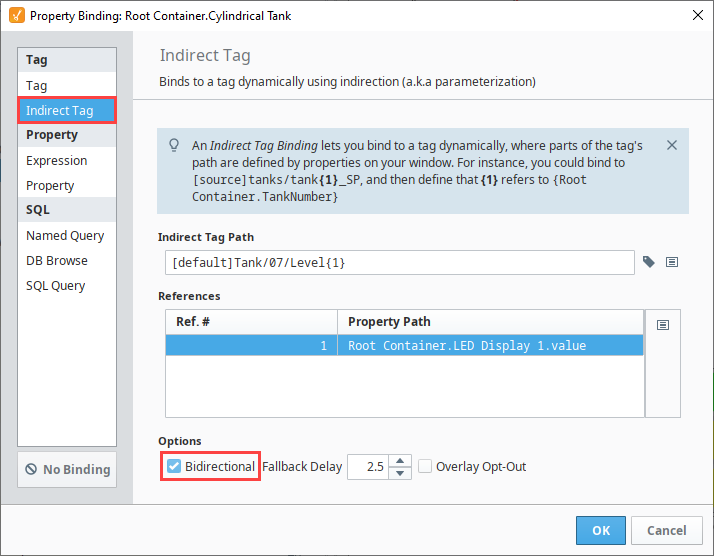
Bidirectional Indirect Tag Binding
Indirect Tag Bindings can also be made Bidirectional by clicking the Bidirectional checkbox at the bottom of the binding window. This will allow any input from a user on that property to be written back to the Tag. To work properly, the Tag needs to have the proper security to accept writes.
Indirect Tag Binding Example
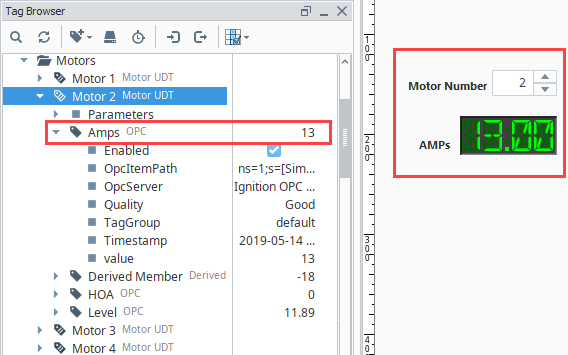
In this example, we have some different motors, where each motor is a folder of Tags. Each motor has an amps Tag that is within the folder, so that our Tag paths look like the following:
Motor 1/Amps
Motor 2/Amps
Motor 3/Amps
Motor 4/Amps
Instead of creating four different displays for these four different Tags, we can create a single display and make it indirect. We need two things for this example: a component to display the value in, and a component which allows the user to select which motor they are looking at.
-
Drag an LED Display component onto the window.
-
Then drag a Spinner component onto the window. This we will use to enable the user to select which motor they are looking at.
-
There are four motor Tags, so change the Numeric Maximum property of the Spinner to 4, and the Numeric Minimum property to 1. You may also need to change the Value (Integer) to 1.

-
Select the LED Display component. Click on the Binding
 icon next to the Value property of the LED Display.
 -
Select the Indirect Tag type.
- Click the Tag
 icon and select the Motor 1/Amps Tag.
 - Delete the '1' in the Tag Path, and replace it with 1.
- In the References section, select the row, and click the Insert Property Value
 icon. Select the Value (Integer) property of the Spinner.
 - Click OK to save the binding.
- Click the Tag
-
To test it out, put the Designer into Preview mode
 . Notice how the value represented in the LED Display depends on what value is in the Spinner. Because the Spinner has the maximum value set to 4, users won't be able to set a motor number that does not exist. Additionally, adding new motors simply means adjusting the maximum value on the Spinner.