Launchers and Workstation
Ignition features several launchable runtimes: Vision Clients, the Designer, and Perspective Sessions. To help with managing these separate systems, Ignition Gateways provide several launcher programs for each runtime. These launchers are the main means of launching an Ignition runtime application. For the purposes of clarity, the following are considered launchers:
- Designer Launcher: launches the Designer against the configured Gateway.
- Vision Client Launcher: opens Vision Clients from an Ignition Gateway.
- Perspective Workstation: opens Perspective sessions from an Ignition Gateway, in a standalone desktop program.
This page describes the download and installation process shared by the application launchers mentioned above, as well as the common property settings. Some property settings are unique to a specific launcher application and will be detailed on that specific launcher application's page.
What Is an Application?
To understand the purpose of a launcher, we need to understand what an application is. An application is a configuration in a launcher that is associated with a project.
The Ignition Designer Launcher is the launcher for the Designer. This launcher has two Applications configured, the Local Gateway and the Production Gateway. Selecting either application and clicking Open Designer will launch the Designer for the selected Gateway.

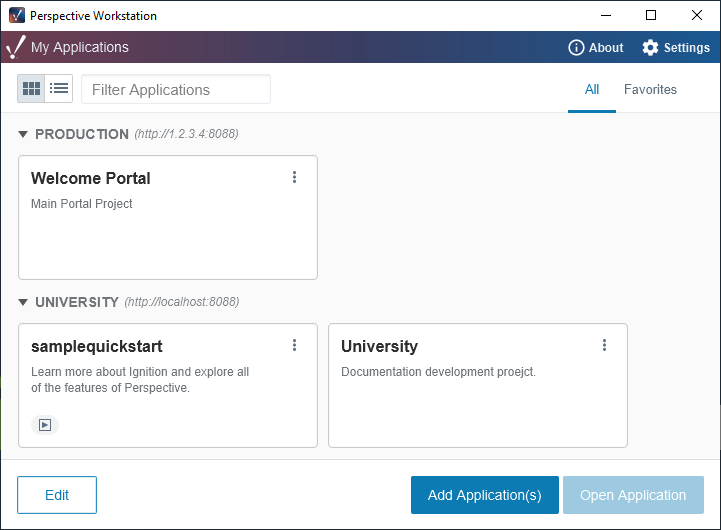
The Vision Client Launcher and Perspective Workstation work under a similar pattern, except each application represents a project in a Gateway. Multiple projects from a single Gateway can be represented in a launcher. There is a Welcome Portal application under the Production Gateway, while the University Gateway features two applications that each lead to a different project.
Launcher Download and Installation
This section demonstrates the common download and installation steps for all the launcher applications. Each launcher application has an install wizard that will guide you through the installation process. The installation steps are common for all the launchers with a few exceptions depending on the operating system you're using.
Although you can run the Ignition Gateway and Perspective Sessions on ARM-based Desktops (such as a Raspberry Pi), the Designer, Vision Client, and Perspective Workstation cannot be run on ARM-based Linux machines. Instead, the Designer, Vision Client, or Perspective Workstation will need to be installed and run from an Intel-based machine.
For the sake of brevity, this section will focus on installing the Designer Launcher, but the steps for installing the Vision Client Launcher and Perspective Workstation are all very similar.
-
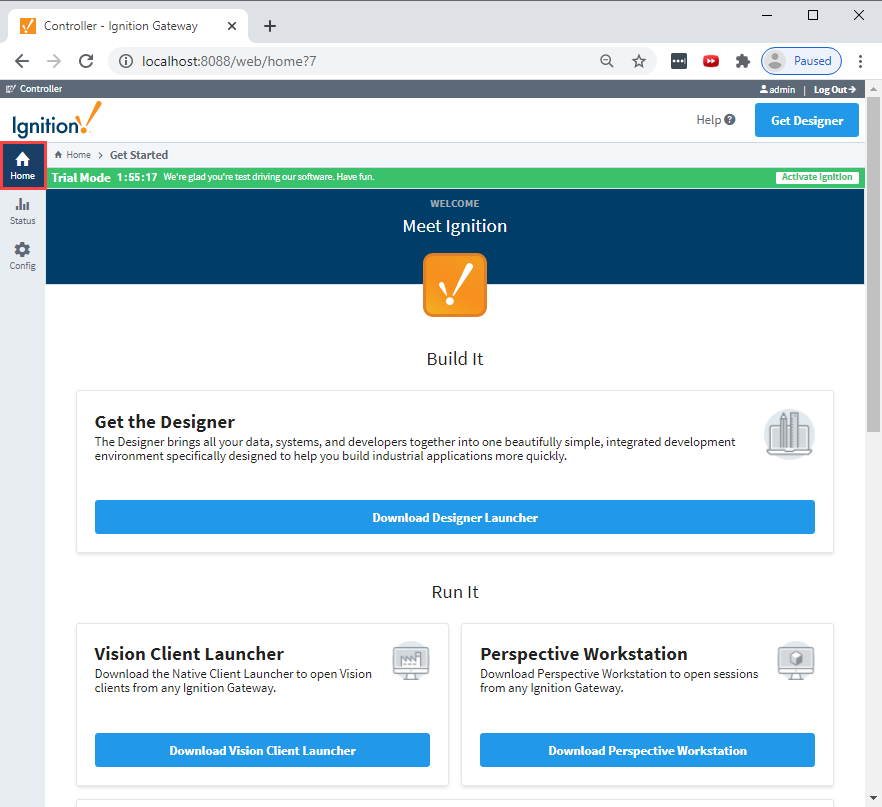
Go to the Home tab of the Gateway webpage. You will see buttons that lead to separate download pages for each of the launchers. Click the desired button and you'll be redirected. We'll click on Download Designer Launcher.
-
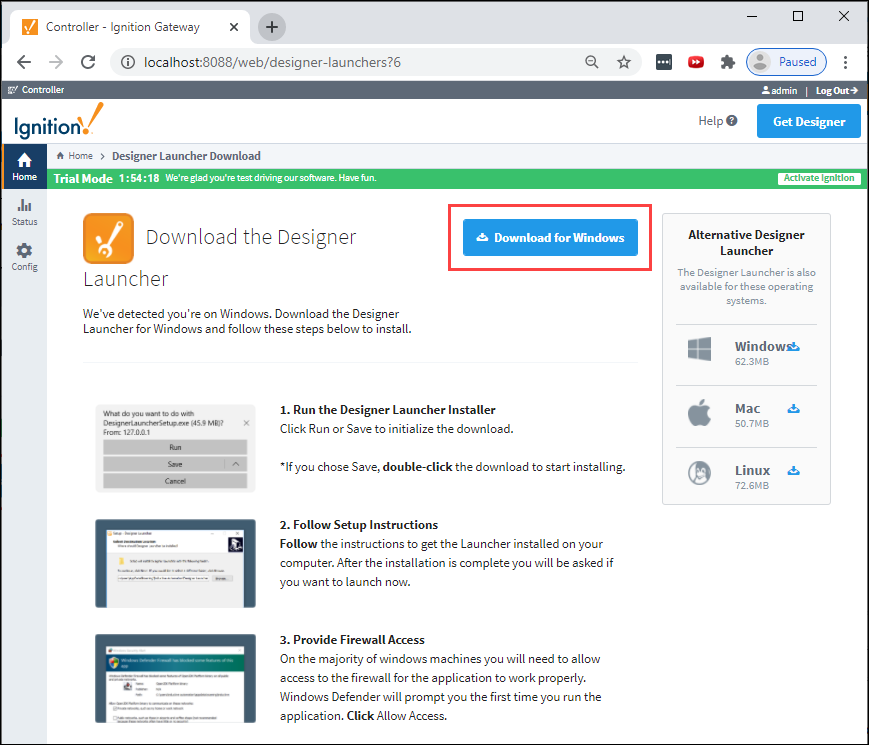
Your web browser will detect the operating system, and suggest the appropriate download for the Download button. Press the button to download the installer for the launcher.
-
Locate the installer on your local system (web browser typically store downloaded files in a "Downloads" folder), and run it.
-
Work through the install wizard. There are only a handful of options in the installer:
- Whether or not to create a desktop icon
- The installation directory for the launcher
- Windows
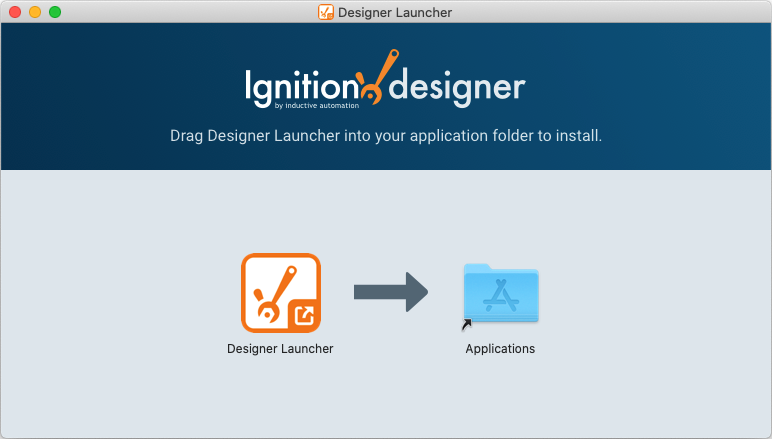
- Mac OS
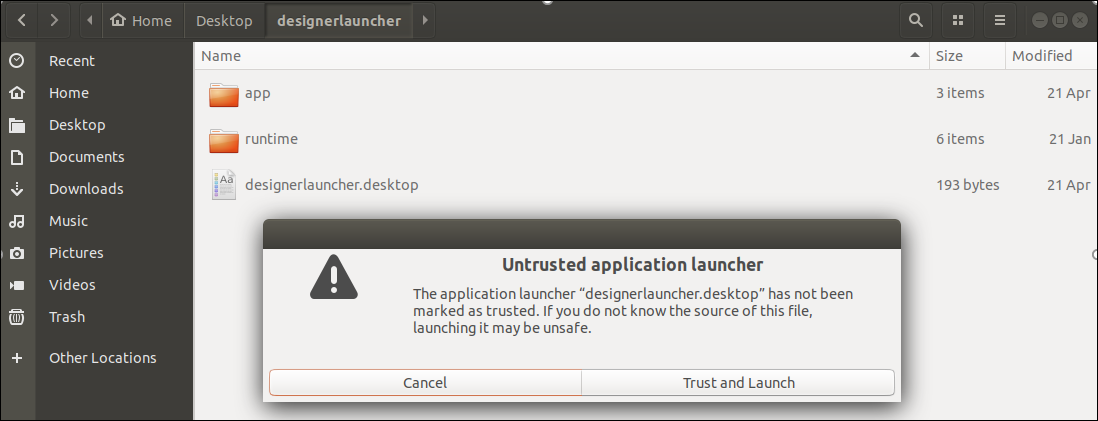
- Linux
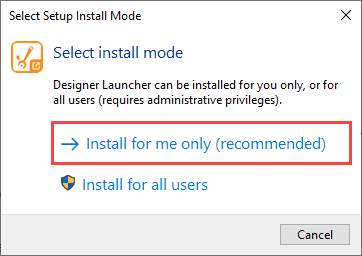
If this is a first time install, the Designer Launcher wizard has an additional step. It will prompt you to select the install mode. Installing locally installs the launcher in the user's AppData\Roaming folder whereas 'all users' installs it in Program Files.
To install the Designer Launcher application, drag the Designer Launcher icon to the Applications folder.
The Ignition Gateway runs on both X11 and Wayland sessions on Linux. However, the Designer Launcher and Vision Client Launcher currently require an X11 display server, due to a known compatibility limitation between Swing (the underlying UI toolkit) and Wayland. If your Linux distribution defaults to Wayland (for example, recent Ubuntu releases), log into an X11/Xorg session before launching the Designer or a Vision Client.
Extract the contents of the tar.gz file to your desired install location.
Navigate to your install folder, and click the designerlauncher.desktop file. A message box may popup about the launcher application being an untrusted application. Click Trust and Launch.
Depending on your flavor of Linux, you may not have the launch option. In this case, your .desktop files will not be supported and you'll need to place the designerlauncher.desktop file in one of the following directories to satisfy Linux permissions and execute.
- /usr/share/applications/
- /usr/local/share/applications/
- ~/.local/share/applications/
Additionally, the Designer and Perspective Workstation depend on an embedded version of the Chromium browser. Required dependencies on some Linux distributions, such libgcrypt and libgconf-2-4, are not bundled with the embedded browser and must be separately installed on the system. Consult the Chromium installation instructions for your distribution for more detailed information.
- Once the installation process reaches its end, click Finish.
The Designer Launcher will open, allowing you to start adding applications.
Upgrading Launchers
Whenever an application is launched from a launcher, the Launcher will check to see if it needs an update. If the Gateway containing the launched application is several revisions ahead of the Launcher, the Launcher will provide a popup notifying you that an update is available.
Manual upgrades can also be performed. Simply download and run a new launcher installer from a more recent Ignition Gateway. During installation, simply set the installation directory to the same directory as the old launcher.
- Windows
- Mac OS
- Linux
(Get-Item -Path 'C:\{Vision Client Launcher Installation Directory}\visionclientlauncher.exe').VersionInfo.ProductVersion
(Get-Item -Path 'C:\{Perspective Workstation Installation Directory}\perspectiveworkstation.exe').VersionInfo.ProductVersion
(Get-Item -Path 'C:\{Designer Launcher Installation Directory}\designerlauncher.exe').VersionInfo.ProductVersion
./visionclientlauncher.sh --version
./perspectiveworkstation.sh --version
./designerlauncher.sh --version
defaults read /{Vision Client Launcher File Path/Vision\ Client\ Launcher.app/Contents/InfoCFBundleShortVersionString
defaults read /{Perspective Workstation File Path/Perspective\ Workstation.app/Contents/Info CFBundleShortVersionString
defaults read /{Designer Launcher File Path/Designer\ Launcher.app/Contents/Info CFBundleShortVersionString
Adding Applications
The process for adding applications/Designers to the Designer Launcher is very similar to adding applications to the Vision Client Launcher and Perspective Workstation. This section demonstrates how to add new Applications.
The following Designer Launcher example is used to show how to add applications for the Designer and Vision Client Launchers and the Perspective Workstation.
-
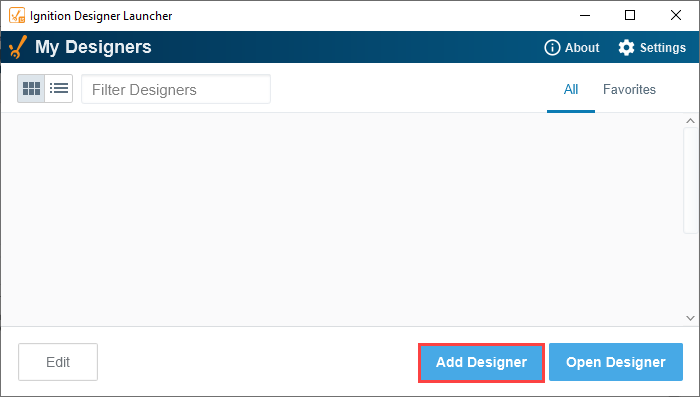
With the launcher open, click the Add Designer button.
-
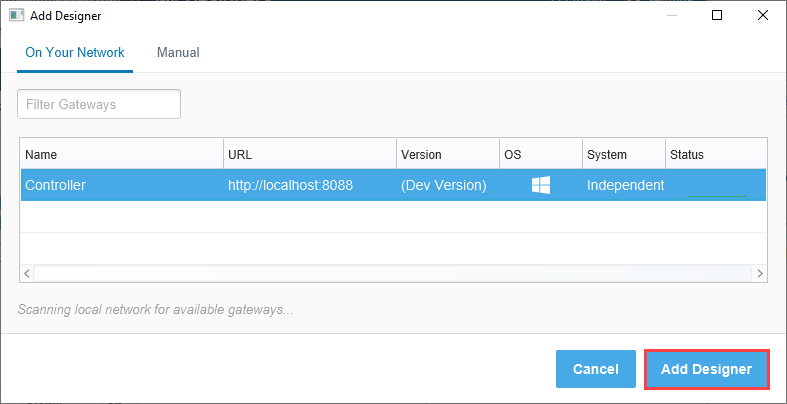
The launcher will browse and list all the available Gateways on your network. Select from any of the available gateways and press the Add Designer or Select Gateway button depending on which Launcher you are using.
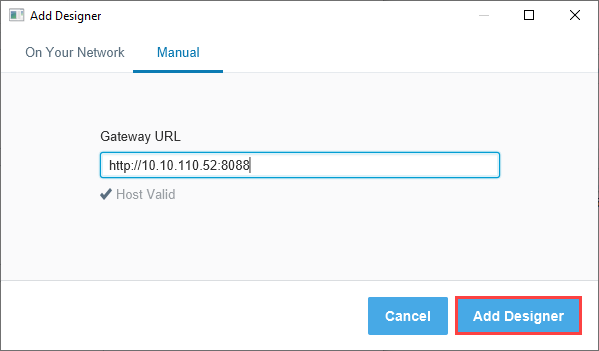
 note
noteIf you don't see the Gateway you're looking for, but know the IP address, you can enter it manually. Click the Manual tab and enter the Gateway URL. It will inform you if you have a valid host name. If so, click Add Designer or Select Gateway depending what launcher application you are are using.
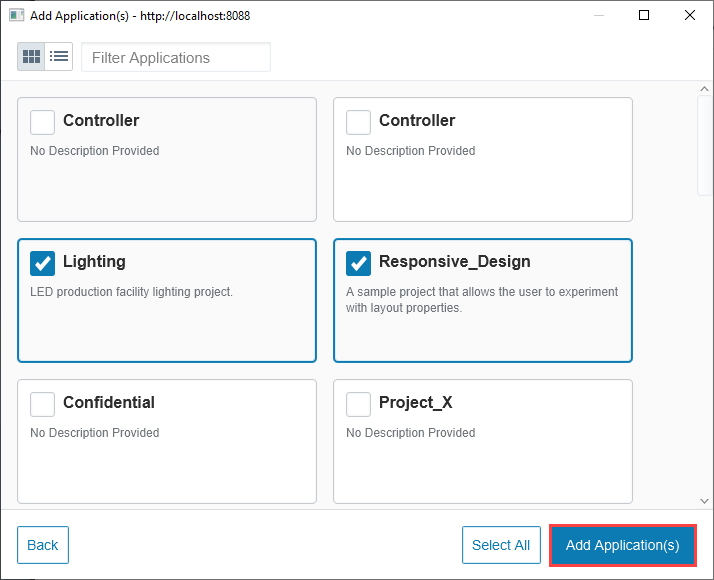
-
If you're adding an application to the Vision Client Launcher or Perspective Workstation, you'll have this extra step where you can select from any of the available projects on the Gateway. Select the desired projects, then click Add Application(s).
-
Once added, the new applications will appear on the starting screen of the Launcher.
Windows Silent Installations
The Designer Launcher, Vision Client Launcher, and Perspective Workstation can be installed on Windows systems from command line without any user prompts.
# Shows a simplified user interface
C:\Users\user\Downloads\VisionClientLauncherSetup.exe /CURRENTUSER /SILENT

# Shows no user interface at all.
C:\Users\user\Downloads\VisionClientLauncherSetup.exe /CURRENTUSER /VERYSILENT

# The following option installs silently without installing a desktop shortcut
C:\Users\user\Downloads\VisionClientLauncherSetup.exe /CURRENTUSER /VERYSILENT /MERGETASKS="!desktopicon"
Using ALLUSERS may trigger a check from User Account Controls, so you may need administrator access for the following command to offer a truly silent installation:
C:\Users\user\Downloads\VisionClientLauncherSetup.exe /ALLUSERS /VERYSILENT
Hosted Launcher Installers
Normally, each Ignition Gateway includes files for the various launchers. When you download a launcher from a Gateway, it will stream its local launcher files. However, you can override this behavior, causing the Gateway to ignore its local launcher files and instead download launchers from the internet. For more information, see the Gateway Configuration File Reference page.
Installers for Windows systems in .msi format are available on the Inductive Automation downloads page. To access them, click on either "Other operating systems and versions" or "Other Versions" on the downloads page, and scroll down to the "Launchers" section.
The .msi installers help make pre-deployment easier in enterprise environments and utilizes existing Windows Installer toolchain features. Notably, .msi installers support two features which make large-scale deployments easier:
- Transforms
- Group Policy Objects (GPOs)
You can read more about transforms and Group Policy on Microsoft's website.
If you wanted to download one of our hosted launchers, without modifying your Gateway's configuration file, you can download them directly from your web browser:
https://files.inductiveautomation.com/launchers/VERSION/LAUNCHER
Where VERSION is the Ignition version (i.e., 8.1.0), and LAUNCHER is the name of the launcher. Launcher names are listed below.
| Launcher | Operating System | Launcher Name |
|---|---|---|
| Vision Client | Windows | visionclientlauncher.exe |
| Vision Client | Windows | visionclientlauncher.msi |
| Vision Client | Linux | visionclientlauncher.tar.gz |
| Vision Client | macOS | visionclientlauncher.dmg |
| Perspective Workstation | Windows | perspectiveworkstation.exe |
| Perspective Workstation | Windows | perspectiveworkstation.msi |
| Perspective Workstation | Linux | perspectiveworkstation.tar.gz |
| Perspective Workstation | macOS | perspectiveworkstation.dmg |
| Designer | Windows | designerlauncher.exe |
| Designer | Windows | designerlauncher.msi |
| Designer | Linux | designerlauncher.tar.gz |
| Designer | macOS | designerlauncher.dmg |
For example, the following would download an 8.1.0 version of Perspective Workstation for Windows:
https://files.inductiveautomation.com/launchers/8.1.0/perspectiveworkstation.exe
Custom Shortcuts
When a shortcut to an application is created, a launchable link is placed on the desktop of the user. This link uses the configuration of the application that is saved in the launcher. This ensures that updates to the launcher are respected even if the link was created before the changes. That being said, you can override the following settings for the shortcut itself:
- "window.mode"
- "timeout"
- "screen"
- "retries"
- "init.heap"
- "max.heap"
- "fallback.application"
- "custom.jre.path"
The values for these settings can be found elsewhere in this User Manual: general launchers settings are on the Launcher Settings page, while each of the three launcher pages list settings unique to particular launcher.
- Windows
- Mac OS
- Linux
- Create a shortcut.
- Right-click and select properties.
- Add additional arguments to the end of the Target field:
...application=test window.mode=fullscreen
- Create a shortcut.
- Right-click or CTRL-click and select Show package contents on the shortcut.
- Inside of Contents/Resources look for the file “launcher.properties”.
- Add additional arguments on their own lines as necessary.
- Create a shortcut.
- Right-click and select properties.
- Add additional arguments to the end of the command, but before the &”:
... -Dapplication=test -Dwindow.mode=fullscreen
Redirect Client Launch Cache
You can also redirect the cache directory that is used by the launcher. Typically the user’s cache is in their home directory in the .ignition directory. This holds all the resources that are required for launching a Client as well as the resources for each launcher. Sometimes this is not desirable, for example in cases where you want a global cache that all users on a machine rely on or when you want the users client cache to reside in a different directory under AppData.
To change this directory, place a file named redirect.txt inside the .ignition directory in their user home directory. This file should have a single line in it which is an absolute path to the appropriate file.
Signature Verification
The Vision Client and Designer Launchers include checks that run when launching a Designer or Vision Client to test if the Gateway is active. The default value for this check is LENIENT.
Users can choose to adjust the security level of this check by changing the signature.verification.strength key in Vision Client or Designer JSON files. The path to these files differs by operating system, but they will generally look like the following:
C:\Users\userName\.ignition\clientlauncher-data\vision-client-launcher.json
C:\Users\userName\.ignition\clientlauncher-data\designer-launcher.json
The following options can be used for the signature.verification.strength key:
- STRICT: Revocation checks are required and legacy Gateways are disallowed.
- MODERATE: Soft fail on revocation checks and legacy Gateways are disallowed.
- AIR_GAPPED: No revocation checks performed, but legacy Gateways are still disallowed.
- LENIENT: Soft fail on revocation checks, but legacy Gateways are allowed.
- LOOSE: No revocation checks and legacy Gateways are allowed.