Designer
The Ignition Designer is where the majority of configuration and design work is done. The Designer uses web-launch technology to open and edit your projects. This is how you can configure your Perspective and Vision projects.
The Designer provides all the firepower to bring your projects to life. It uses a drag-and-drop configuration making screen development quick and intuitive. You can create user interfaces by dragging Perspective components onto a view, Vision components onto a window, and Tags onto your components to instantly bind data to tables, charts, and graphs. You can set up tags and Transaction Groups to log data to your databases. You can set up Reports to generate and save data however you'd like. The Designer saves all your projects to the Gateway so everything is controlled in one place.
This page provides some good information about the Designer, Designer workspace, Tools, and how to create a project.
Opening the Designer
Opening the Designer requires running the Designer Launcher. Once the Designer Launcher is installed and configured, you'll have all your projects at your fingertips. If you created a desktop shortcut for the Designer Launcher at install, simply click to open it and select a Designer to open. From there you can create a new project, import a project, or open an existing project.
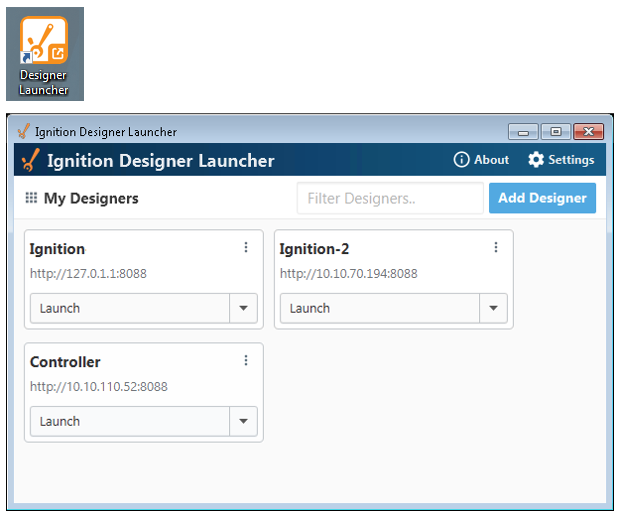
If you have a Designer that has projects that you work on regularly, you can create a shortcut to that Designer and keep it on your desktop. When you click on your shortcut, it opens the Designer, then click on the project you want to edit. Now you can hit the ground running designing your project!
Refer to the Designer Launcher page for downloading, installing, and configuring the Designer Launcher.
Creating a Project
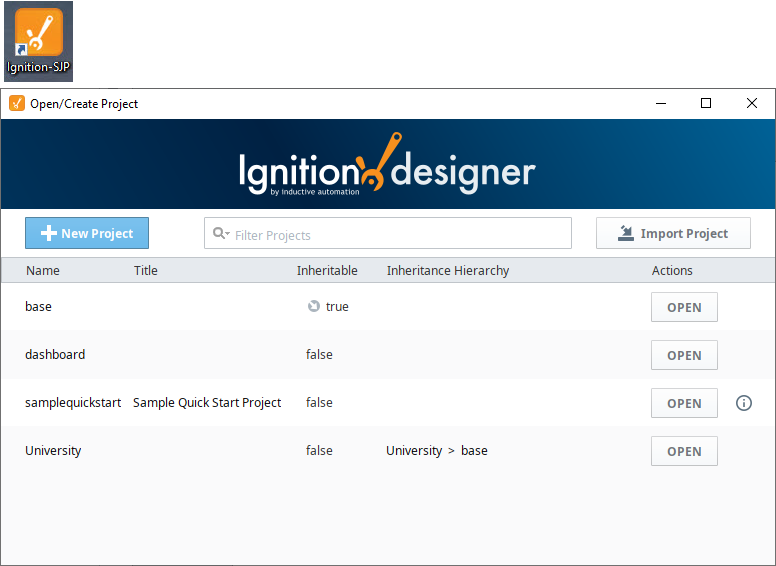
The first step in working with a project is creating one. Once you launch the Designer, the Open/Create Project window is displayed where you will see any existing projects and the option to create a new project.
-
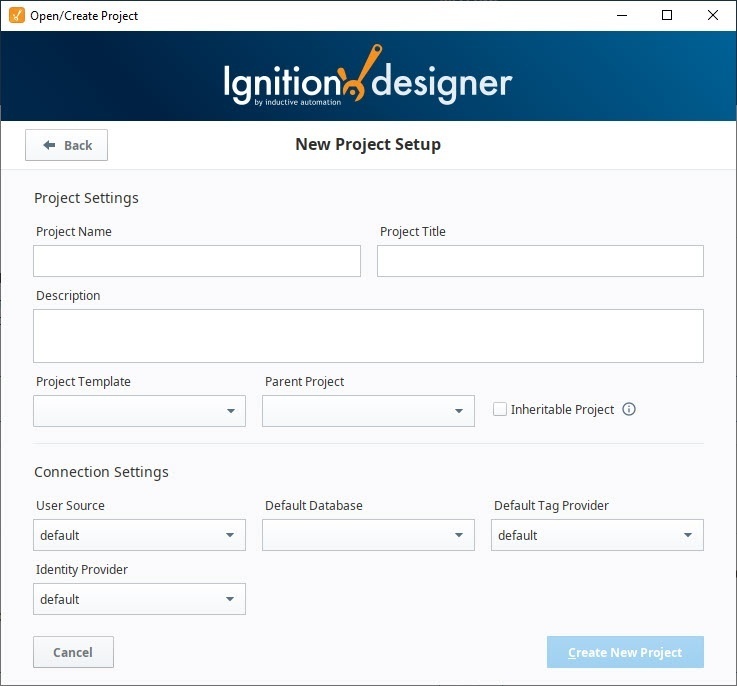
After opening the Designer, click on Create a New Project button. The following window will be displayed.
-
Enter the Project Name (required) and any other configuration settings you need for your project. Most settings are optional. Refer to the Project Creation Settings table below for a description of each property.
-
Click on Create New Project.
New Perspective Project
If you have the Perspective Module installed, your project will open on the Perspective Configuration page after the project is created. From here, you can begin designing your Perspective project.
New Vision Project
To design your project in Vision, expand the Vision module in the Project Browser. The Vision Getting Started window will open, allowing you to create windows, add components, and create Client Tags.
Project Creation Settings
The table below contains descriptions for available settings when creating a new project in the Designer.
| Property | Description |
|---|---|
| Project Name | The Project Name can only consist of alphanumeric characters and the '_' (underscore) character. Spaces and other special characters are not supported. Note: It is not advisable to change the Project Name after it's been created, instead, change the Title property. |
| Project Title | This is the name that will be displayed on the launch page of the Gateway and in the runtime Client or Session, (optional) There are no restrictions on using special characters or spaces. If you do not specify a title, the project name will be displayed on the Gateway launch page and in the runtime. |
| Description | Enter a description of the project (optional). Once a project is created, this description can be viewed on the Open/Create Project screen when you hover over the Information |
| Project Template | Select a Project Template (optional). There are several pre-built project templates focused on navigation that support either Perspective or Vision. Click the dropdown to see all the available options. |
| Parent Project | A project may have a parent project, and will inherit all of the resources of that parent project, (optional). Click the dropdown list to see all the available options. |
| Inheritable Project | Inheritable projects are not runnable as a stand-alone project, but are intended to provide shared resources to one or more child projects. |
| User Source | Determines the User Source associated with this project (when using the Classic authentication strategy). |
| Default Database | Select a Default Database (optional). Any queries to the database will use this database connection unless explicitly specified otherwise. |
| Default Tag Provider | Select a default Tag Provider (optional). If left blank, bindings and references to tags will always need to include the tag provider |
| Identity Provider | Determines the Identity Provider associated with this project (when using the Identity Provider authentication strategy). |
Open or Create a Project from within the Designer
To create a new project or open a different project from within the Designer, use the File > Open menu in the top menubar.
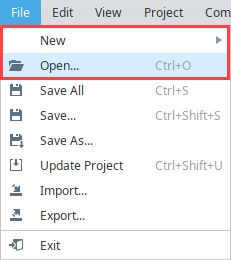
The Open/Create Project screen will be displayed. You can choose from existing projects or create a new project.
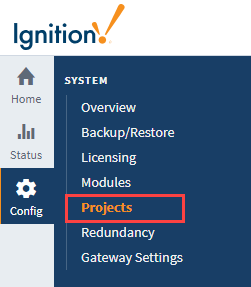
Updating Project Settings
Project settings such as the title, description, connections, and inheritance are set through the Gateway Webpage Config Tab, under System > Projects. For more information, see Projects.
Designer's Workspace
The Designer workspace is centrally located and organized by panels. Some of the panels include a Project Browser, Tag Browser, Component Palette, and Property Editor. These panels can change depending on the type of resource you are currently editing. For example, if you are editing a Perspective view or Vision window, the Designer workspace has Component Palette and Property Editor panels. If you're editing an Alarm Notification Pipeline, your Designer workspace will be the Pipeline Block Editor. If you're editing a Report, your Designer workspace will be the Report Designer. Each type of workspace has panels that are only valid when that workspace is active.
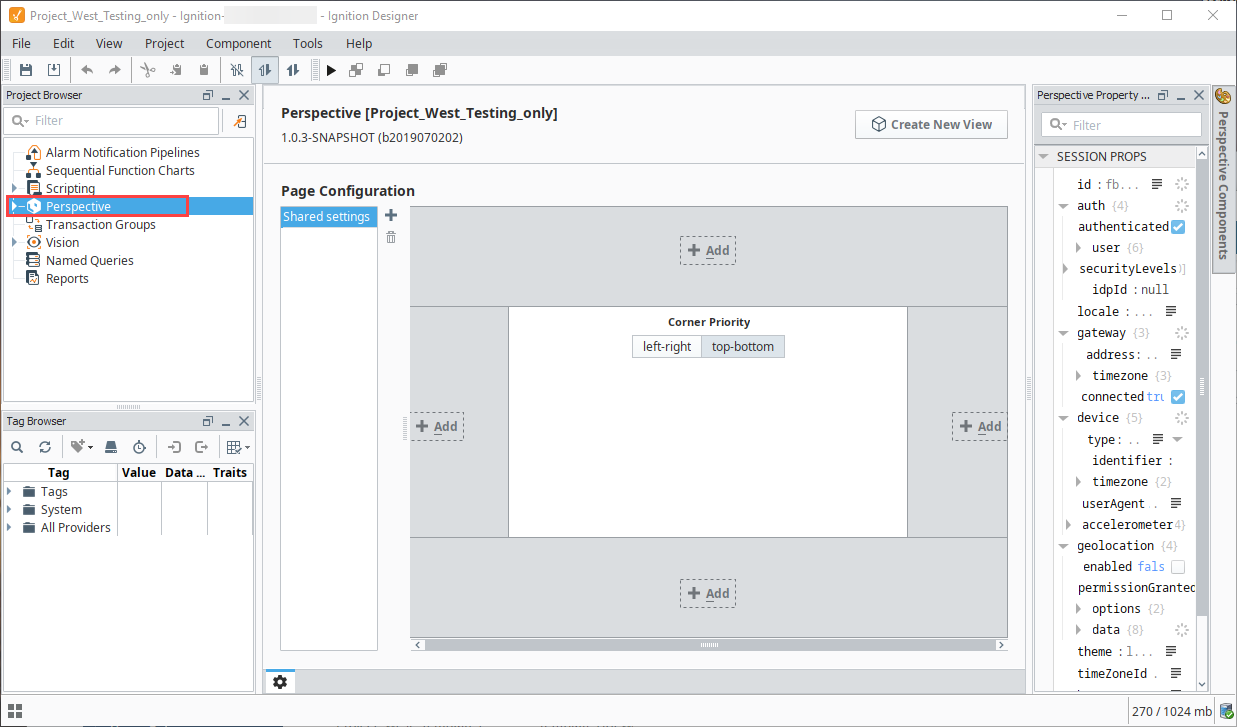
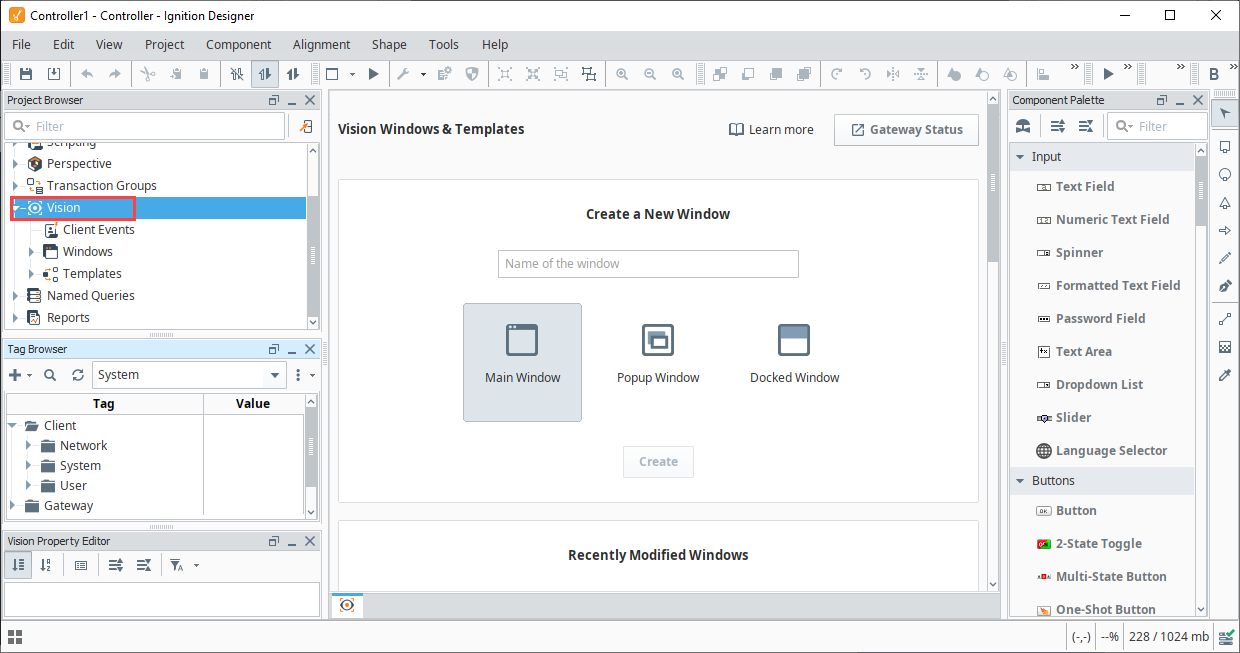
Here are two images showing the Perspective Designer workspace and Vision Designer workspace, and an example displaying the same components. At a glance, they look very similar, but there are some differences, including each having their own Component Palettes. To learn more, refer to the Perspective Designer Interface and Vision Designer Interface pages.
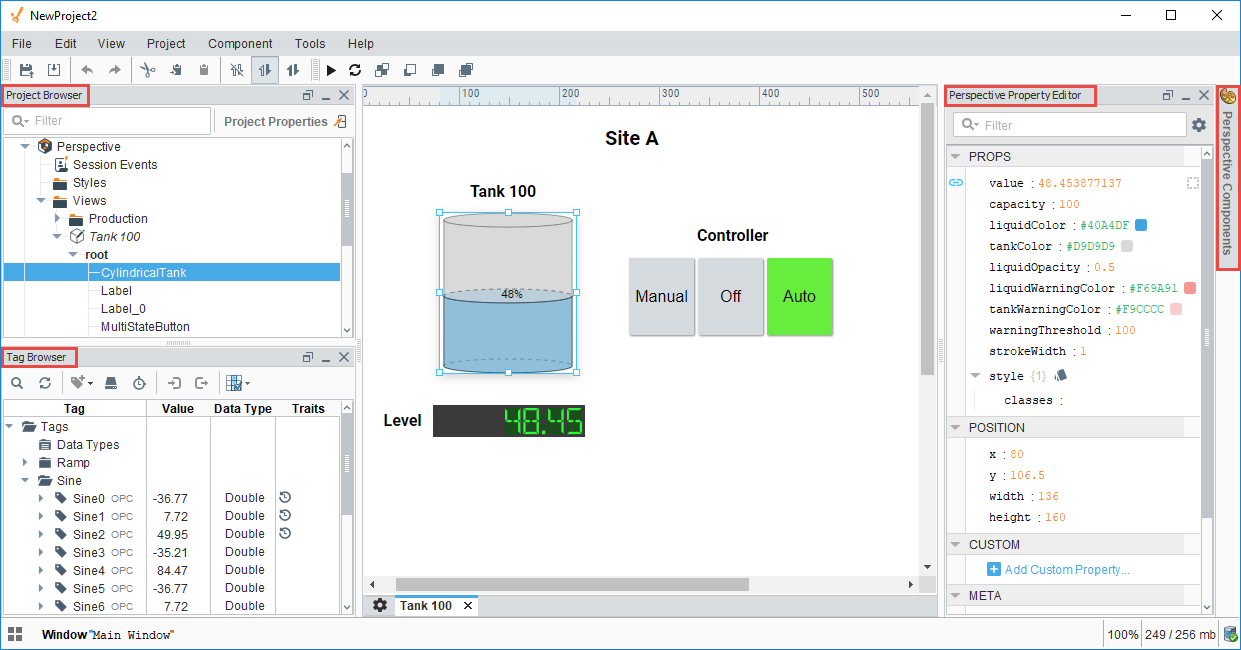
Perspective Designer's Workspace
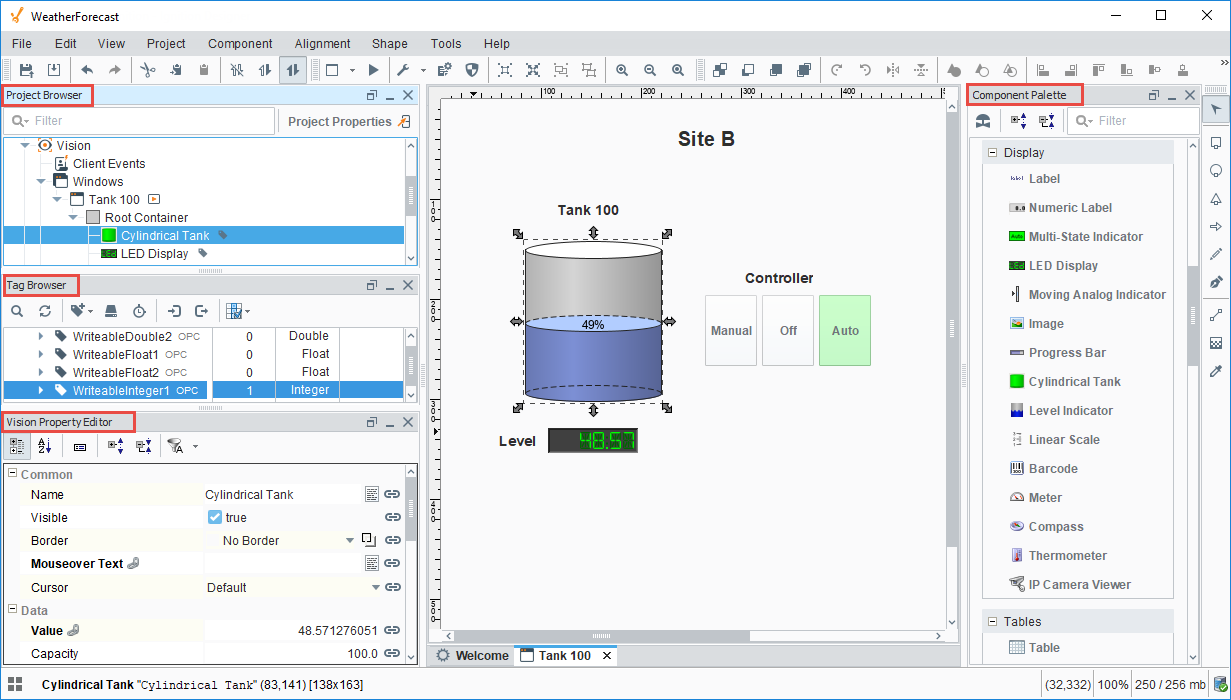
Vision Designer's Workspace
Designer Tools
The Designer has a host of tools to help you accelerate building, testing, and deploying your project. Let's talk about a few here.
Tools Menu
In addition to all the panels available in the Designer workspace, there is also a Tools menu to help you create your projects.
-
Console - The Output Console is the script-writer's best friend, and most frequently used to test and debug Python scripts in Ignition.
-
Image Management - The Image Management Tool manages and stores images used for your projects.
-
Script Console - The Script Console is used to test and debug Python scripts.
-
Database Query Browser - The Database Query Browser is a very convenient tool that lets you make simple selects and edits in a database table, and interact with all of the databases that Ignition is connected to (i.e., running queries, browsing tables and schemas). It is very common during the course of project design to inspect the database directly, or to experiment with a SQL query to get it just right.
-
Translation Manager - Opens up the Translation Manager panel, and allows you to configure language translations. See also: Localization and Languages.
-
Symbol Factory - The Symbol Factory contains a variety of high quality vector graphics symbols that can bring your projects to life.

Status Bar
The Status Bar at the bottom of the Designer workspace allows you to view and adjust certain Designer settings.
![]()
- Panel Chooser - Clicking the Panel Chooser icon
 opens a menu that allows you to open and close Designer panels, as well as to reset all panels to their default positions.
 - Current Window - Displays the name of the currently open Window. (Vision only)
- Mouse Coordinates - Displays the coordinates of your mouse relative to the open Window. (Vision only)
- Zoom Level - Changes the zoom level. You can adjust the zoom level between a minimum of 25% and a maximum of 500%.
- Memory Usage - Displays your used/maximum available memory. You can change the maximum in the server configuration.
- Gateway Connection - This icon
 shows the current status of your Gateway connection. Clicking on the icon opens the connected Gateway in a browser.
Previewing the Project
The Designer provides the capability to preview, test, and interact with the screens and functionality before you deploy your project. The Designer workspace operates in two distinct modes: Design mode and Preview mode. Designers can easily switch between these modes to make sure their project is working as expected during the course of development by simply clicking Preview Mode ![]() icon from the top menubar, or clicking Project also from the top menubar, and selecting Preview Mode.
icon from the top menubar, or clicking Project also from the top menubar, and selecting Preview Mode.
The Preview Mode ![]() icon toggles to be a Design Mode
icon toggles to be a Design Mode ![]() icon when it is pressed.
icon when it is pressed.

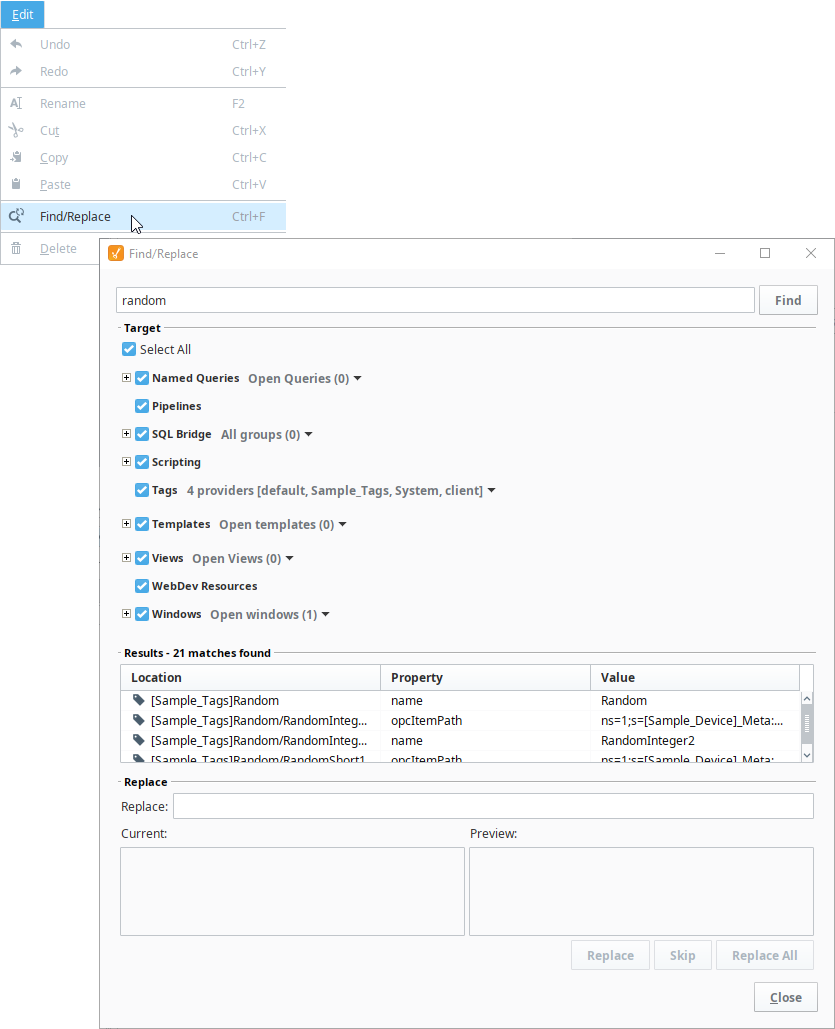
Find and Replace
The Find and Replace is a handy tool in the Designer workspace. You can search your entire project for specific components, properties, and scripts. You can even use the replace command to make mass changes expeditiously to a project with very little effort.
Keyboard Shortcuts
There are a lot of ways to speed up your development once you are familiar with how Ignition works. There are many keyboard shortcuts in Designer that are listed throughout the Designer interface alongside menu options.
Concurrent Editing and Conflict Resolution
The Ignition Designer uses a lock-free strategy for handling concurrent editing. Multiple people can work together and make changes to a project at the same time. An unlimited number of Designers can be open concurrently, and modifying any resource in the Designer doesn't lock it. The Designer keeps track of the resources that are being edited, and any conflicting edits will be resolved at the time the project is saved. The developer who creates a saving conflict will be prompted to resolve the conflict by choosing whether to use their own changes, accept the other designer's changes, or cancel their save and figure out what to do in another way.
Concurrent Users UI
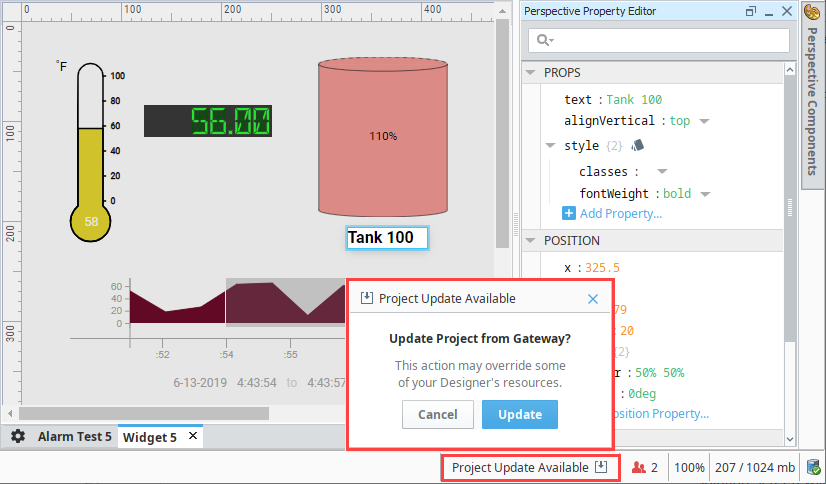
The Concurrent User Interface allows users to see which project resources are open in other Designer instances, the names of the users that have them open, and when a project update is available. The UI is located in the lower right corner of the Designer.
If you open a resource that is already open in another Designer, you will be greeted with a new popup confirming that you want to proceed.

The UI makes use of the color red to denote when there are conflicts with the changes in another Designer instance, or if their users are saving on overlapping resources (multiple users are making changes and saving while the same resource is open).
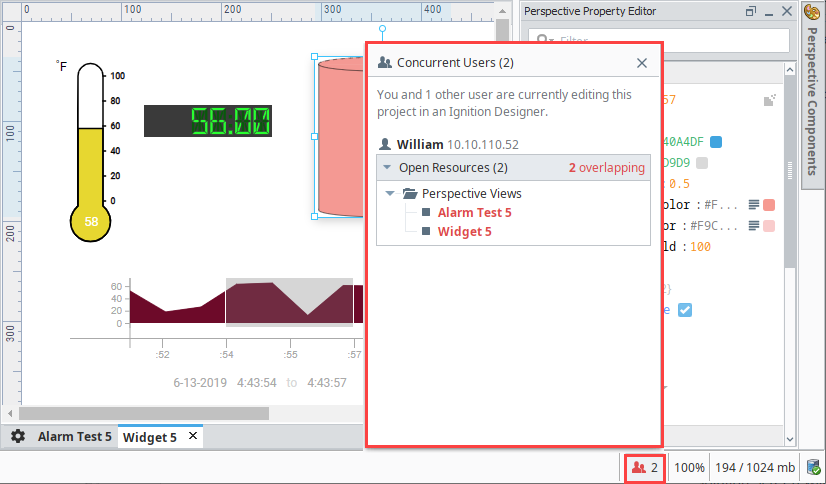
If the user in the other Designer instance saves their project, the UI will display that a project update is available. Click on Project Update Available to either update or cancel the project update.
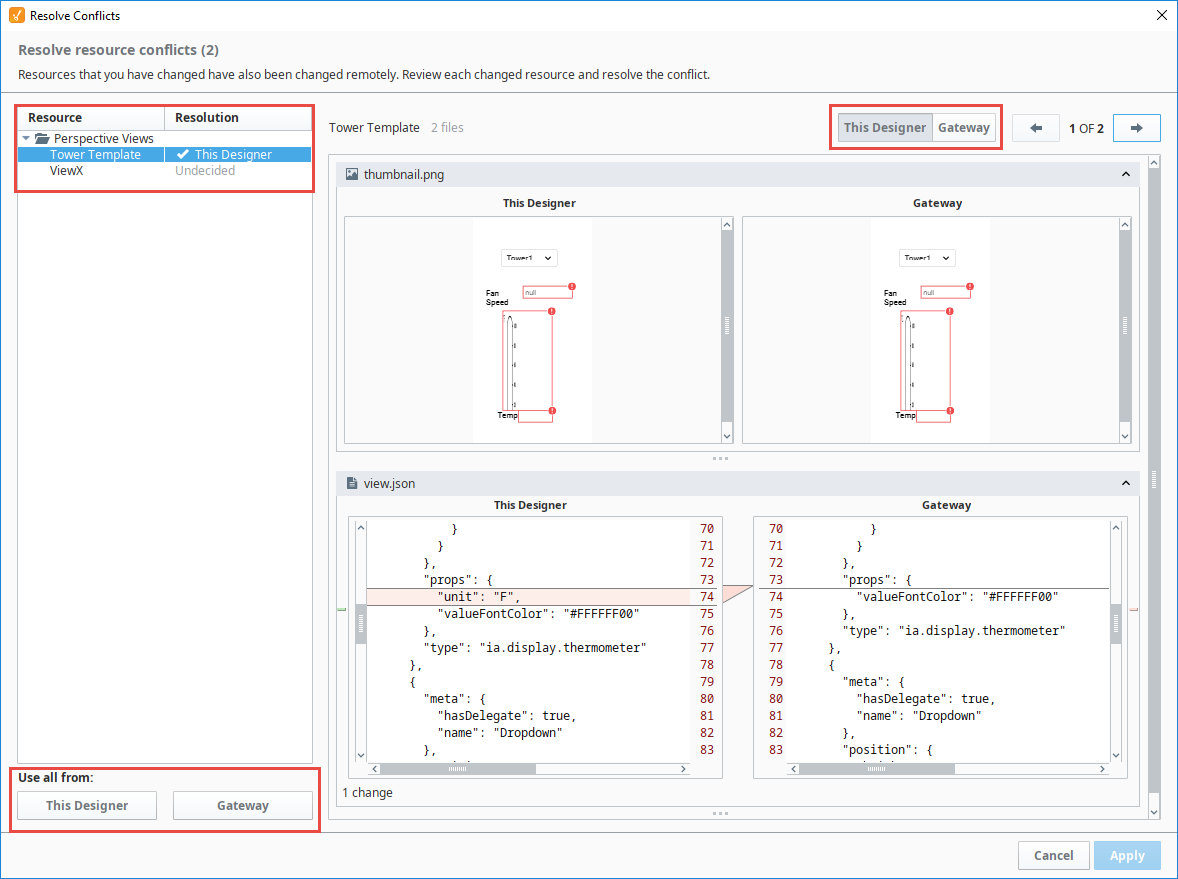
Conflict Resolution
When you're ready to save your project, go to the Menubar and select File > Save. When the Save Project dialog pops up, select the items you want to save and click the Save button.

If there are any conflicts, the Designer will ask you to update your project and the conflict resolution screen will open automatically. You will see a thumbnail image of both screens and the .json code showing the conflict. To resolve the conflict, you will be given a choice; accept your changes, accept the other developer's changes, or cancel the save and contact the other developer. Buttons are provided at the top and bottom of the screen for you to enter how you want to resolve the conflict.
The Resource Tree displays the conflicts and the resolutions. The selected conflict will be highlighted in blue. The image below shows changes were made to the Thermometer. The line number and the code are highlighted at the bottom so you can quickly identify the conflict. Once the conflict is resolved, a checkmark will appear in the Resolution column next to the conflict and how it was resolved. You'll notice that there is second conflict. To resolve the conflict, select it in the Resource Tree or click the arrow to navigate to the next conflict.