Gateway Network
Overview
The Gateway Network allows you to connect multiple Gateways together over a wide area network, and opens up many distributed features between Gateways.

The Gateway Network provides the following features:
- A dedicated HTTP data channel that can handle multiple streams of message data.
- The ability to set up a node to act as a proxy for another node.
- Security settings that restrict incoming connections based on a white list or on manual approval of the connection. Incoming connections can also be disabled entirely.
- An available Secure Socket Layer (SSL) mode. When enabled, connections must send SSL certificates to prove their identity. A connection will not be accepted until its SSL certificate is approved.
Gateway Network Features
The Gateway Network opens up certain services for use that make managing multiple Gateways and having them effectively communicate with each other a snap. It also has special security that can restrict certain services from happening in certain zones of the Gateway Network.
Enterprise Administration
The Enterprise Administration Module (EAM) uses the Gateway Network for message and file transfer, and can monitor network connections for availability. The EAM reports whenever communications are lost via alarm events and system tags.
Distributed Services
Distributed services included the following:
- Remote Providers: Remote Realtime and Historical Tag Providers make remotely controlling and storing Tag data even easier.
- Remote Alarming: Remote Alarming makes notifying all Gateways in the network possible, to quickly and effortlessly track down issues.
Security Zones and Service Security
Security Zones can be set up to lock down or prevent access to certain parts of Gateways within the Gateway Network.
Outgoing vs. Incoming Connections
When using the Gateway Network, you will be working with two type of connections.
- Outgoing Connections: To establish communications, create an outgoing connection on the local machine. The outgoing connection always begins the connection process to a remote machine. After the outgoing connection is created, the local machine will attempt to use the connection to establish communications with the remote machine.
- Incoming Connections: On the remote machine, an incoming connection will automatically be created when the new connection attempt is detected. For connections where security settings require manual approval, you will need to approve the incoming connection before it can be used. If no security controls have been set, the incoming connection will automatically accept the connection from the local machine and begin sharing data.
Connections and Servers
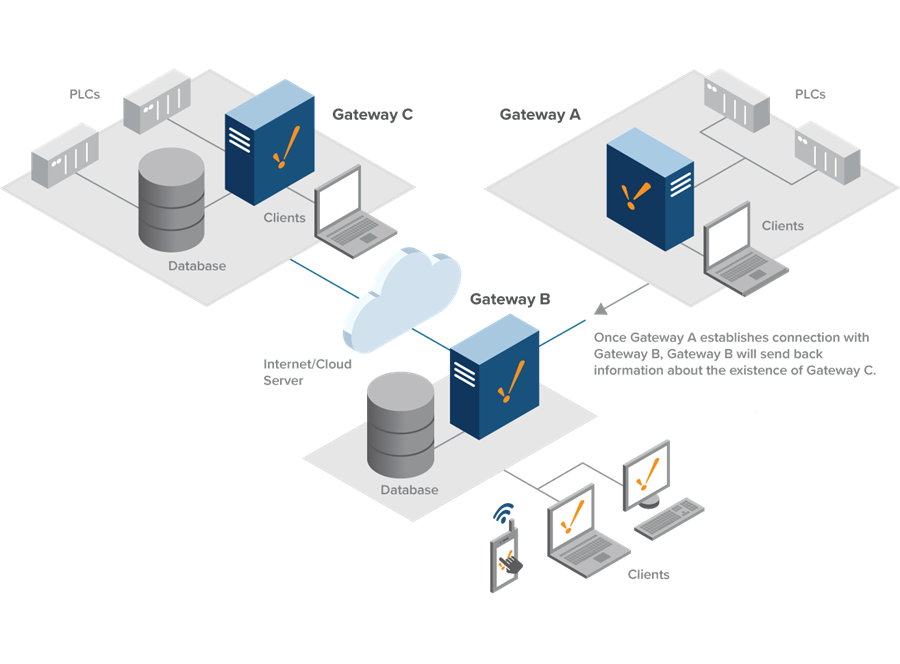
Every machine on the Gateway Network is known as a Server. When you establish a connection to a remote machine, the remote Server sends data about itself and also sends data about any other Servers known to that machine. For example, assume your local machine is GatewayA. The remote machine is known as GatewayB. GatewayB also knows about another remote machine named GatewayC. As soon as your local GatewayA establishes a connection with GatewayB, GatewayB also sends information about the existence of GatewayC.
Modules such as the Enterprise Administration Module (EAM) are aware of this relationship and allow communication between GatewayA and GatewayC, even though there is no direct connection from the local machine to GatewayC.
If you are cloning Gateways to then be connected via Gateway Network, it is important to notice that there is a Gateway unique identifier in %IgnitionInstallationDirectory%/data/.uuid. No two Gateways connected via Gateway Network should share a .uuid. Generally, Gateways are cloned by restoring the same Gateway backup on multiple servers. Since Gateway backups carry their .uuid with them, restoring the same Gateway on multiple servers will result in multiple Gateways having the same .uuid. To get around this, you must stop your Ignition service, delete %IgnitionInstallationDirectory%/data/.uuid, then start your Ignition service so that a new, unique .uuid is generated. Doing this before connecting two cloned Gateways will prevent any .uuid collisions.
Which Server Should I Configure the Outgoing Connection On?
In regards to connecting multiple Gateways over the Gateway Network, there is little difference between an Outgoing and Incoming connection: these terms simply indicate which server the connection was configured on, and are mostly ignored by the rest of Ignition. Thus, assuming GatewayA and GatewayB, configuring an outgoing connection from A to B is equivalent to configuring an outgoing connection from B to A. When connecting two Gateways, only a single connection is required between them.
General Settings
Main
The Gateway Network General Settings set the basic rules for the system. By default, these settings are lenient to allow for easy setup, but can be set for security.
| Setting | Description |
|---|---|
| Enabled | Uncheck this checkbox to disable using the Gateway Network. |
| Require SSL | If true, only connections that use SSL to encrypt traffic will be allowed. This setting only applies to incoming connections. Default is true. |
| Require Two Way Auth | Enforces two-way SSL authentication. If true, you will need to install the remote machine's certificate on this machine, in addition to manual approval of this machine's certificate on the remote machine.To provide the remote machine's certificate, manually export a certificate from the remote machine's metro KeyStore, located in <installdir>/webserver/metro-keystore. Default KeyStore password is metro, and the alias is metro-key. Place the certificate on the local machine in data/certificates/gateway_network Changed in 8.1.14 On Ignition versions 8.1.14 and greater, the certificate is stored at data/gateway-network/client/security/pki/trusted/certs. |
| Send Threads | The maximum number of threads that will be used to upload messages. Applies to outgoing connections. Default is 5. Changed in 8.1.37 This property was moved to the Gateway Network Settings > Outgoing Connections tab to be set when creating or editing an outgoing connection. See Connection Send Threads under Setting up a Gateway Network Connection for more details. |
| Receive Threads | The maximum number of threads that will be used to download messages. Applies to outgoing connections. Default is 5. Changed in 8.1.37 This property was moved to the Gateway Network Settings > Outgoing Connections tab to be set when creating or editing an outgoing connection. See Connection Receive Threads under Setting up a Gateway Network Connection for more details. |
| Processing Queue Limit | Number of received messages that can be held until they are processed by the local system. When this capacity is exceeded, new messages are rejected and errors are reported to the remote Gateway. Applies to incoming connections. |
| Websocket Idle Timeout | New in 8.1.3 The maximum number of milliseconds that a websocket is allowed to remain idle before it is closed. This value should always be set higher than outgoing connection ping rates to avoid premature connection termination. |
| Proxy Service Call Intercept | New in 8.1.34 If enabled on a proxy Gateway, this setting will intercept recurring service enumeration calls that the proxy Gateway normally passes along. If the service enumeration information is available locally on a proxy Gateway, the information is returned directly instead of forwarding the call. Useful when too many service enumeration calls are occurring. Default is false. |
Security
You have several options to control security from the Gateway Network settings.
These settings are independent of SSL mode, which is detailed below. To change security settings, go to the Gateway Webpage and navigate to Config -> Networking -> Gateway Network and select the General Settings tab.
| Setting | Description |
|---|---|
| Allow Incoming Connections | If false, only outward connections defined on this Gateway will be allowed. Uncheck this checkbox to disable all remote machines from being able to establish an incoming connection. To establish any connections with remote machines, you will need to create outgoing connections from this machine. Default is true. |
| Connection Policy | Dictates what connections are allowed. Options as follows:
|
| Specified List | Connections with a Gateway Name in this list are automatically allowed if the Connection Policy is set to SpecifiedList. Separate Gateway names with a comma. |
| Allow Proxying | If enabled, this Gateway will be allowed to act as a proxy, and forward requests between Gateways that do not have direct connections. Default is false. Changed in 8.1.14 This setting was replaced in 8.1.14 with Allowed Proxy Hops. |
| Allowed Proxy Hops | New in 8.1.14 The maximum number of proxy hops which could be used to reach the destination Gateway. Any number less than or equal to zero is equivalent to no proxy hops allowed. |
Setting Up a Gateway Network Connection
When you create a new outgoing Gateway Network connection, you need to specify the address for the remote server. There are also settings for ping rates and timeouts. The defaults can be used for these fields. The following are all the available settings for setting up an outgoing Gateway Network.
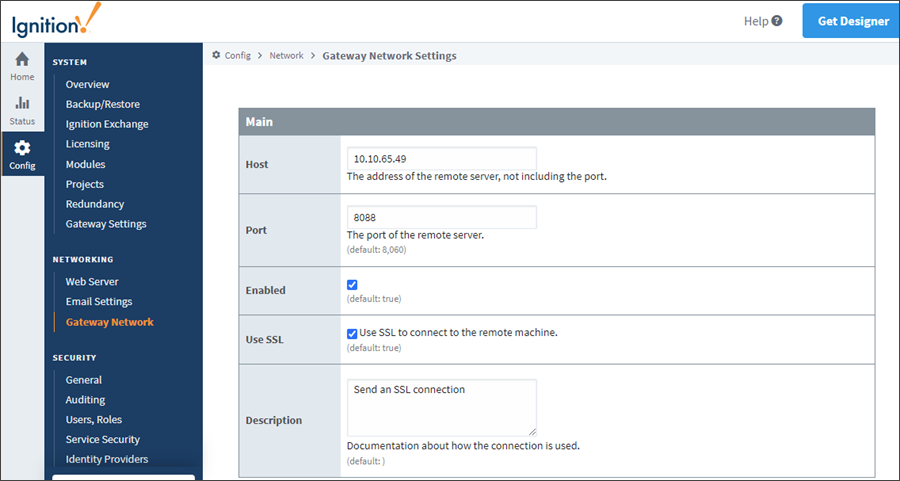
Main
| Setting | Description |
|---|---|
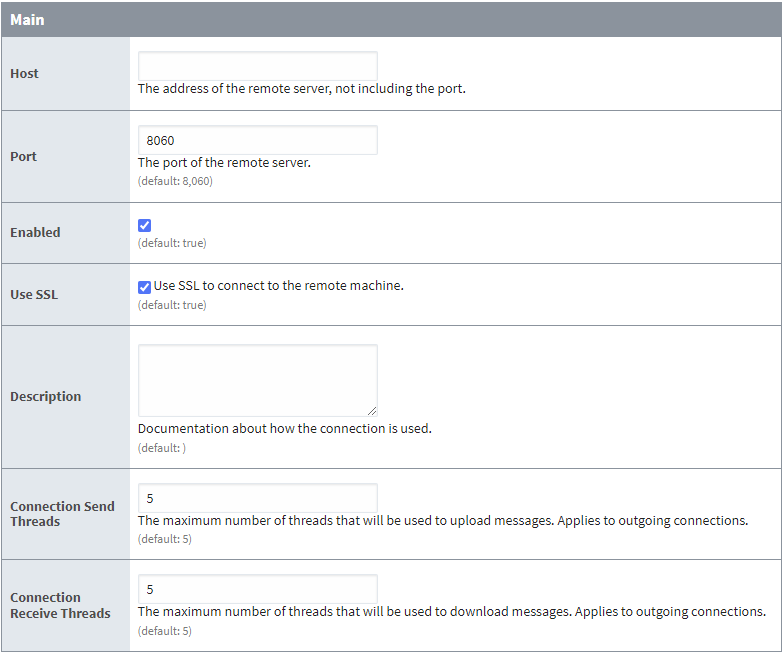
| Host | The address of the remote server, not including the port. Example: 1.2.3.4 |
| Port | The port of the remote server. Default is 8060. |
| Enabled | Whether this connection is enabled. Default is true. |
| Use SSL | Use SSL to connect to the remote machine. Default is true. |
| Description | New in 8.1.26 Documentation about how the connection is used. The description will not be sent to other Gateways. |
| Connection Send Threads | New in 8.1.37 The maximum number of threads that will be used to upload messages for this outgoing connection. Default is 5. |
| Connection Receive Threads | New in 8.1.37 The maximum numbers of threads that will be used to download messages for this outgoing connection. Default is 5. |
Ping
| Setting | Description |
|---|---|
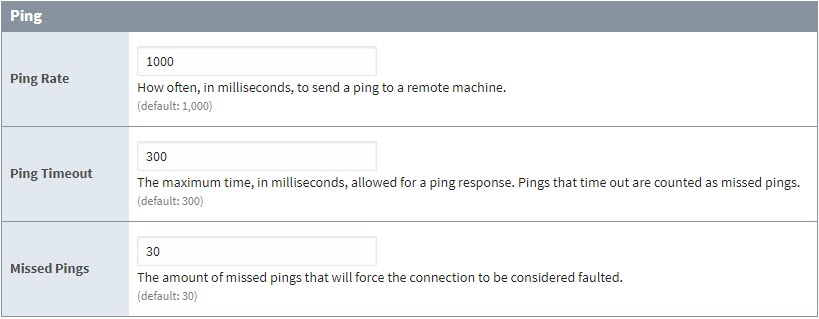
| Ping Rate | How often, in milliseconds, to send a ping to a remote machine. Default is 1,000. |
| Ping Timeout | The maximum time, in milliseconds, allowed for a ping response. Pings that time out are counted as missed pings. Default is 300. |
| Missed Pings | The amount of missed pings that will force the connection to be considered faulted. Default is 30. |
Timeouts
| Setting | Description |
|---|---|
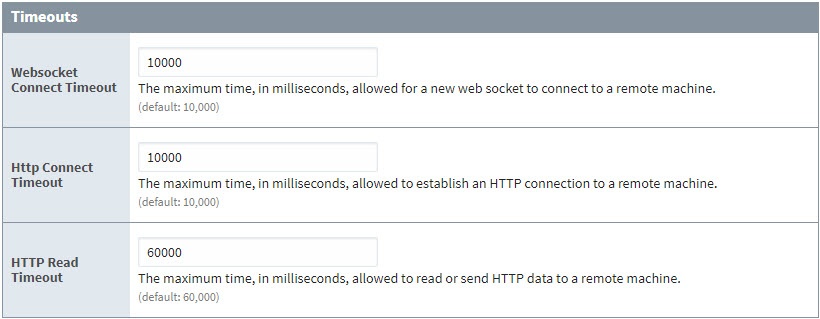
| Websocket Connect Timeout | The maximum time, in milliseconds, allowed for a new web socket to connect to a remote machine. Default is 10,000. |
| HTTP Connect Timeout | The maximum time, in milliseconds, allowed to establish an HTTP connection to a remote machine. Default is 10,000. |
| HTTP Read Timeout | The maximum time, in milliseconds, allowed to read or send HTTP data to a remote machine. Default is 60,000. |
Gateway Network Connection Example
To establish a basic communication link between two Gateways, first log into the Gateway where you want to establish the outgoing connection. For this example, we use an SSL connection.
-
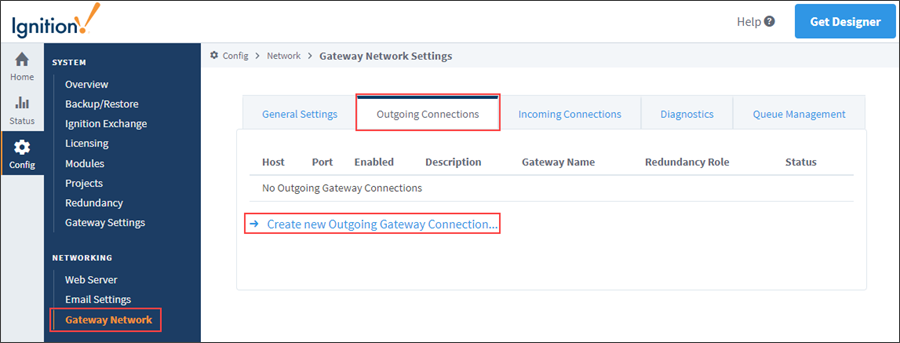
On the Gateway Webpage, navigate to Config > Networking > Gateway Network.
-
Click on the Outgoing Connections tab. Click the Create new Outgoing Gateway Connection link.
-
In the Host field, enter the network address of the remote server.
-
In the Port field, enter the SSL port used by the remote server. By default, this is set to 8060 (which is defined /data/gateway.xml).
noteThis port is different from the default SSL port an Ignition Gateway would use when communicating to a client (default port 8043).
-
Check the Use SSL checkbox.
-
Enter any desired information in the Description field to easily identify how the connection is used from the Outgoing Connections list.
-
Use the default settings in the Ping section and Timeouts section of the page.
-
Click the Create New Outgoing Gateway Connection button at the bottom of the page.
-
You'll see a confirmation message that the connection was created.
-
At this point, your Gateway transmitted its certificate to the connected Gateway, but the incoming connection is not yet allowed. The Gateway’s connection will not show up under the Incoming Connections section until after the certificate has been approved.
-
Log into the other Gateway. Navigate to Config > Networking > Gateway Network.
-
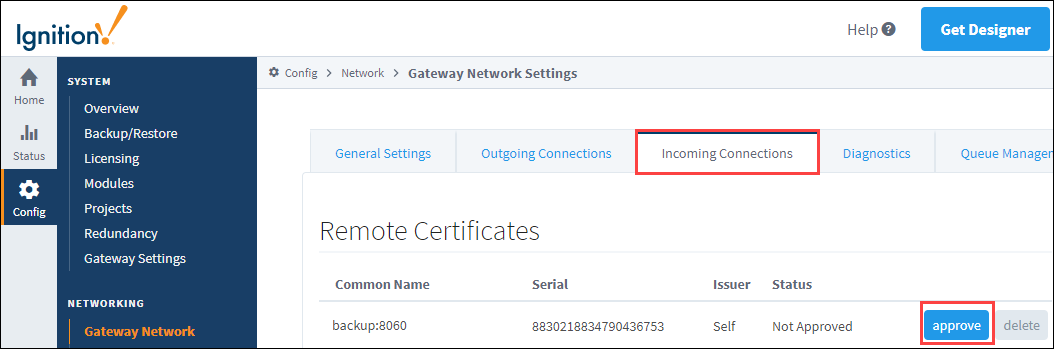
Click on the Incoming Connections tab. The first Gateway’s certificate should be present. The certificate Common Name field holds the network address of the machine that transmitted the certificate. The Serial field holds a numeric string that is automatically generated when the certificate is created, and is unique to every certificate.
-
Click the approve button to accept the certificate. You'll see a confirmation message. Click the Confirm button.

-
Now, the Gateway’s connection will appear under the Incoming Connections section with a PendingApproval security status. Click More > Approve to establish the connection.
Deleting Connections
Outgoing and incoming connections can be deleted for cases when the connection no longer exists on the other side.
-
To delete a connection, navigate to Config > Networking > Gateway Network.
-
Click on either the Outgoing Connections tab or the Incoming Connections tab.
-
Click More, and then select Delete next to the connection.
noteFor incoming connections, if a remote machine is still connected to the local machine with an outgoing connection, a new incoming connection will be created after deletion. For these cases, you must log into the remote Gateway and delete the outgoing connection. Then you can delete the local incoming connection.

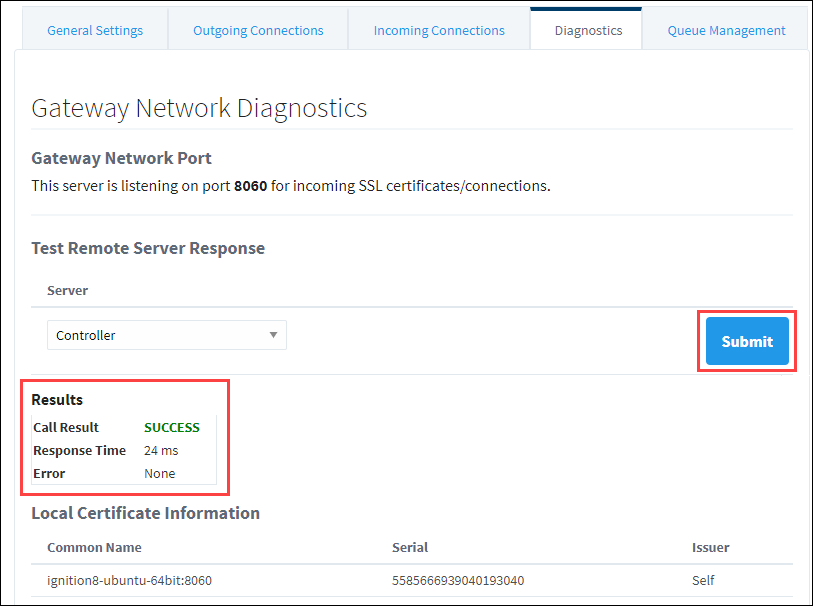
Gateway Network Diagnostics
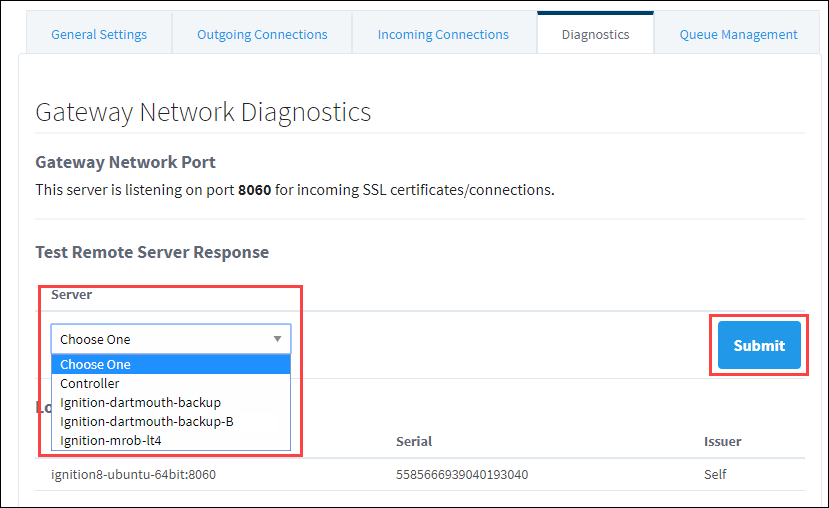
The Diagnostics tab on the Gateway Network Settings page gives you insight to the Gateway and and remote server response times.
-
To test the response time of a remote server, select the server name from the Server dropdown list.
-
Click the Submit button.
-
The results will be displayed indicating if the call to the remote server was successful, what the response time was, and if there were any errors.
Gateway Network Queue Management
The Gateway Network system shares information across Gateways using a configurable number of send and receive threads. Gateway Network Queues are named to reflect their purpose and enable Ignition to prioritize which subsystem should have access to send or receive a thread at any given time. The Queue Management tab allows users to further direct how a queue should behave.
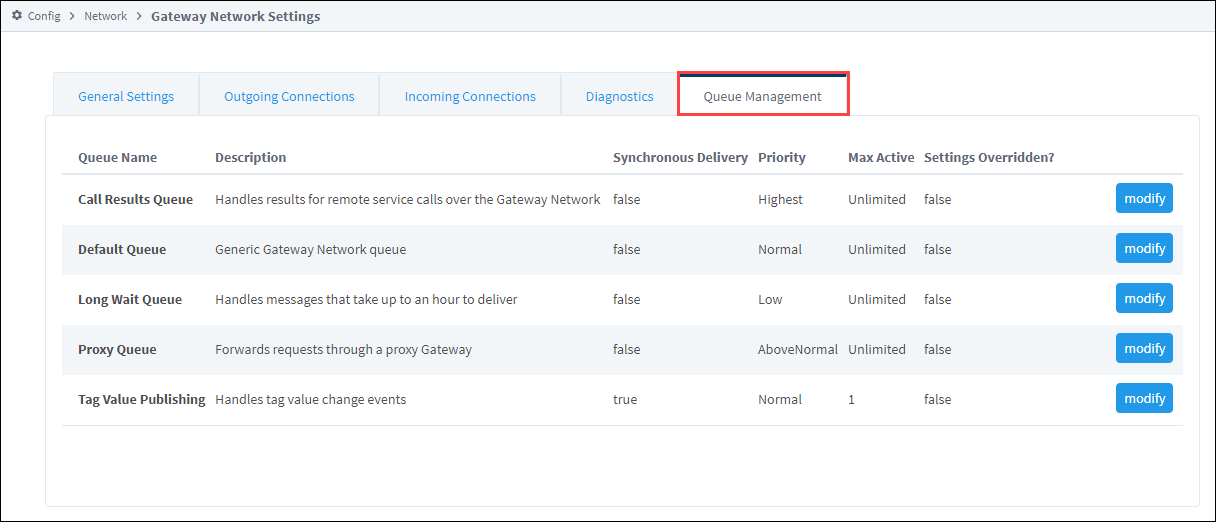
Queue Settings
Clicking modify for a queue type accesses the Queue Settings page where the following information is available to view or edit.
| Setting | Description |
|---|---|
| Queue Name | Name of the queue you are modifying (read only). |
| Description | Description for the queue you are modifying (read only). |
| Synchronous Delivery | This setting is configured by the queue and is unchangeable. If true, the queue will not dispatch another task until the current active task has completed. When a queue uses synchronous delivery, the maximum number of allowed active tasks is fixed at 1 and cannot be changed. Default is false.Note: Some queues are hard-coded as “Synchronous Delivery” queues, for example the Tag Value Update queue. For these queues, the Max Active setting is fixed at 1 and cannot be changed by the user. The user can only change the priority of the queue. |
| Max Active | The maximum number of active tasks allowed at a time. A task is considered active when it has been dispatched to the Gateway Network connection. You can set a limit to ensure that the Gateway Network connection will not become overloaded. Set this value to -1 to not enforce a limit on active tasks. Default is -1. |
| Priority | Determines the queue's priority in relation to other queues. A lower priority may result in messages in this queue taking longer to send, but can help prevent a Gateway Network connection from being overloaded. |
Adjust Queue Message Capacity
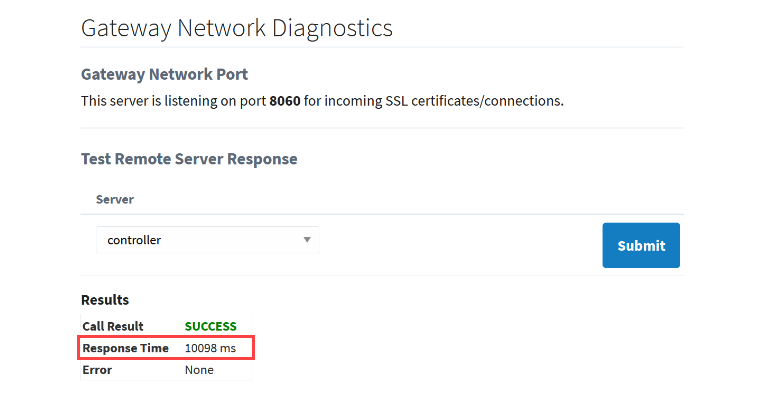
Overloading a Gateway’s queue active messages can starve the send or receive threads for Gateway Network connections. Starving the send or receive threads for the connection can potentially prevent other subsystem messages from getting through. To solve this issue, edit the Max Active field to set a limit that will allow the Gateway Network connection to continue functioning correctly.
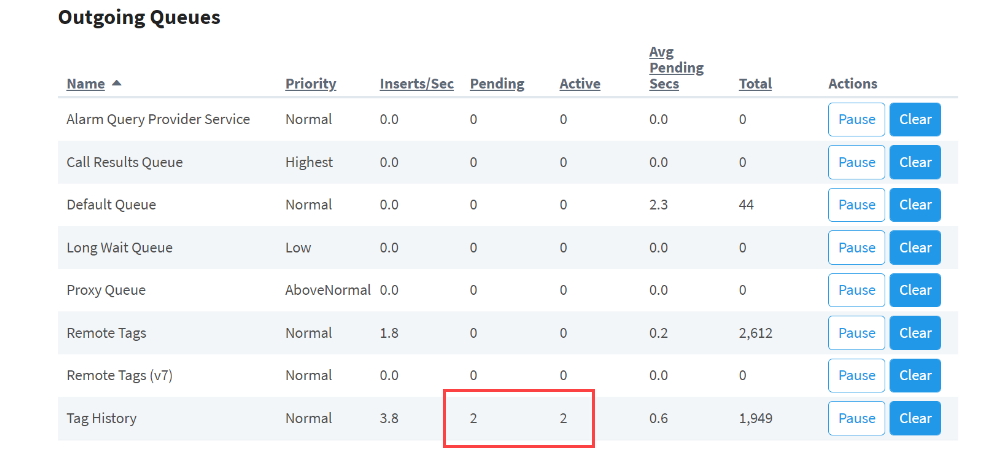
Since this is a known problem with Tag History Queues, we will use an example with a GatewayA and GatewayB, where GatewayA requests tag history data from GatewayB to display on a chart. A user has noticed other items related to the Gateway Network connection, such as remote tags, are no longer displaying properly. They use the Gateway Network Diagnostics tab to confirm the network is not the issue, which indicates a slow database may be causing a cascading effect where other messages are delayed by all the Tag History Query calls.
This cascading effect happens because the Gateway Network asynchronously dispatches some functions. One Gateway thread handles the initial call, and a different Gateway thread dispatches the call’s results. In our example, GatewayA is unaware that GatewayB is taking a long time to run the queries and will continue to dispatch more tag history requests. When the limit of send and receive threads available to a Gateway Network connection is reached, other messages can no longer get through. This can be verified as the issue by checking GatewayB’s current Incoming/Outgoing Tasks and Results Response Time.
Adjusting queue message capacity controls the flow of requests to prevent thread starvation across the network. Select Modify for the Tag History Queue to access Queue Settings and adjust capacity. Make sure the Gateway responsible for the thread requests is where the queue capacity is updated. In this example, GatewayA Tag History Queue Max Active count was set to 2 and saved by clicking Create New Queue Override Settings.
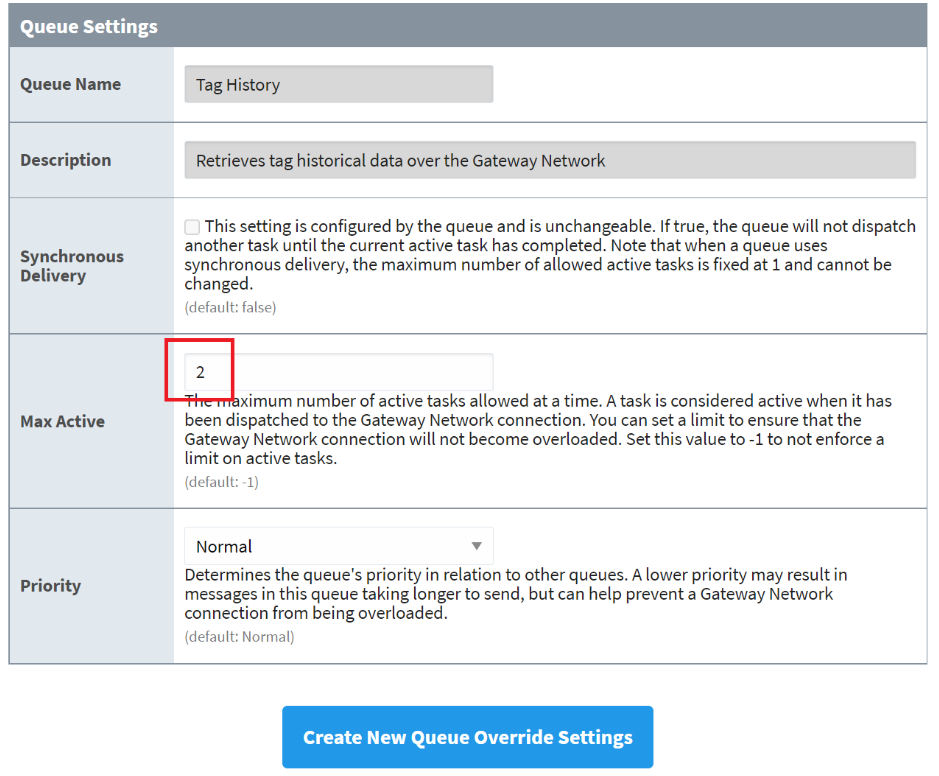
The Gateway Network Status page Remote Gateway Details now shows pending items since the Tag History Active upper limit has been met. Note that pending tasks are ones that have not yet been picked up for dispatch by the Gateway Network connection. These will be discarded if not dispatched within 1 minute. Be aware these requests being deleted may show more errors on components like the GatewayA chart, but all other subsystem messages can now get through without issue.
Gateway Network Proxy Rules
Setting up proxy rules is not mandatory when creating a proxy connection, as this is handled by the Allowed Proxy Hops property in the Security section above.
Proxy Rule Settings
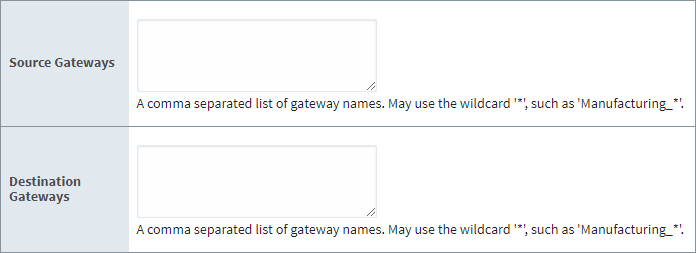
The following table represents the various configurable settings within a proxy rule. In addition to specifying individual Gateways, you can use wildcards to list out Gateways you want.
| Name | Description |
|---|---|
| Source Gateways | The list of Gateways that are asking for available routes. If the asking Gateway is on this list either by name or wildcard, the proxy Gateway will check the list of Destination Gateways to determine what to do next. |
| Destination Gateways | The list of Gateways the proxy Gateway will use to see if there is a name or wildcard match. The Action property will then either Allow or Deny the route. |
| Description | Description of the proxy rule. Useful for users to determine what the rule is used for. |
| Action | The action to take when a proxy route between a source Gateway and a destination Gateway matches this rule. Options include Allow or Deny. If set to Deny, the proxy route will not be reported to remote Gateways. Default is Allow. |
Remote Providers
Remote Realtime and Historical Tag Providers make remotely controlling and storing tag data even easier.
If a route does not match a proxy rule, that route will be allowed and be visible to the asking Gateway by default.
Setting up a Proxy Rule
-
Navigate to your Gateway Network configuration settings, located at Config > Networking > Gateway Network.
-
Go to the Proxy Rules tab and click on Create new Proxy Rule....

-
Set up your list of Source Gateways and Destination Gateways. See Proxy Rule Settings for a description of each setting.
-
Give your rule a description. This will make it easier to identify the purpose of your rule in the future.

-
Set the Action setting to either allow the proxy route or deny the proxy route, then click Create New Proxy Rule.

A few things to note about proxy rules:
- Proxy rules are followed in a top-down order, with the rule at the top of the list having the highest priority.
- Proxy rules are bidirectional. If a controller Gateway can access an agent Gateway with proxy rules, the agent Gateway can also access the controller Gateway.
- Proxy rules view redundant Gateway pairs as a single entity.