Alarm Notification
The Alarm Notification module enables you to send a message to a group of users when an alarm becomes active or cleared. This functionality is enabled by having the Alarm Notification module installed with alarm pipelines and Email notification set up. Additional modules can be installed which add SMS notification and Voice notification capabilities
Five Steps to Alarm Notification
Regardless of what type of notification you decide to use, there are five simple steps to getting alarm notification set up on an Ignition Gateway.
Notification User
Setting up users with contact information is the first step to sending out alarm notifications. Most users will have already added contact information when they set up their username and password. This step is typically done in the Config section of the Gateway Webpage.
On-Call Roster
The second step to sending out alarm notifications is creating an On-Call Roster. An On-Call Roster is a collection of users that are notified when an alarm occurs. When an alarm is triggered, it is sent to a designated On-Call Roster where it evaluates the users schedules, and only notifies those users that have an active schedule. Users that are off-schedule will not be notified. The On-Call Rosters are set up in the Config Section of the Gateway Webpage.
Alarm Notification Profile
The Notification Profile is the third step, and determines what type of notification (Email, SMS, or Voice) is sent out. The notification profile typically connects to an outside system that can do the actual notification. Each alarm notification type can be configured for both one-way and two-way notifications. A notification profile will be set up in the Config section of the Gateway Webpage.
Alarm Notification Pipeline
The next step is setting up an Alarm Notification Pipeline. The Alarm Notification Pipeline creates a list of actions that the alarm will do. A pipeline can send out notification using pre configured Notification Profiles and On-Call Rosters, and can have logic to determine who to notify and when. Alarm Notification Pipelines have a section in the Ignition Designer where they are created.
Adding Pipelines to Tags
The last step of the alarm notification process is to add an Alarm Notification Pipeline to a tag. Every alarm on a tag can have a pipeline set up that the alarm will use when the alarm becomes active, which is most common, but can also use a pipeline to notify users when an alarm becomes acknowledged or gets cleared. This last step of the process is configured on individual alarms on tags.
Notification Testing
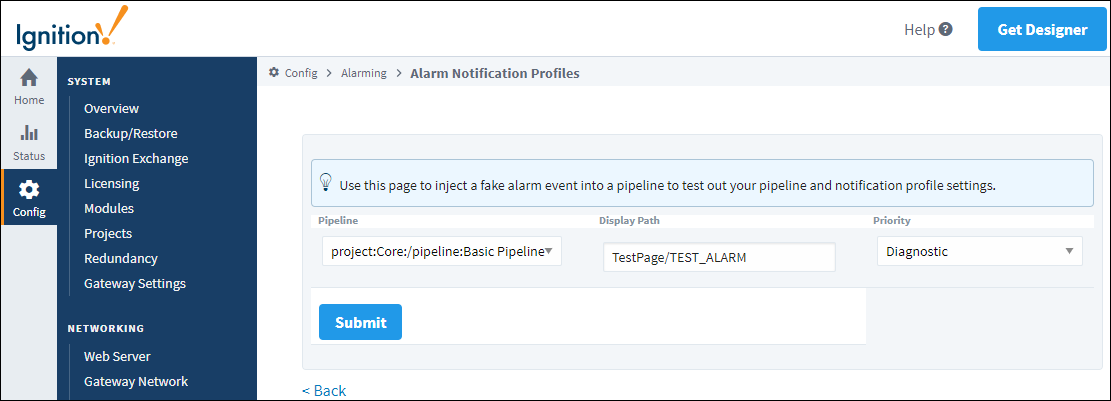
Before assigning Pipelines to alarms, the notification system can inject test alarms to help troubleshoot any problems. A notification will be sent out to any On-Call Rosters in the selected pipeline, so it is recommended to either enable test mode on any Notification blocks, or create a testing-only roster.
To test alarms, follow these simple steps:
-
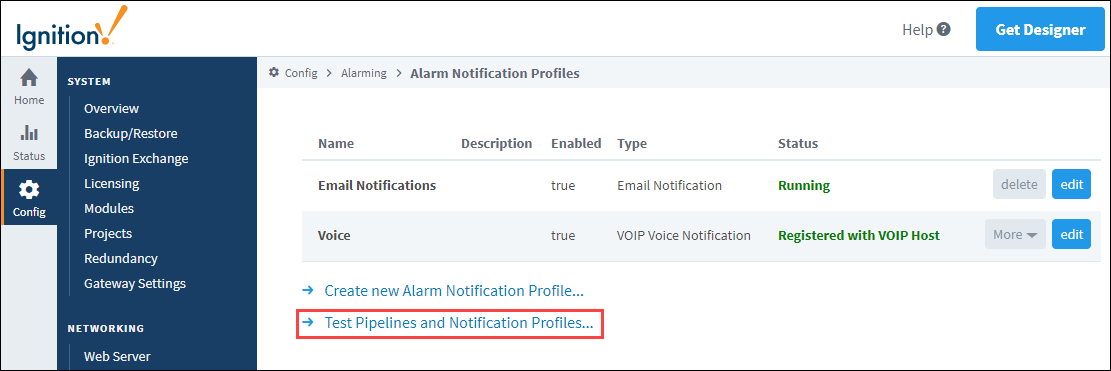
Go to the Gateway webpage and select the Config section.
-
From the menu on the left, select Alarming > Notification. The Alarm Notification Profiles page will open.

-
Click on Test Pipelines and Notification Profiles.
-
Select your configured Pipeline, and click the Submit button.
-
Once the system has been tested successfully, the last step is to assign a pipeline to your alarms. This can be done by editing your Tags in the Designer. Go to your Tag Browser and double click on your Tag.
-
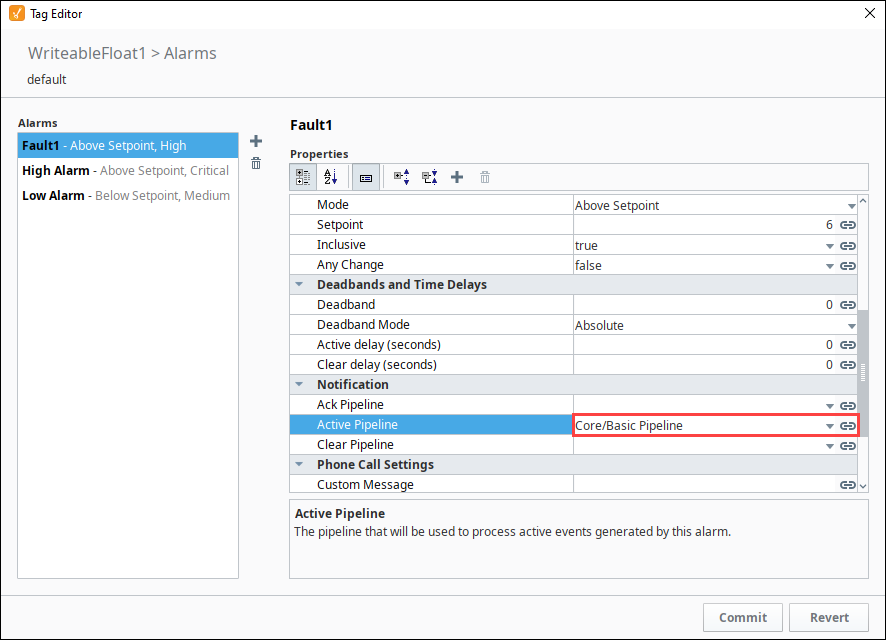
The Tag Editor will open. Click on Alarming.
-
Select an alarm and go to the Notification section, and choose a pipeline (i.e., Escalate) to assign to your alarm. Click OK.
Now, when an alarm occurs, an alarm notification will be sent to the users in the On-Call Roster with active schedules.