Vision Windows
Windows are the key to your HMI/SCADA application. A window is the basic building block of any Vision project, where each window can contain any number of components that can display tag values, run scripts, write values to the database, and accept user input. When you save your project, these windows are loaded into the Vision Client where any number of windows can be opened at one time.
Your windows are brought to life through the property bindings and event handlers on your components. They can be designed to fit any need, from simple screens showing basic information, to complex diagrams outlining an entire plant floor with various controls. Despite their abilities, using windows is relatively simple so that even new users can get started creating windows right away. The possibilities are endless when designing windows for your project.

Window Anatomy
While there is only one type of window object, windows have various properties that determine how they behave within the Client. When these settings are configured in specific ways, they create certain categories or types of windows: Main windows act like a typical HMI screen and take up all available space, Popup windows are often opened by a component in a Main window and appear to float on top of the Main window, and Docked windows stick to one side of the screen and are typically always open. These types of windows all provide different functionality to a project which, when combined create the basis for a Vision project that displays relevant information while remaining intuitive and user friendly.
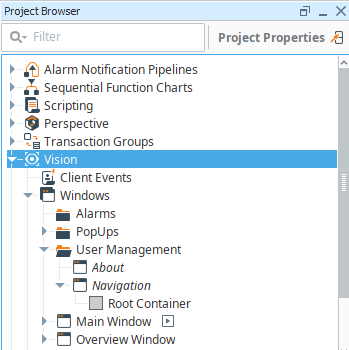
Root Container
Inside a window there is always a Root container. The Root container is where you place all components in the window. This is a normal Container component except that it cannot be deleted or resized, and is always set to fill the entire window. The root container will be the root of all components that go onto the window.
Window Name and Title
Windows have both a Name and a Title. The name is used within the Project Browser to differentiate the windows from each other and to form part of the path to the window. Windows can be renamed by right clicking on the window object and selecting rename or by pressing F2. Each window must have a unique path, so windows can have the same name as long as they are not in the same folder.
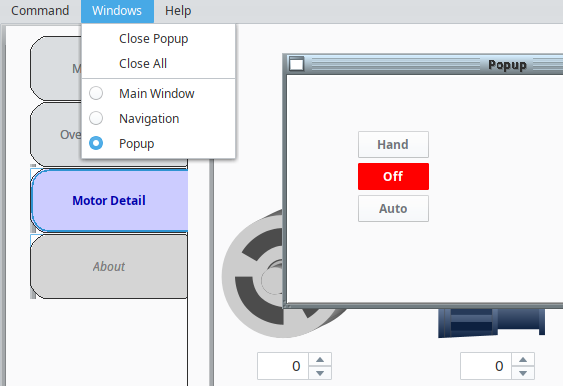
The Title property is a property within the property editor and works a little differently than the name. By default, Ignition assigns the Title property the same name as the window type that is created (i.e., Main window, Docked window, or Popup window). These window titles are used for the titlebar of a window, but are also used when viewing currently opened windows. In the Client, the Windows menubar command will display a list of all currently opened windows, as well as allow you to switch between which one is in focus. The list of opened windows displays the title of the window, and not the window name or path, so it is also important to have good titles for your window.
Titlebar and Border
A window can display a Titlebar and/or a Border. A titlebar allows you to drag a window around the workspace, and contains the window's close, maximize and restore buttons. The border of a window also lets you resize the window when it is floating or docked. Whether or not the titlebar and border are displayed depends on the property values set for your Titlebar and Border properties. A window typically displays both a titlebar and border when it is floating, but only a titlebar when maximized. It is often desirable to remove titlebars and borders on maximized windows.
Creating a Window
Creating windows is easy. You can create a new window by right-clicking in the Project Browser, using the Welcome Window, or using the File Menu.
Project Browser
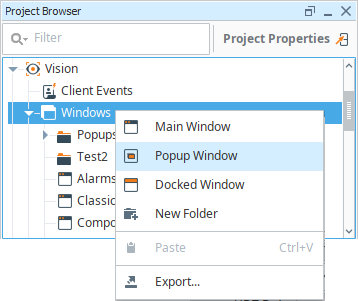
A common method is to right-click within the Windows section of the Project Browser and select one of the window types to create a window. While you can create each type of window, it is important to remember that the only difference is the configuration of the window properties.
Welcome Window
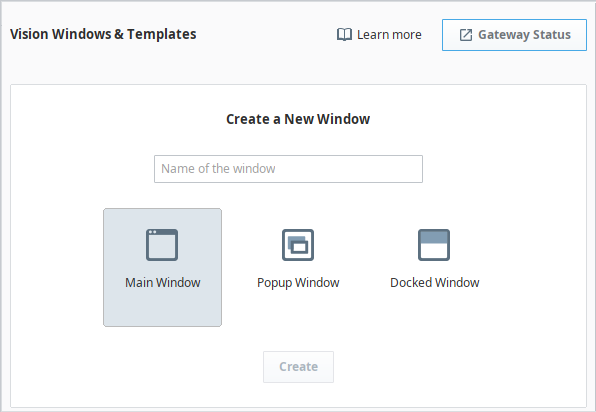
The Welcome Window that is shown when the project is first opened has a few quick start options. One of these options is the ability to create a new window by selecting the desired window type you want to create.
File Menu
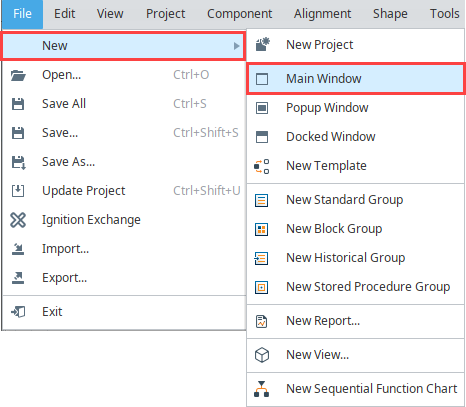
In the menubar of the Designer, the File menu has a New option that allows you to create a new window regardless of where you are in the project.
Organizing Windows
You can create folders to organize your windows. A window's name must be unique among the windows in its folder, but you can have the same window name in multiple folders. The window name and folder path are very important, they are used as references by other windows. You can create as many folders as you want and nest them as deep as you need for your project. To rearrange a window, just click and drag the window where you want to place it.
If you have a security requirement to open a different startup window depending who is logged in, you can create a Client startup script to open a dynamic set of windows. To learn more, refer to Open Dynamic Windows on Startup.
Window Right-Click Menu
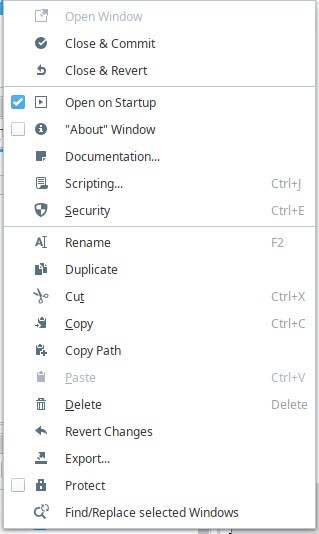
For a full list of properties that can be set on windows, refer to Vision - The Window Object. Windows also have right-click menu of options for additional functionality.
| Function | Description |
|---|---|
| Open Window | Opens the selected window. |
| Close & Commit | Commits any changes to your workspace and closes the window. |
| Close & Revert | Reverts any changes that were made since the window was last opened or saved. |
| Open on Startup | One of the most useful properties is the Open on Startup property, which when enabled will automatically open the window when the Client first starts up. This makes it easy to open a static set of default windows that everyone can see after logging in to the project. Multiple windows can be set to open on startup, though it is recommended that only a single main window is set to open on start, as opening multiple at once will cause them to be hidden behind one main window. All windows that Open on Startup have a little box with a Right Arrow |
| About Window | An "About" Window relays information to the user that may be important, such as instructions on how to use the project, or information about the projects creator. To specify a window as the About window, right click on the window in the Project Browser. Then click the About Window checkbox. The window will have a Information Bubble In the Client, the window will be displayed when a user selected Help > About This Application. 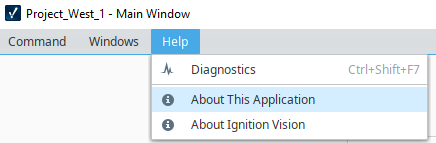 |
| Documentation | Windows can also have notes attached to them. The notes provide a way for a windows designer to provide some documentation on what the window is doing and how the various components interact with one another. Any windows that have notes will have a small Document Changed in 8.1.19 Prior to 8.1.19, this field was called Notes. |
| Scripting | The Scripting option takes you to the Component Scripting for that window. For more information, refer to Component Events and Script Builders in Vision. |
| Security | The Security options displays Security Settings for role-base security. For more information, refer to Security in Vision. |
| Rename | To rename a window, select this option then enter a new name. |
| Duplicate | Duplicates the selected window. |
| Cut | Cuts the selected window onto the clipboard. |
| Copy | Copies the selected window onto the clipboard. |
| Copy Path | Copies the path of the selected window into the clipboard. |
| Paste | Pastes the content in the clipboard into the selected context. |
| Delete | Deletes the current selection. |
| Revert Changes | Reverts local changes to the window, resetting it to the last save or load state. |
| Export | Exports the window as a project resource file which can then be imported into other projects. See the Example Export and Import sections below for more details. |
| Protect | Locks the individual project resource from inside the Designer. |
| Find/Replace selected Windows | Opens a popup to search your selected window(s) for specific resources. You can then use the replace feature to make changes. |
Exporting Window Example
In the Designer, you can export and import windows from one project to another project using external files or sending it directly to a project on the same Gateway.
-
You can export windows in two ways.
- To export multiple windows, right click on the folder of windows, and select either the Export option or Send to Project option. The window export works similarly to the project export, the difference being that it automatically highlights only that window to export from the list of project resources.
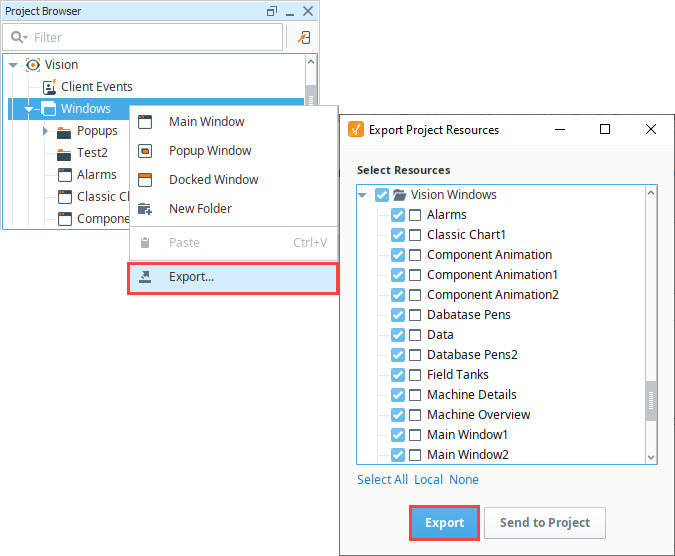
- To export one window, right click on an individual window and click Export, then choose the Export or Send to Project option.
-
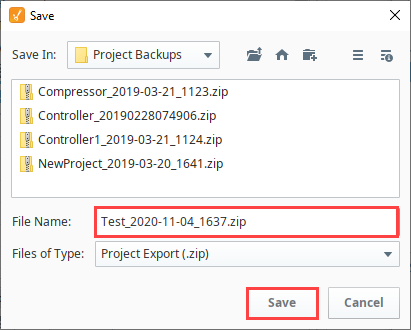
If you choose the Export option, the Save window is displayed. You can save the windows with the existing project name (not recommended if you are only exporting part of a project), or type a new name in the File Name field.
-
Click Save to save the windows as a project export file.
Importing Window Example
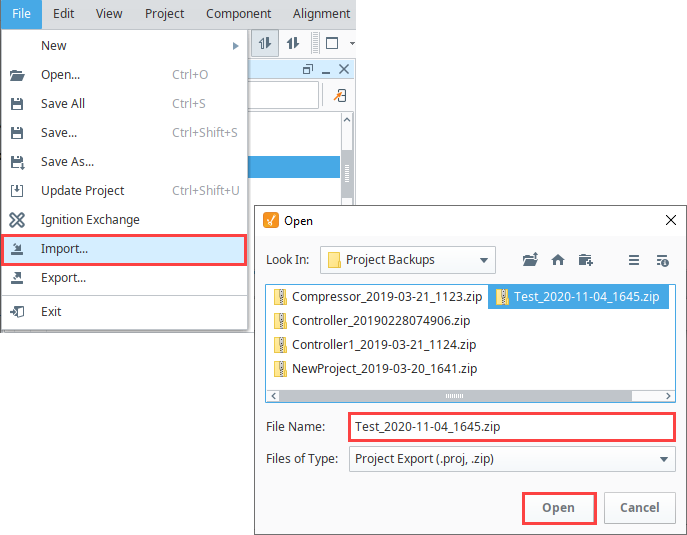
Importing the individual windows can be done by right clicking File from the top menubar and selecting Import.
Browse to the folder that contains the .zip file you want to import, and click Open.
Navigation Strategy
Setting up a navigation strategy allows you to navigate between different windows in the runtime Client. While we have a few examples of the most common navigation strategies, it is certainly not an exhaustive list as most users tend to combine multiple strategies to create a project that fits their needs.
A typical navigation strategy for a Vision project is as follows:
- Have a Docked window or two, usually docked North and/or West.
- Have a single Main window visible at a time.
- Use swap navigation to swap between the Main windows. This ensures that only one main window is open at a time.
- Use standard open navigation to open various Popup windows as necessary.
This style of project is so common, that the default operation of the Tab Strip component expects it. When it is in its default automatic operation, it expects that each tab represents a main window, and will automatically swap from the current screen to the desired screen. Additionally, the [System]/Client/User/CurrentWindow tag is calculated based on this strategy: its value is the name of the current maximized window. This navigation strategy is used in the Ignition Public Demo that you can download from our website.