Vision Templates
Templates are a simple but powerful feature in Ignition that you can use with Vision windows. The power comes from the ability to modify only the template in one location while affecting all of the instances used throughout the project. HMI and SCADA systems typically have a lot of repetitions in their screens. You might use a group of the same components multiple times within your project. The data driving each set of graphics is different, but the graphics themselves are copies of each other. You can make a single template and use instances of the template repeatedly.
When using templates, you define the graphical display in one place. This place is called the master template, but can also be called the template definition. You then use this master template many times in your project on multiple windows, thus making a number of template instances. Any changes made to the master template are then reflected in all of the template instances. Using templates early in your project development for any repeating displays can save a significant amount of time later on.
Without templates, the only way to do this is to copy-and-paste the components then re-bind them each time you want another. This is simple and works, but it can cause major headaches and time-consuming corrections later on, because if you ever want to make a change to how they are represented, you're stuck making the change to each copy of the group.

Template Properties
Template Properties (also called Template Parameters) allow each template instance to reference different data. Because the primary use of templates is the ease of maintaining repeated user interface elements, correctly using Template Parameters is very important. This is very similar to the concept of Parameterized Popup Windows. In that case, any Custom property on the Root Container of the window is used as a parameter, and is passed into the window when it is opened. With Templates, you have a property in the root of the master template that is exposed when you drop a Template Instance on a window.
Template Parameters and Internal Properties
When you open the Custom Properties window by right-clicking the checkered box of the template and selecting Customizers > Custom Properties, you'll notice it is different than the Custom Properties of all other components. There are two kinds of custom properties here:
-
Template Parameters: These parameters appear on each template instance, allowing each instance to be configured differently. Commonly, this is some sort of indirection. For example, if you have a template representing motors, you might have MotorNumber as a parameter property. Then you can use that property as an indirection variable in other bindings within the template. Parameter properties are not bindable from within the template master design. When you use the template to create a template instance, the property becomes bindable. This ensures that the property only has a single binding configured for it.
-
Internal Properties: These properties cannot be used as parameters in your instances. They show up when designing the template master, but it does not show up on the template instances. Internal properties are bindable from within the template master design. These properties are intended to be used for the internal workings of the template.
Indirection and UDT Tags
There are two primary ways to achieve indirection when using templates. Let's continue to use the example of a motor. Your system has many motors in it, and your template is used to display the status of the motors and control the motor's running mode. The goal is to be able to drop instances of the template onto your windows, and configure them in a single step to point to the correct motor's tags.
Standard Indirection
If the tags representing the datapoints of each motor are arranged in an orderly way in folders or with a consistent naming convention, you can use standard indirection to configure your template. You can add a parameter such as MotorNum to the template. Then you configure the contents of the template using indirect tag binding, where the value of MotorNum is used for the indirection.
UDT Parameter
If your motors are represented by a User Defined Type (UDT), you can directly use a property of that type. Make your indirection property the same type as your custom data type. Then inside your template, you can use simple property bindings to create a link to the members of the UDT. When you create a template instance, you can simply bind that property directly to the correct Motor tag, and all of the subtags of motor are correctly mapped through the property bindings.
Changing Template Path
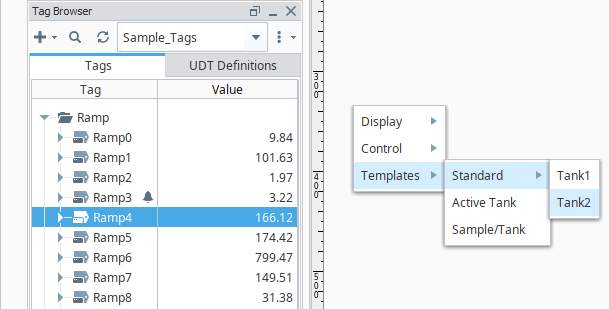
An instance of a template on a window has a property called Template Path. You can change this property on a window dynamically, and it can be bound to anything that produces a valid template path. For example, if there are two tank templates in a folder called Tanks, one template is called Tank A and the other is called Tank B. Each tank has a different look, but they have the same custom properties. Their respective template paths are Tanks/Tank A and Tanks/Tank B. The template rendered on a window can swap between Tank A and Tank B by binding the instance's Template Path property to any string reference that says Tanks/Tank A or Tanks/Tank B.
The Drop Target Parameter
When you specify parameters in the Custom Properties window by right-clicking the checkered box of the template and selecting Customizers > Custom Properties, you can set one of the parameters as the Drop Target. This allows you to drop a tag of that type onto your template instances or onto a window to facilitate even quicker binding. For example, let's say that you have a parameter that is an integer and you've made it the drop target. If you drop an integer tag onto a window, your template appears in the menu dropdown list of components which is displayed. Choosing your template creates a template instance and binds that parameter to the tag.
This also works for UDT tags. Let's say you have a custom data type called Motor and a template with a Motor-typed parameter set as the drop target. If you drop a motor tag onto a window, it creates an instance of your template automatically. If you have more than one template configured with Motor drop targets, you have to choose which template to use.
Resizing Templates
You can configure the layout of each template so it resizes properly.
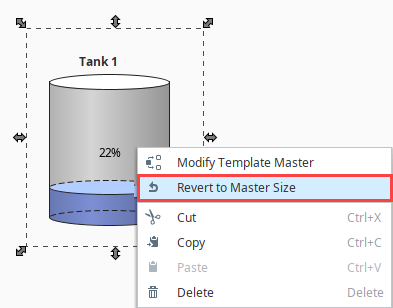
By default, when you drag a template into the window from the Project Browser, the size of the instance is exactly the same size as the master template. You can make the size larger or smaller. To go back to the same size as the master template, right-click on the instance and choose Revert to Master size.
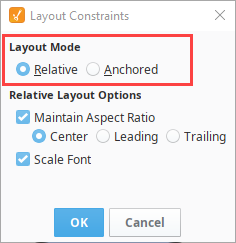
For every component or template instance you add to the window, you can pick a Layout option as to how it is going to resize in the Client. Right-click on the instance, select Layout from the menu, the Layout Constraints window displays showing all the default settings.
To learn more about layout, see the Component Layout page.
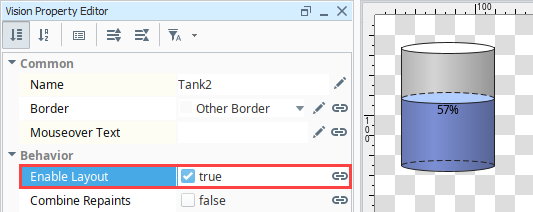
If your template instance resizes in the Client, then it will stretch all of the components inside it in the same way a Component Group works by ignoring any layout settings and stretching without maintaining aspect ratio. If you want the template instances to respect your layout settings, set the Enable Layout property to true in the template definition.
Nested Templates
You can embed templates inside of other templates. The nested template behaves like a component. This can be useful if the project can be broken down into many similar, small parts. Instead of building a template for a tank with a gauge, a motor with a gauge, and a compressor with a gauge, it might instead be better to first build a simple gauge template that can then be added to each of three templates so that it already is set up correctly.
Simply drag the already made template into the new template, just like you would onto a window. You easily use an indicator template made to display values from a motor template, or values from a tank template, as long as you set up the indicator template with the proper indirection. This way, you only have to set up the indicator once and write in a few parameters, instead of having to customize the indicator the same way for every template that it gets added to.


Accessing Components Inside a Template Instance
When working with a Template Instance, the components inside that instance or normally hidden, and otherwise inaccessible. However, you can access these components via scripting. It helps to think of Template Instances as multi-layer containers. In most cases, users interact with only the Outer Layer, which contains the Template parameters, and the other default Template Instance properties. A Python script can access the Inner Layer, which then provides access to the components within.

A script can traverse to the Inner Layer from the Outer Layer with a getComponent call.
myTemplate = event.source.parent.getComponent('MyTemplate')

# The '0' in the first getComponent call effectively refers to an index value of a component,
# which happens to be the Inner Layer.
myTemplate.getComponent(0)
From the Inner Layer, a script can then call getComponent again to access any components within. Assuming a Template with a Label component named "Label", we could access the Text property with the following:
myTemplate = event.source.parent.getComponent('MyTemplate')

print myTemplate.getComponent(0).getComponent('Label').text