Creating a Template
Templates are a simple but very powerful feature that you can use with your Vision windows. Templates are a built once, in one place, which is called the master template. You then create template instances throughout your project. Each of these instances will have the same components and properties as the master template, and will automatically update as changes are made to the master template.
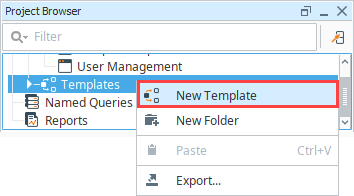
Creating a template is easy. To start, right click on the Templates section of the Project Browser and select New Template.
Basic Template
Here we create a basic template. After the template is configured, you can create multiple instances of it throughout your project.
-
In the Project Browser, right-click Templates and select New Template.
A checkered box is displayed in the design space where you design your template. The checkered box means that the template is completely transparent. You can set a background if you want.
-
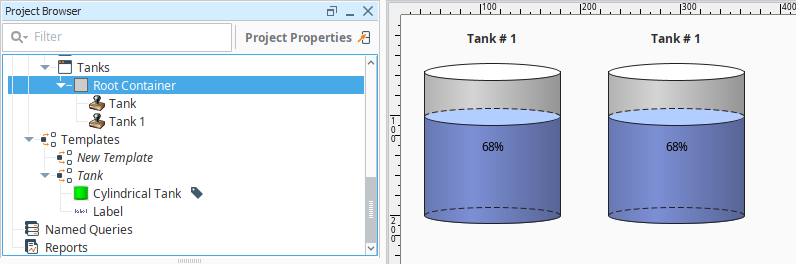
Right-click on New Template and click Rename to change its name to something else, for example "Tank".
-
Drag a Cylindrical Tank and a Label component onto the screen. Resize the components to fill the area of the template.
-
Bind the Value of the tank to a Tag, and set up the label to be a name for the tank.

-
Now that we made a template, use that template on a window. Navigate to a window, and then click and drag our tank component onto the window. The template can be dragged onto the window multiple times to create multiple instances of the template, or even added to other windows.
Dynamic Templates
While the basic template is a good example of what a template is, the real power of the template is its ability to be dynamic. The template can create parameters that can accept values from the instance, and use them throughout the template. This way, instead of always displaying Tank 1 values, we can pass in a tank value for the cylindrical tank component to use.
-
In the Tank template, right click on the gray background and go to Customizers > Custom Properties.
-
Click the plus button to add a Template Parameter. Give it a name like tankValue, and click OK. There should now be a new property on the Tank Template object called tankValue.

-
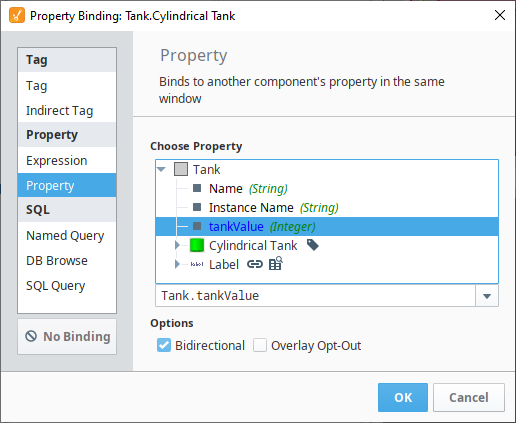
Now bind the Value property of the cylindrical tank to the tankValue property that we just made. Note that it will be 0 right now, but we will pass in a value later.
-
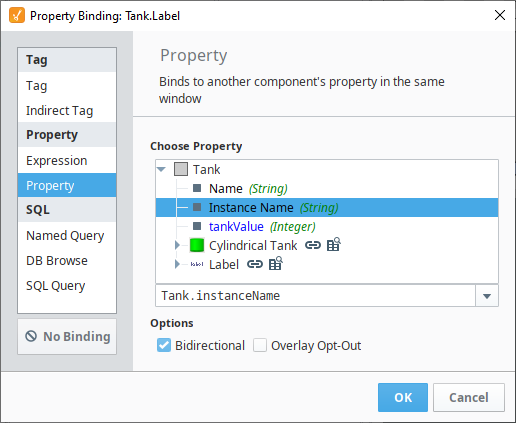
We also want to change the label, since this template won't always be pointing at Tank 1. So we can bind the Text property of the label to Tank Template's Instance Name. This way, whatever we name the template instance is what the label will show.
-
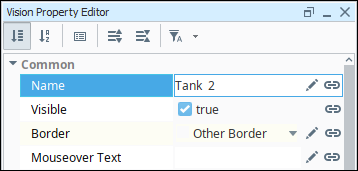
Back on our window, we want to change our two instances so that the first one is called Tank 1, and the second is called Tank 2. Notice how the labels change when we change the name of the template. Select your second Tank, and change the Name property to Tank 2.
-
We also want to bind the tankValue property of each instance to separate Tags. In this example, you can do this simply by selecting Tank 2 and clicking on the binding
 icon for the tankValue property and selecting another Tag.
-
We now have two instances of the same template, but they are displaying different information because we are passing different values into each.

Edit a Template
You can open a template for editing by double-clicking on it in the Project Browser, or by double-clicking any instance of that template within a window. You design your template the same way you design windows: by adding components to it, and configuring those components using property bindings and scripting.
There are a few differences between templates and windows from an editing perspective. Templates, unlike windows, have a transparent background by default. This can be changed simply by editing the background color of the template. Templates also do not have the concept of the "Root Container" - the template itself acts like a container.
Once you change the master template, all the instances of that template are updated.
Templates are a project resource. As such they can be copied, duplicated, protected and more. There are several actions available with a right click menu.
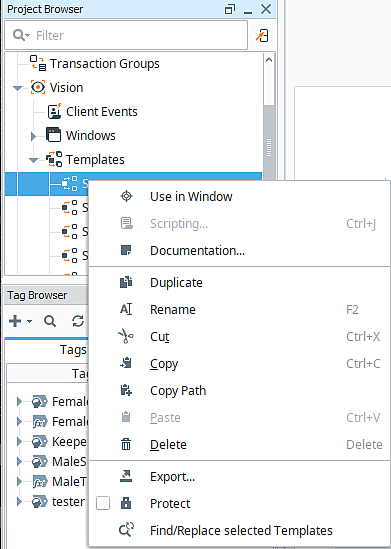
| Action | Description |
|---|---|
| Use in Window | Places the selected template on the current window. |
| Scripting... | Opens the Component Scripting Window where you can set scripting on this template. For more information, see Script Builders in Vision. |
| Documentation... | Opens a popup window where you can make notes about the template. |
| Duplicate | Duplicates the template in the Templates folder. |
| Rename | Renames the template. |
| Cut | Cuts the template, but leaves it on the clipboard. |
| Copy | Makes a copy of the template on the clipboard. |
| Copy Path | Copies the path to the template and places it on the clipboard. |
| Paste | Pastes a template that's currently on the clipboard. |
| Delete | Deletes the selected template. |
| Export | Opens export Project Resources window. where you can export this template and other resources. For more information, see Project Export and Import. |
| Protect | Once a project resource protected, it cannot be changed except by someone that has the permission to unprotect it, and modify it. For more information, see Project Security in the Designer. |
| Find/Replace selected Templates | Opens a popup window to search your selected template(s) for specific resources. You can then use the replace feature to make changes. |
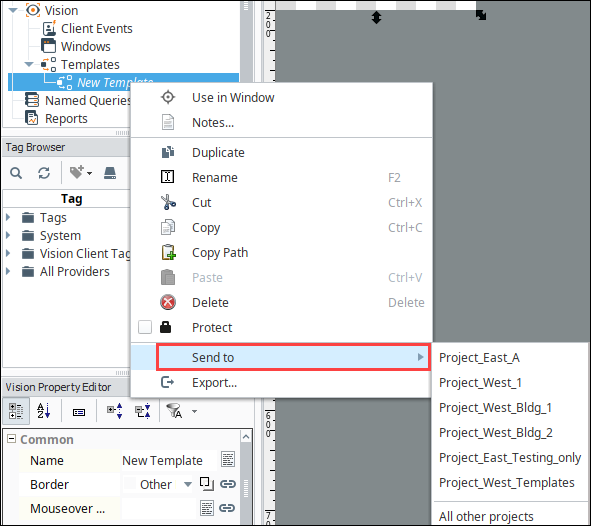
Example - Send a Template to a Different Project
You can share Templates with other projects.
If a Template by the same name already exists in the target project, it will be overwritten.
-
To send a Template to a different project, right click on the template name and choose Send to.
-
A list of existing projects is displayed. Choose a specific project, or select All other projects if you want to send the template to all projects.
-
A confirmation message is displayed. Click Yes to confirm.

Template Custom Properties
Templates have the capability to incorporate custom properties. In this way, they are the same as any other Ignition components. The main difference between the custom properties for an Ignition component and a template is that the template has internal properties and template parameters.
-
Internal Properties - Internal properties help facilitate the bindings within a template in the same way that a window's root container will help facilitate bindings between components that make up the template. When a template is deployed onto a window the internal custom properties are not exposed to the world outside the template.
-
Template Parameters - The template parameters are the template's custom properties that are exposed to the outside world. In other words, when a template is deployed onto the root container of a window, the template parameters are available for binding with the objects on that window or to Tags.
Creating the Template Instances
Once you've made your template, you can use it on any of the windows in your project by doing any one of the following steps:
-
You can drag the template from the Project Browser into an open window just like you can drag components into the window for display.
-
You can right-click on the template in the Project Browser and choose Use In Window, which will let you place the template inside a window with another click.
-
You can drag a Tag from the Tag Browser to a window and from the pop-up menu, which is displayed, you can choose a template. This only works if the template has a configured Template Parameter that been enabled as a drop target.
-
New in 8.1.22You can alt-click on an open template in the Project Browser and drag it into an open window just like you can drag components into the window for display.
The template instance can then be moved and resized like any other component.