Using the Template Canvas
The Template Canvas component works much like the Template Repeater in that it can easily create multiple copies of a master template. What makes the Template Canvas unique is that it can display instances of multiple master templates, and set their layout in any way you want. The Template Canvas has a customizer that can help put the templates together within it, but the customizer is just driven by a Templates dataset property on the Template Canvas. The Template Canvas can be made dynamic by setting up a binding on the Templates property, such as a query that pulls in an entirely new dataset of information, or even a cell update binding, which updates individual cells of the dataset. With that, you can load new templates into the canvas at runtime, or even move the templates around.
The Template Canvas has two layout systems:
-
Absolute Positioning, where each template instance has an absolute position within the Template Canvas
-
Layout Positioning, which uses the MiG Layout system to place the instances within a grid like system.
Creating a Template
Before we get started with the Template Canvas, we first need to have a template. Here we are going to make a simple Form Input template, that consists of a Label and a Text Field. The template will need two parameters. A Label_Text parameter which is what will get displayed in the label, and a TextField_Text which we can use to pass user input outside of the template by making it bidirectional. This template is a great way of quickly making user input forms, by using a template for each piece of info that needs to be collected. The steps for making the template are listed below, or you can skip ahead to using the Template Repeater in the next section.
Making the Template
-
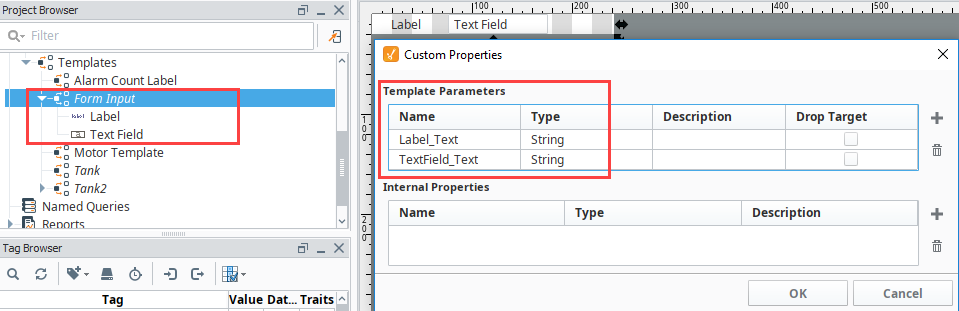
In the Templates section of our Project Browser, create a new template called Form Input. We are going to want to pass in values to and from the template, so we need to create Template Parameters.
-
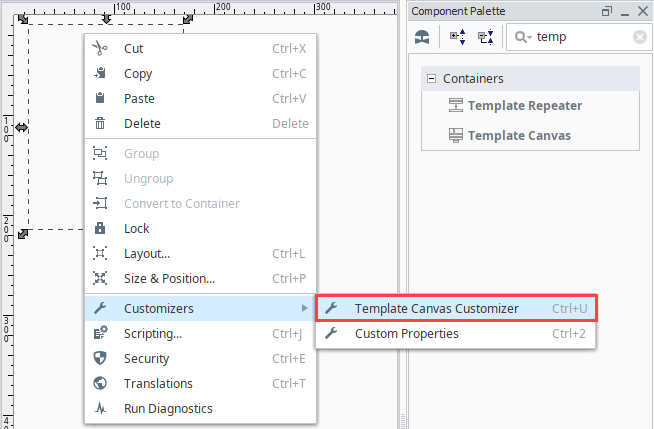
Right-click in the Form Template workspace, and select Customizers > Custom Properties. Add a Template Parameter called Label_Text, and make it a String type.
-
Add a second Template Parameter called TextField_Text, and make it a String type, and click OK to save your template parameters.
-
Next, drag a Text Field component and a Label component onto the Template.
-
On the Label component, set the Horizontal Alignment property to Trailing.
-
Finally, we want to set up some bindings on our Template.
-
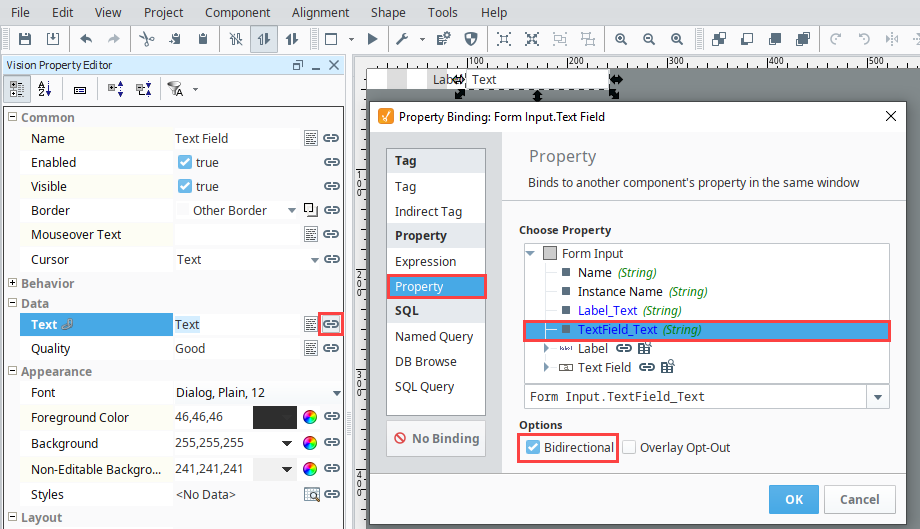
Using a property binding, bind the Text property of the Label component to the Label_Text Template Parameter.
-
Using a property binding, bind the Text property of the Text Field component to the TextField_Text Template Parameter, and make it Bidirectional.
-
-
Set the Size and Position for the components by right-clicking on each component. Set the Label component to Position: (68, 1) and Size: [32x20]. Set the Text Field component to Position: (104, 2) and Size: [130x20]. Next, set the Form Input template to Size: [237, 24].

-
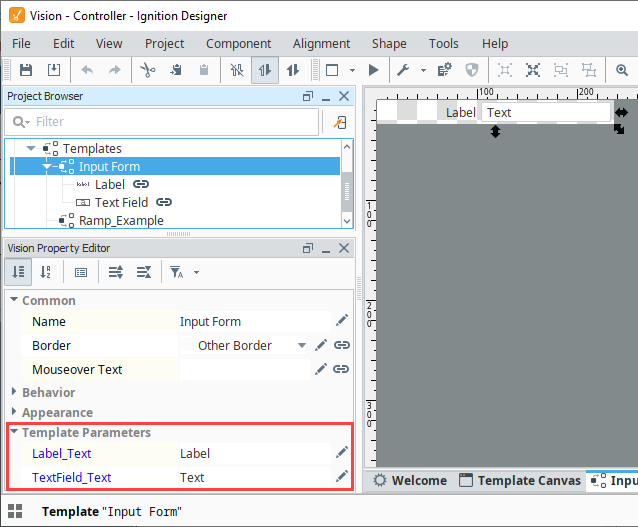
Once you have the properties added and components bound, type a value into each Template Parameter to confirm the bindings are working.
- Label_Text: Label
- TextField_Text: Text
Absolute Positioning
First, we can set up our Template Canvas using Absolute Positioning, which is a little simpler to understand as each template has a width and height as well as an x and y position.
-
Drag a Template Canvas component to a window and open the Template Canvas Customizer. The customizer provides an easy interface to setting up our templates.
-
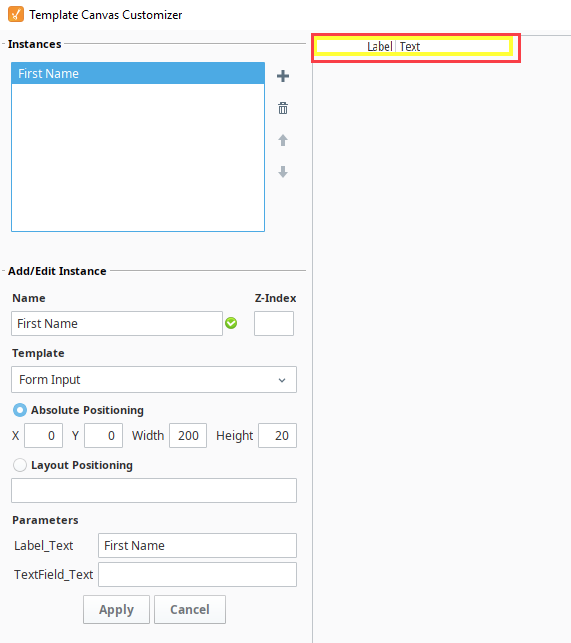
Enter in the following values for the first instance:
- Name: First Name
- Template: Form Input
- Absolute Positioning: 0, 0, 200, 20
- Parameters: Label_Text = First Name (leave TextField_Text blank)
-
Click the Add button to add the instance. The instance will then be visible in the preview section of the window. Values for the components are still using the default values for the Label_Text and TextField_Text. This is intentional. The new values will appear once you hit OK and close the canvas customizer.
noteLabels have Absolute Positioning properties: X, Y, width, and height labels. A Z-index field indicates where a given template instance should appear in the z-order within the template canvas (top or bottom).
 note
noteTake notice of of the yellow outline around the instance and how First Name is highlighted at the top of the customizer. This means that the instance is selected, and the customizer is in edit mode. This allows you to make changes to the selected instance. To exit edit mode and add a new instance, click on the Cancel button in the lower left of the window. Clicking on the Cancel button in the lower right will cancel out of the customizer.
-
Let's add another instance. Click on the Add
 icon in the Instance area to clear the Add/Edit Instance fields from the prior entry, and enter the following:
- Name: Last Name
- Template: Form Input
- Absolute Positioning: 0, 20, 200, 20
- Parameters: Label_Text = Last Name (leave TextField_Text blank)
-
Once entered, click the Add
icon again. You'll see that you have two instances visible in the preview section of the window. Once both instances are configured, click the OK button.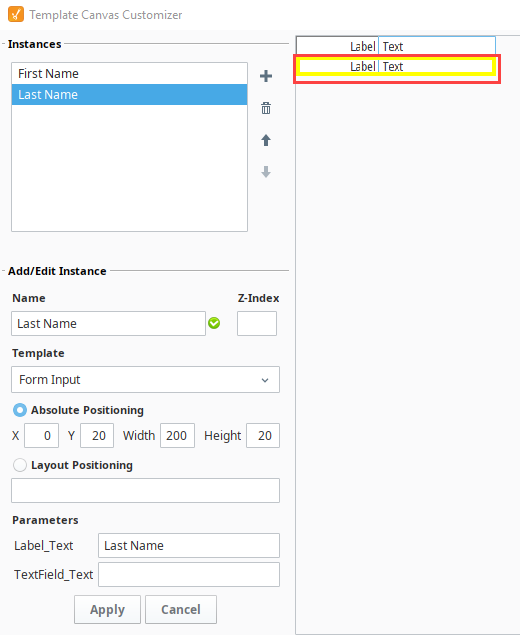
-
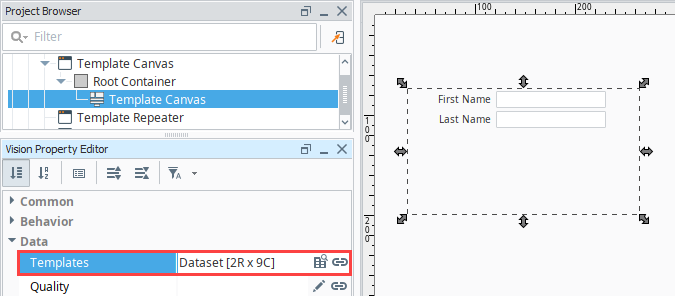
Now, both instances appear in the Template Canvas.
-
If a new instance needs to be added, it can be added through the Template Canvas Customizer. However, the Template Canvas also has a 'Templates' property. This property stores all of the data that was entered into the customizer into a dataset, so new instances can be configured directly on the Templates property. View the dataset by clicking the Dataset Viewer button next to the Templates property. Furthermore, template instance configurations could be stored in a database table, and the Template Canvas could fetch the data with a SQL Query binding on the Templates property.

Layout Positioning (MiG Layout)
Instead of having to manually enter a size and position for each instance, we can make use of Layout Positioning to have the Template Canvas determine the best position for each instance, while also making suggestions as to where each instance is placed in relation to another. The layout positioning uses a grid-methodology to instance placement. Each instance, unless otherwise specified, is considered a single "cell" in the grid.
Don't Mix Absolute and Layout Positioning
We do not recommend using both Absolute and Layout Positioning for instances on the same Template Canvas. Select either Absolute or Layout Positioning for your instances. Layout Positioning will determine the best position for each instance in your canvas, where Absolute Positioning allows you to manually specify the width, height, x and y positions for each instance.
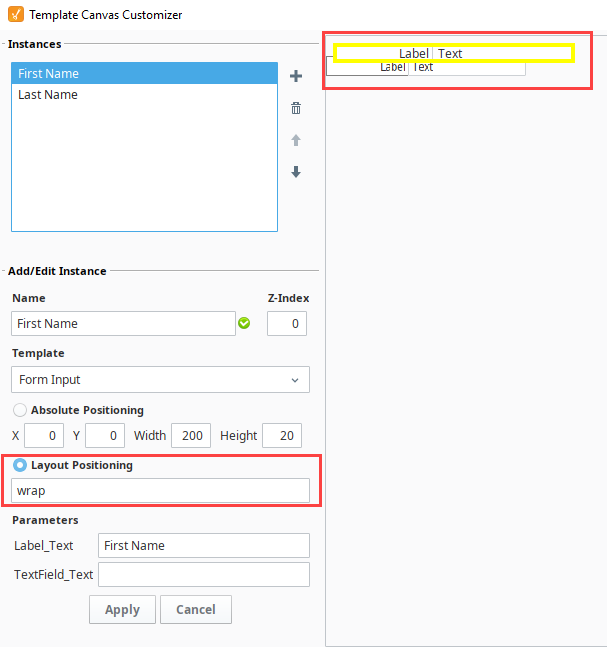
Continuing from the example above, the First Name and Last Name instances are using Absolute Positioning. Let's tell the First Name instance to use Layout Positioning and enter the 'wrap' parameter. This means the next cell in the grid should be placed on the next row.
-
With the Template Canvas component selected, open the the Template Canvas Customizer again, and make the following modification to the First Name instance.
- Click the radio button for the Layout Positioning property and enter 'wrap' the field.
-
Click Apply, and the First Name instance will appear to overlap with the Last Name instance. This is because the grid only accounts for instances using the Layout Positioning.
-
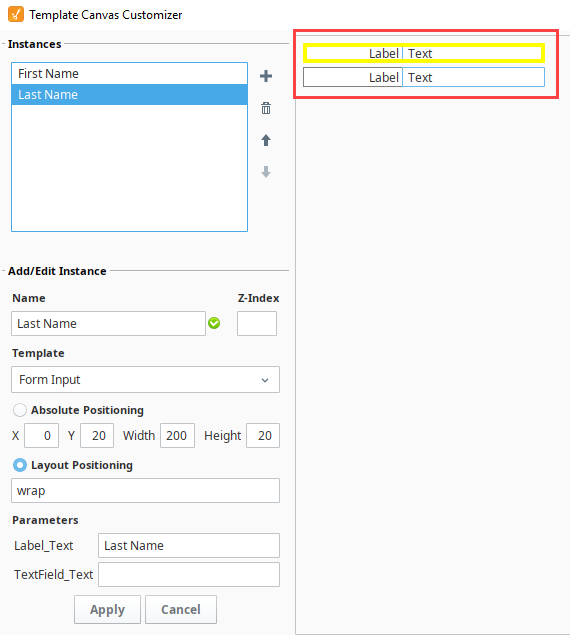
Next, we can configure the Last Name with Layout Positioning as well. Make the following changes to the Last Name.
- Click Layout Positioning radio button and enter 'wrap' in the field below.
-
Once the changes have been applied, click OK. You'll notice in the preview section of the window that both instances are now in line.
-
Open the Templates property by checking the Dataset View button. Notice that the x, y, width, and height columns are no longer used, but the layout columns for First Name and Last Name now have a value of 'wrap'.
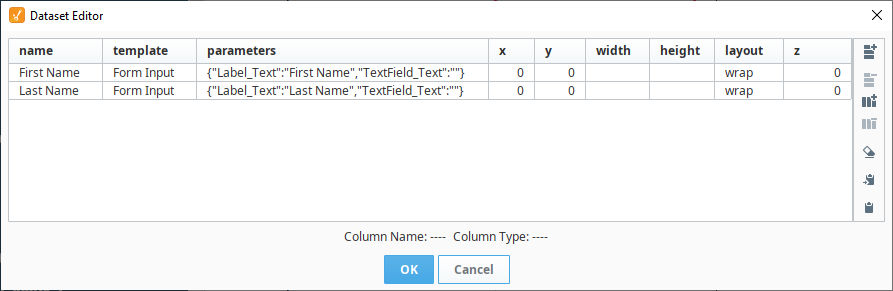
-
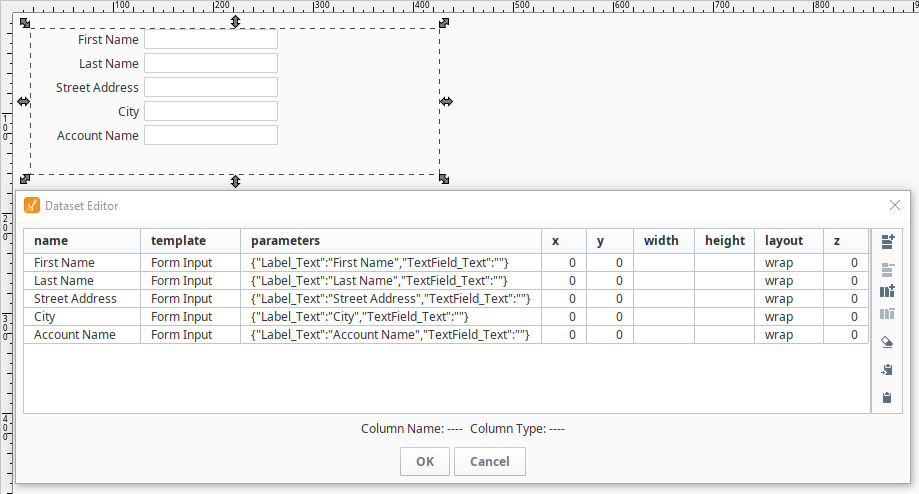
Like the previous example, new rows can be added directly to this dataset. Furthermore, the 'wrap' value means the next template instance will begin on a new line. Add three new instances for Street Address, City and Account Name. Use either the Template Canvas Customizer or simply add new rows in the dataset viewer with the values:
| name | template | parameters | x | y | layout | z |
|---|---|---|---|---|---|---|
| Street Address | Form Input | {"Label_Text":"Street Address","TextField_Text":""} | 0 | 0 | wrap | 0 |
| City | Form Input | {"Label_Text":"City","TextField_Text":""} | 0 | 0 | wrap | 0 |
| Account Name | Form Input | {"Label_Text":"Account Name","TextField_Text":""} | 0 | 0 | wrap | 0 |
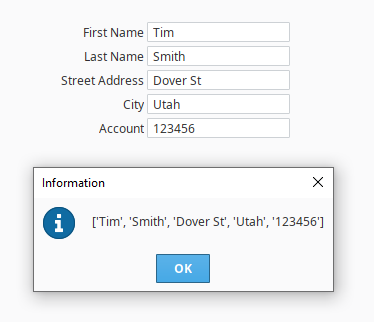
Read User Input
The last step is to read the user input. Put the Designer into Preview Mode and add some values for each text field component. Once finished, switch the Designer back to Design Mode, and add a Button component to the window (not the template canvas)
Add a script to the Button component using the Code Snippet below - Read User Input Example. Place the code on the actionPerformed event of your component by double clicking on the Button component and opening the Script Editor tab.
# Reference the template canvas component, and call the getAllTemplates() method.
# This will return a list of every instance in the canvas
templateList = event.source.parent.getComponent('Template Canvas').getAllTemplates()

# Initialize a list. User input from each text field will be stored in this variable
userInput = []

# Iterate through each template instance inside the canvas
for template in templateList:

    # add the user inputted value to the userInput list. The values are originally returned in Unicode.
    # the Python str() function is casting the Unicode values as string values.
    userInput.append(str(template.TextField_Text))

# Show the values in a messageBox. This could be replaced with an INSERT query, or some other action.
# str() is used again to case the list as a string. This only required to work with the messageBox function
# since the function requires a string argument be passed in
system.gui.messageBox(str(userInput))
When running the script, each value should appear in the message box. If you're not getting a value in the message box, make sure the Text Field property is bound to the TextField_Text template parameter as mentioned in the Creating a Template section, Step 6b.
This example can easily be expanded to do something more meaningful with the input, like store to a database table.