Tag Bindings in Perspective
A Tag Binding is a straight-forward binding type. It simply binds a property directly to a Tag Property (typically the value). This sets up a subscription for that tag. Every time the chosen tag changes, the binding is evaluated and pushes the new value into the bound property. If you choose a tag in the tree, and not a specific property of that tag, the Value property is assumed.
Tag Binding Interface
There are three different types of tag bindings in Perspective (direct, indirect, and expression), but they all share some common interface elements.
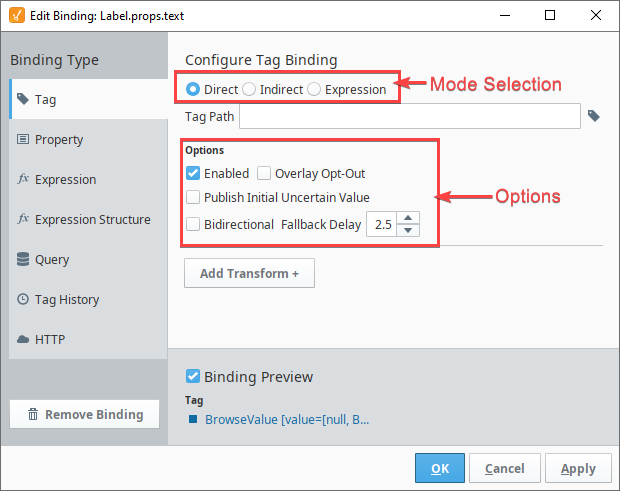
Mode Selection
Allows the binding to switch between the different tag binding modes, which are described further down this page.
Options
The following options are available, regardless of mode:
| Option | Description |
|---|---|
| Enabled | Determines if the binding is enabled. Unchecking this option will prevent the binding from executing. Useful in cases where the binding needs to be temporarily disabled. |
| Overlay Opt-Out | If the target of the binding returns a non-good quality code, this setting indicates whether the component should reflect the quality code with a component overlay. |
| Publish Initial Uncertain Value | New in 8.1.8 Which switching to the view where this binding is located, the binding is briefly provided an initial value of "null" with a quality code of Uncertain_InitialValue. Because this quality code is not good, the component will show a quality overlay. Once the most recent value of the target tag has been received, the binding will replace the null value with the newly received value, and remove the quality overlay.If checked, this setting will cause the binding to ignore this initial null value. This prevents the quality overlay from appearing due to the initial null value. All other overlays will function normally. |
| Bidirectional | Determines if this binding should be allowed to write back to the target. Defaults to unchecked, meaning that the binding will only ever read the target's value. If checked, then changes made to the bound property will cause the binding to send a write request to the target of the binding. |
| Fallback Delay | When a value is manually written to the bound property, a write request will be sent to the target (assuming Bidirectional is checked). If the binding doesn't receive confirmation that the write request was accepted, the value on the bound property will instead fallback to the value on the target. This option determines the number of seconds until the binding value falls back. |
Drag and Drop
Ignition automatically creates the Tag Bindings to several of the component properties when you choose to bind a tag to a component by dragging and dropping. This is true for both creating a component by dragging and dropping a tag onto empty space in a container, and by dragging and dropping a dropping a tag directly onto a component property.
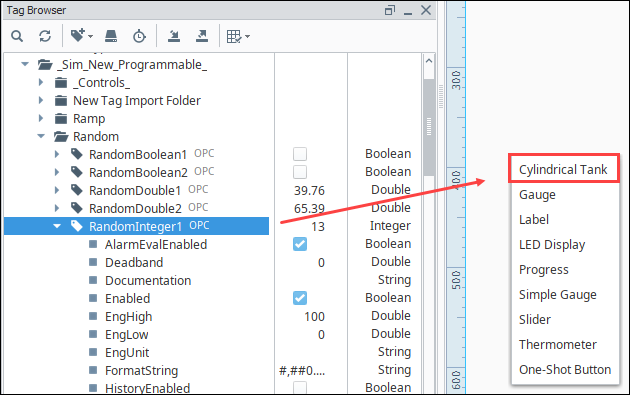
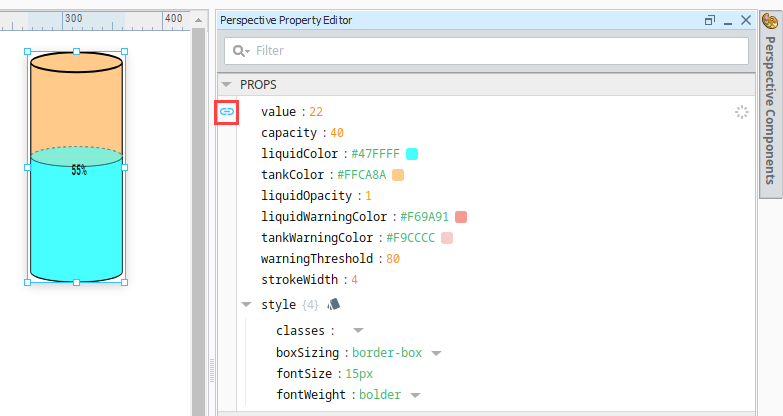
You can drag a tag onto a container. Perspective will give you an option for the kind of component you'd like to use to represent the Tag. Configuration options for tag drop are set in the Project properties. For more information, see Tag dropConfig. In this example we drag the tag for a tank onto a view and choose the Cylindrical Tank option.
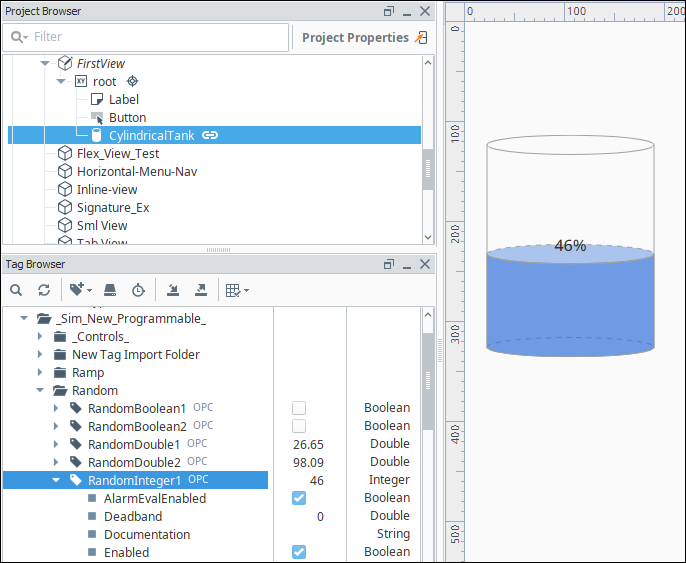
A Cylindrical Tank component is placed on the view. Notice that the value for the component and the value for the tag match. The component's displayed value will update as the tag updates.
Direct Tag Binding Mode
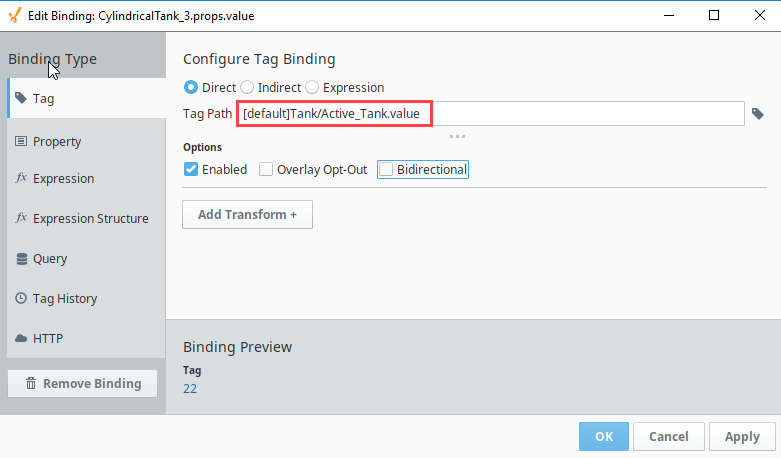
A direct binding binds a component property to a tag path. Every time the tag's value changes, the binding is evaluated and the new value is sent to the bound property. In the example below, the value of the Active_Tank tag is displayed as a percentage of the capacity of the Cylindrical Tank component.
Indirect Tag Binding Mode
An Indirect Tag Binding is very much like a standard Tag Binding, except that you may introduce any number of indirection parameters to build a tag path dynamically in the session. These parameters are numbered starting at one, and denoted by braces, such as {intParameter}. The binding will be linked to the tag represented by the tag path after the indirection parameters have been replaced by the literal values they are bound to.
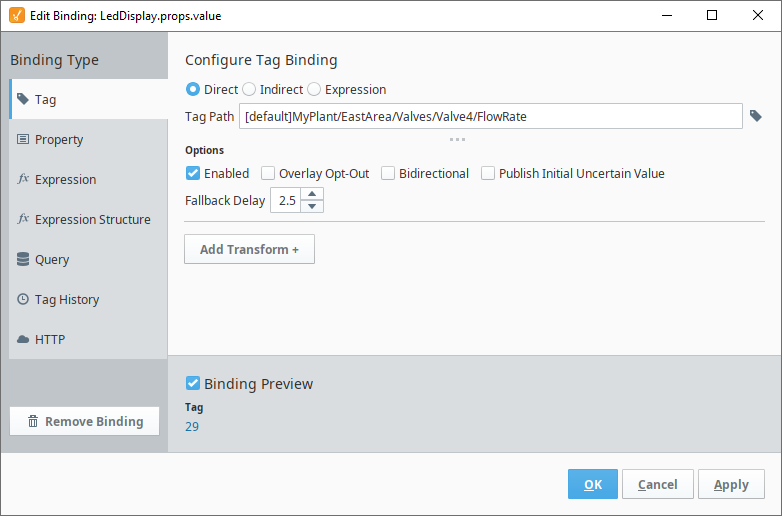
For example, instead of binding directly to the FlowRate tag inside the Valve4 folder, as shown below, you can build an indirect tag path that will point to the FlowRate tag for all valves between Valve0 to ValveN where N is any valve number.
[default]MyPlant/EastArea/Valves/Valve4/FlowRate
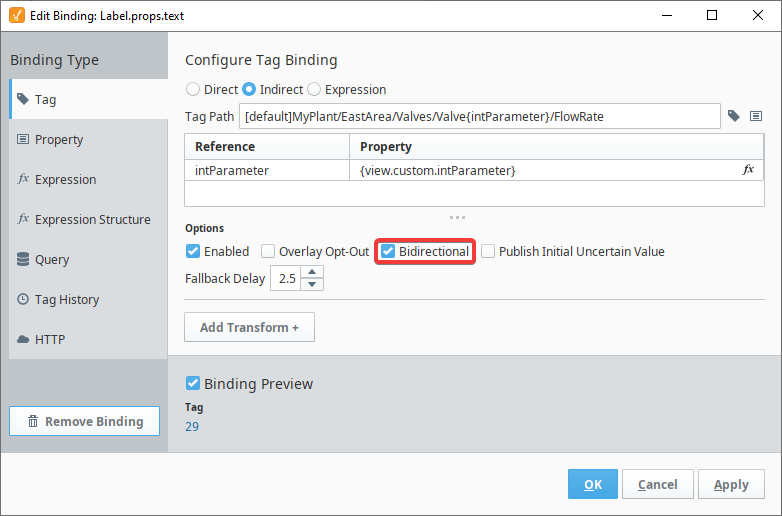
Below, the valve number, 4, is replaced by {intParameter} where {intParameter} is a placeholder for a dynamic reference that will be used to create a single tag path capable of referencing every FlowRate tag inside every existing Valve.
[default]MyPlant/EastArea/Valves/Valve{intParameter}/FlowRate

The {intParameter} dynamic Reference must be pointed to a Property or View Parameter. Your property can pointed to any component property value or tag value to build an Indirect Tag Binding. In this example, the {intParameter} dynamic reference is pointing to a view custom property named valveNumber that is used to help users control which Valve the binding is reading a FlowRate from.
Indirect Tag Binding - Bidirectional
Indirect Tag Bindings can also be made Bidirectional by clicking the Bidirectional checkbox on the Edit Binding screen. This will allow any input from a user on that property to be written back to the tag. To work properly, the tag needs to have the proper security to accept writes.
Indirect Tag Binding Example
In this example, we have some different motors, where each motor is a folder of tags. Each motor has an amps tag that is within the folder, so that our tag paths look like the following:
Motors/Motor  1 /a mps
Motors/Motor  2 /a mps
Motors/Motor  3 /a mps
Motors/Motor  4 /a mps
Instead of creating four different displays for these four different tags, we can create a single display and make it indirect. We need two things for this example: A component to display the value in, and a component which allows the user to select which motor they are looking at.
-
Drag an LED Display component onto the view. This will be the display component.
-
Drag a Dropdown component onto the view. This will be used to allow the user to choose what motor the LED Display is showing amps for.
-
Select the Dropdown component. In the Property editor, under the options property, click Add Array Element....
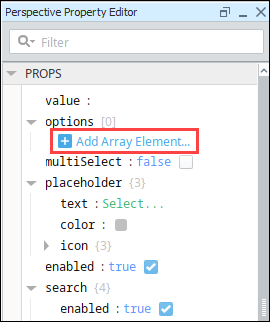
-
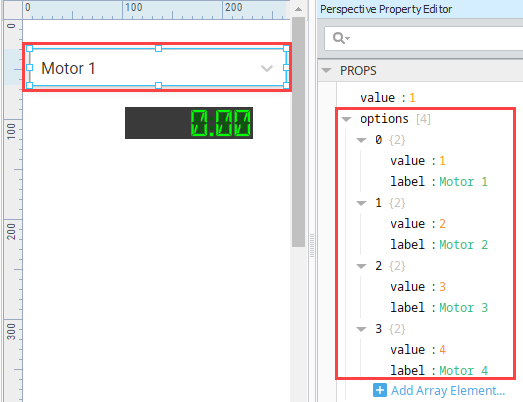
Set the value to 1 and the label to Motor 1.
-
Repeat steps 3 and 4 to add array elements for Motors 2, 3, and 4.
-
Click on the LED Display component. Select the Binding
 icon in the value property.
 -
Click on the tag binding type then click the Indirect button.
-
Click the Tag
 icon and scroll down to the Motors/Motor 1/Amps Tag. Click OK.
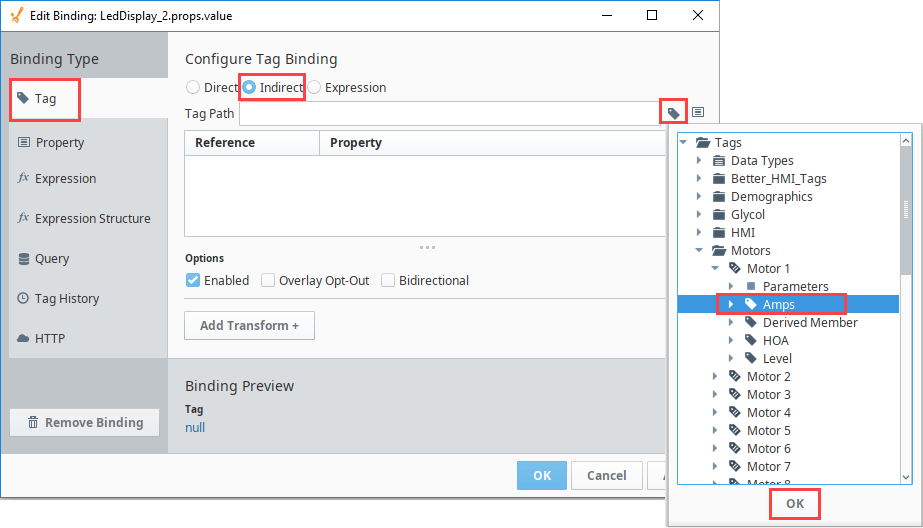
-
In the Tag Path field, replace the 1 with
{1}. We are replacing[default]Motors/Motor 1/Ampswith[default]Motors/Motor {1}/Ampsmaintaining the space betweenMotorand{1}.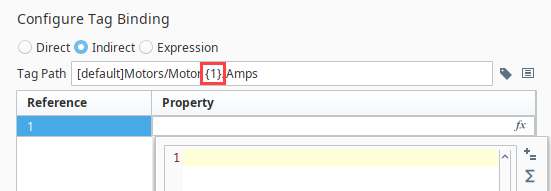
-
In the References list, select the row. Click the Properties
 icon.
icon. -
Scroll to the Dropdown component and select the value property of the Dropdown. Click OK.
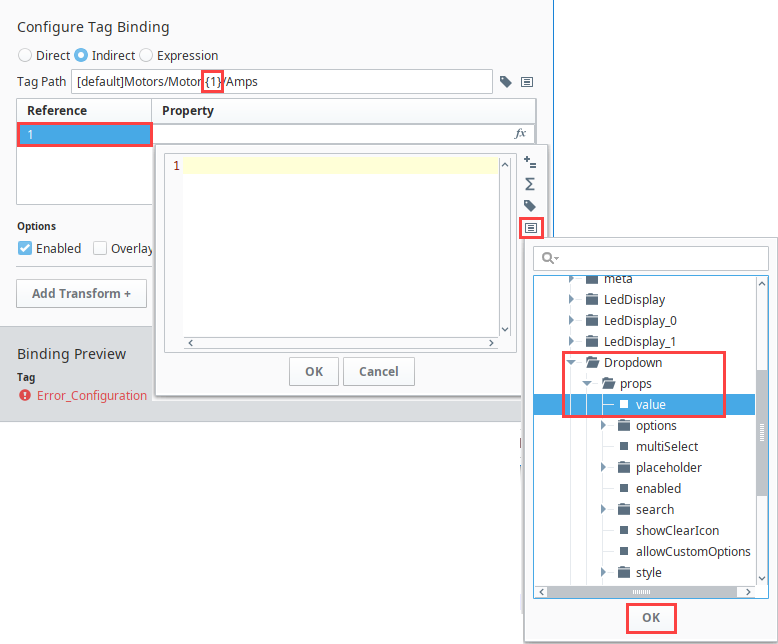
What we have done is configured the Dropdown component's value property to be inserted into our indirect tag path in place of
{1}. If we select "Motor 1" from the Dropdown component, its value property then becomes 1. The number 1 then takes the place of{1}in the indirect tag path making it[default]Motors/Motor 1/Amps. Similarly, selecting Motor 2 from the Dropdown component updates the value property to 2, so that the number 2 then takes the place of{1}in the indirect tag path making it[default]Motors/Motor 2/Amps. -
Click OK to save the binding.
-
Put the Designer into Preview mode
 to see the components and the indirect in action.
 -
Select a motor in the Dropdown component. The value in the LED Display component will change depending on the Motor that is selected in the Dropdown list.

Tag Expression Binding
The tag Expression binding uses the Expression language to specify an entire tag path. This mode allows the bound property (tag) to be bidirectional. The tag path in the Expression is expected to be a string. Note that is different and not to be confused with an Expression Binding.
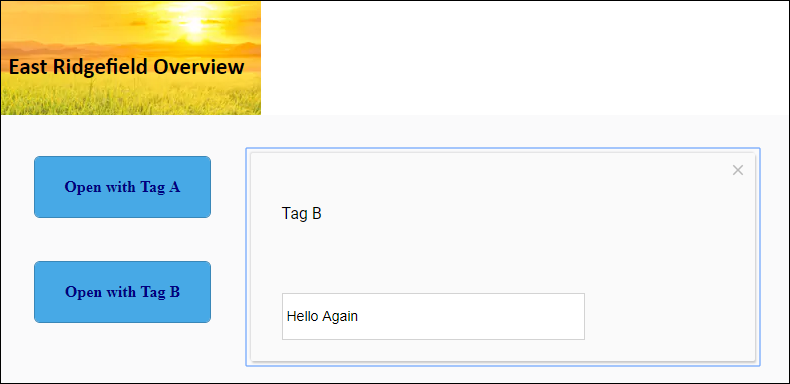
Tag Expression Binding - Example
For this example, we start with two tags: Tag A and Tag B and two buttons on a view.

-
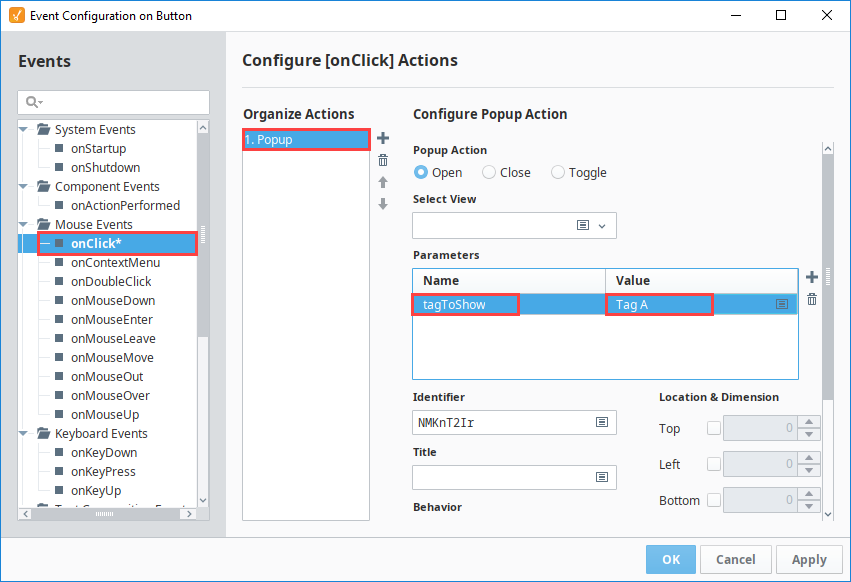
Right-click on the first button and select Configure Events.
-
Select onClick.
-
Under Organize Actions, click the Add
 icon and select Popup.
 -
Under Parameters, click the Add
icon to add a new parameter. -
Enter "tagToShow" in the Name field and "Tag A" in the Value field. Click OK.
-
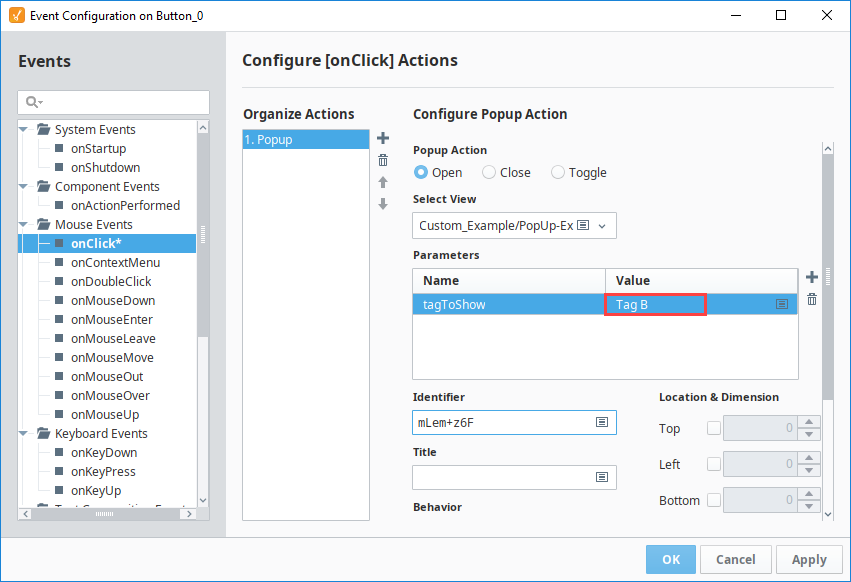
Repeat steps 1 through 4 for the second button, but in the Value field, enter Tag B. Click OK.
-
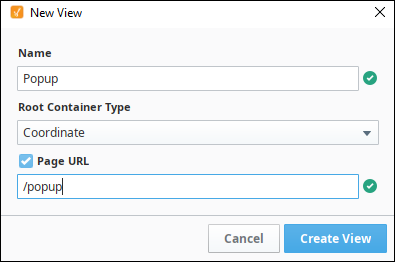
Create a new view named Popup.
-
Drag a Label component and a Text Field component onto the Popup view.
-
In the Popup view, click on Add View ParameterA.
-
Add a new parameter, tagToShow.

-
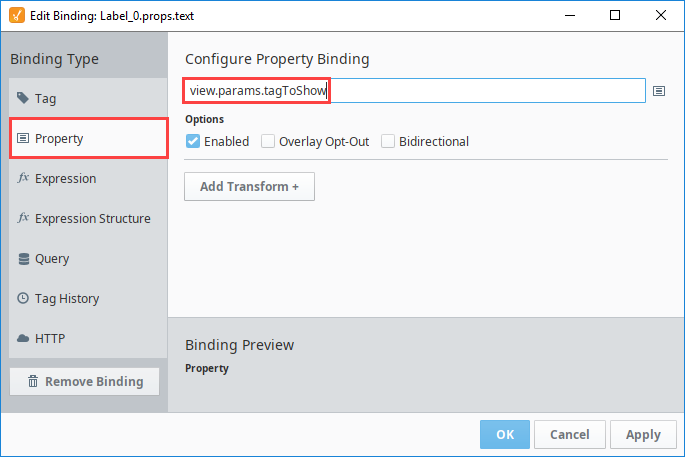
Select the Label component. Click on the Binding
icon next to the text property. -
On the Edit Binding screen, select the Property binding type. Enter view.params.tagToShow in the Configure Property Binding field.
-
Click OK.
-
Next set a binding on the Text Field component. Select the component then click on the Binding
icon next to the text property. -
On the Edit Binding screen, select the tag binding type and select the Expression button.
-
Enter the following expression. This expression in the example tells the Text Field to display the value of Tag A if the view parameter is equal to Tag A. Otherwise display the value of Tag B.
if(
    {view.params.tagToShow} = "Tag A",
    "Z_Other_Tags/Tag A",
    "Z_Other_Tags/Tag B")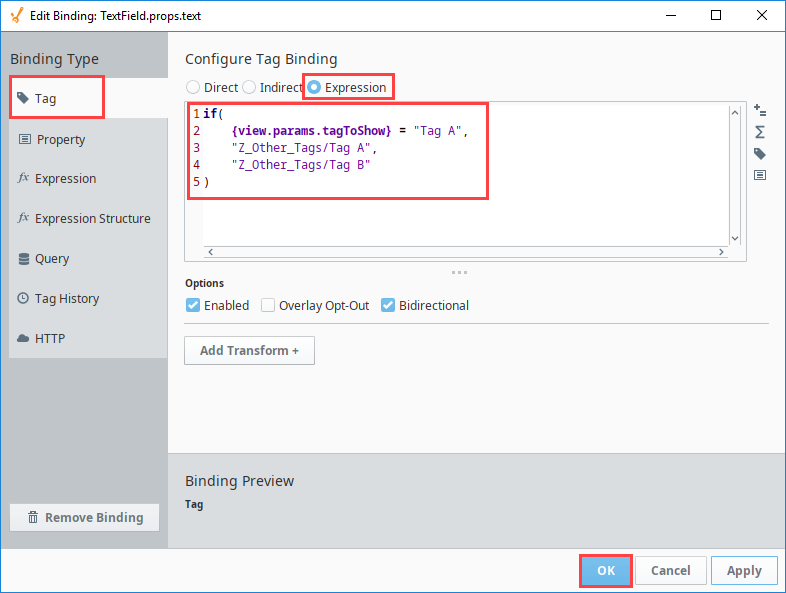
-
Click OK to save.
-
Put the Designer into Preview mode
. When you click on the Open with Tag B button, the popup appears to show the Tag B label.