Property Bindings in Perspective
Property bindings are important when designing projects in Perspective. Each Perspective component has a number of properties that change the way a component looks and behaves, but it's through property bindings that bring your Perspective sessions to life to accomplish useful things.
A property binding is the simplest type of binding. It's a way of linking one component property in a view to another component's property in the same view. Not only can you link one property in a view to another property in the same view, but you can also link a component to a property within a UDT, and pass a property into an embedded view through a view parameter.
This page describes how to set up property bindings for properties in the same view, bind to a property within a UDT, and how to use a view parameter to pass a property into an embedded view.
You cannot have a binding refer to a property in another view instance even view instances that may be embedded in a view. You can pass a property into an embedded view through a view parameter.
Property to Property Binding
A property binding simply binds one component's property to another. When that property changes, the new value is pushed into the property that the binding is set up on. In this example, we'll use a Tank, LED Display, and Slider components. We'll bind the 'value' properties of the Tank and LED Display to the 'value' property of the Slider in the same view so whenever the value of the Slider changes, the Tank and LED Display will reflect the same value.
-
In the Designer, create a view.
-
From the Component Palette, drag Cylindrical Tank, LED Display, and Slider components into your Designer workspace.
-
Select the Tank. In the Property Editor, click on the Binding
 icon for the 'value' property.
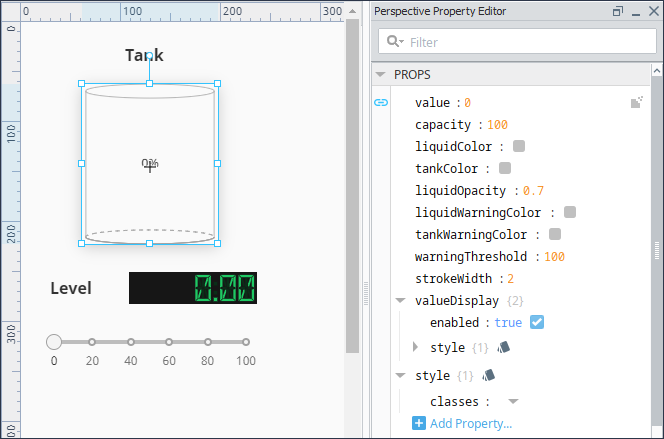
-
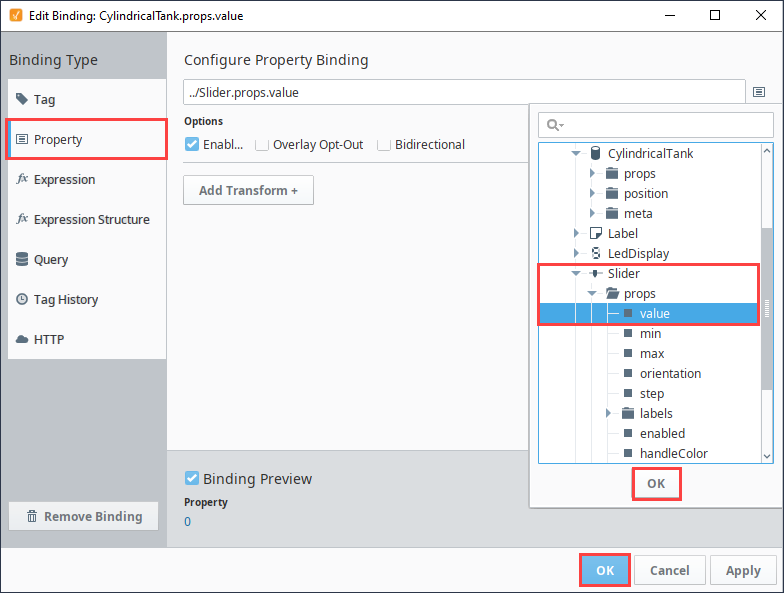
This opens the Edit Binding window. Configure the following settings:
- Select the Property binding type.
- Under Configure Property Binding, click the Insert Property
 icon to open the Property popup box. Expand the folders and select the Slider 'value' property. Click OK.
 - Click OK to save the binding settings.
-
Select the LED Display. In the Property Editor, click on the Binding
icon for the 'value' property and repeat Step 4. -
To see the labels on the Slider, select the Slider and set the show property to 'true'.
-
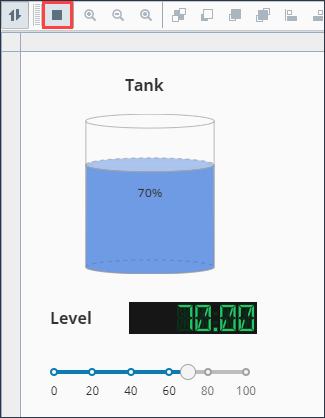
Save your project. Put the Designer in Preview Mode
 .
. -
Move the slider and you'll see both the tank level and LED display change to the value of the Slider.
Pass a Property into an Embedded View Using a View Parameter
The only way to a pass a property across views is by passing a view parameter into an embedded view. You have options on how to pass a property into an embedded view, how you decide to set up passing a parameter depends on how you design your project. You can set up passing a property to a embedded view using a parameter with strictly property bindings, or with a Tag binding. Tag bindings allow you to store values in a database in the event you want to collect history but will force all sessions to see the same value.
Use a Property Binding
In this example, we'll use a Tank view containing the Tank, LED Display, and Slider that shows passing the 'value' properties from the Tank and the LED Display to the 'value' property of the Slider. Now we will set the Slider to pass its value to a parameter on the embedded view. To demonstrate this, you can use the same Tank view from the Property to Property Binding section above, or you can create another view using the same components as in the example above, and assign the view a new name.
-
Using your original view from above, select the view in the Project Browser.
-
Create a view parameter under Params called 'sliderValue' and make it bidirectional by toggling the Arrow
 icon until the arrowhead is at both ends.
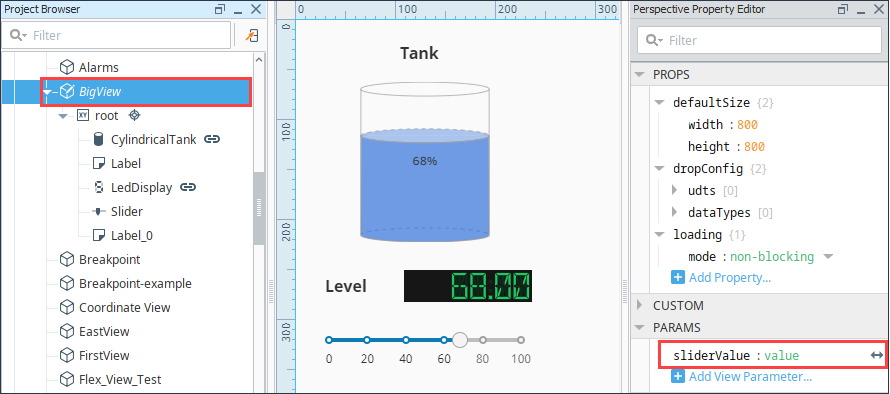
-
In the Project Browser, create a new view (i.e., Tank3Page) that will contain the embedded view.
-
Drag an Embedded View from the Component Palette to the Designer workspace.
- With the Embedded View selected, set the 'path' property to your original view (i.e., BigView) from the dropdown list.
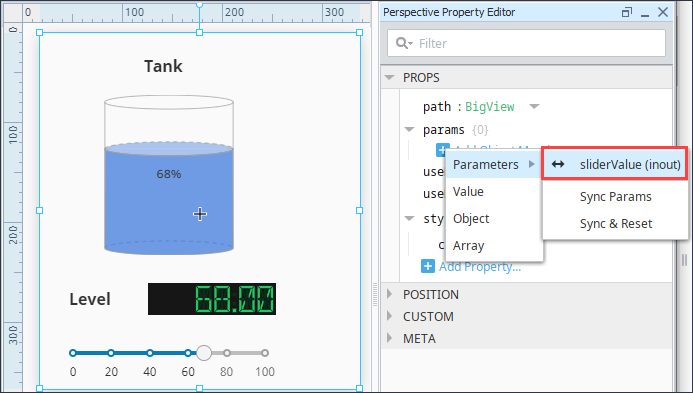
- In the Property Editor, click the Add Object Member
 icon under props.params.
 - In the Parameters list, select the sliderValue parameter.
-
Save your project.
-
From this new view, put the Designer in Preview Mode
. Drag the slider to a value to change the value on the Tank and LED Display. -
You can see from the Embedded View (i.e., Tank3Page), that your sliderValue reflects the same values as your slider.
Using a Tag Binding
Now, let's pass a property using a Tag binding. Using a Tag binding will allow you to maintain the value of the Slider when you relaunch a Client or Session and store values in a database in the event you want to collect history.
-
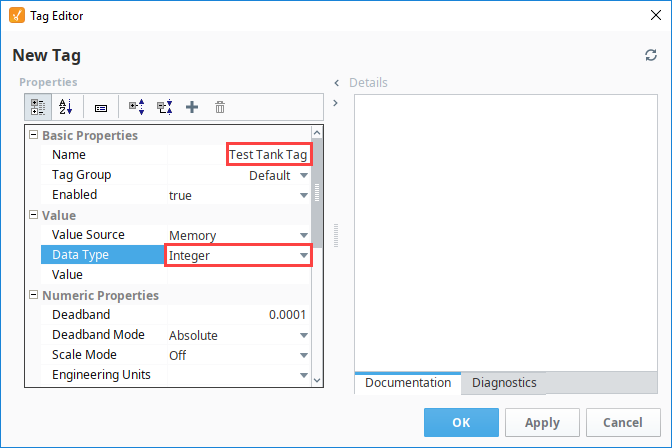
In the Tag Browser, create a Memory Tag with a data type of Integer, and assign a name (i.e.,Test Tank Tag).
-
Select the Embedded View. Click on the Binding
icon next to the 'sliderValue' and bind it to the memory Tag (i.e., Test Tank Tag).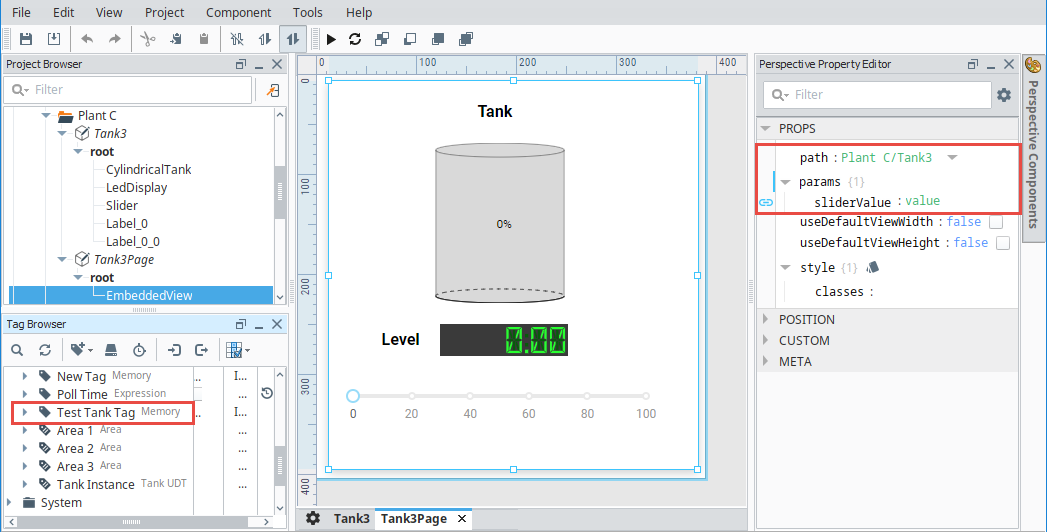
-
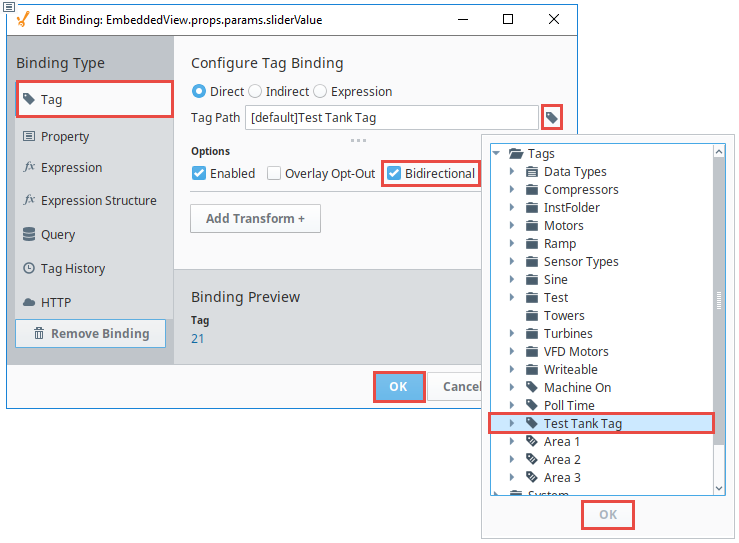
This opens the Edit Binding window. Configure the following settings:
- Select the Tag binding type.
- Under Configure Tag Binding, click the Tag
 icon to open the Property popup box. Expand the folders and select the 'Test Tank Tag'. Click OK.
 - Click the Bidirectional checkbox. allowing the Tag to be updated by the embedded view.
- Click OK to save the binding settings.
-
Now that all your bindings and Tag are configured, let's test out passing a parameter using a Tag. From the original view (Tanks), put the Designer in Preview Mode
and move the Slider to different values. Then, go to the embedded view and see if the value was passed. Your embedded view should reflect the same values as in your original view.