UDT Nesting
It's possible to set up UDT nesting in Ignition where you are putting one UDT inside of another UDT. The UDT is nested as an instance within another UDT. It facilitates quicker development of projects since you're able to piece together multiple UDT definitions as needed without having to build everything from the ground up as with each UDT definition. This is particularly useful because it promotes rapid development if you are expanding a plant or facility where all you have to do is make a few Tag changes to existing parameters and property settings.
For example, you may have a production line that is built out of several different machines. You don't need to re-create a motor for each line, instead you can create it once and use it in every line.
Inheritance (having simple and complex version of similar objects) is different from nesting UDTs, and can be found under UDT Inheritance.
Set Up UDT Nesting
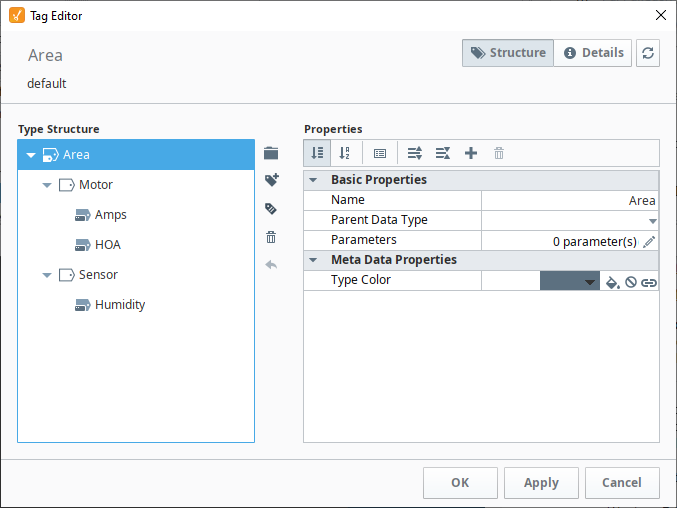
In this example, let's use our Motor and Sensor data types that were created and used in previous sections of this manual. We are going to create a third UDT called Area that will contain the Motor and Sensor data types inside of it.
- In the Tag Browser, right click on Data Types and select New Tag > New Data Type. The Tag Editor window will open. Assign the new data type a Name called Area.
- Inside of the Area data type, create two data type instances, one for Motor and the other for Sensor:
- Click on the New UDT Instance
 icon, select New UDT Instance > Motor/Motor1. Click OK.
 - Rename the new instance
Motor. Click Apply. - Click on the New UDT Instance icon, select New UDT Instance > Sensors/Sensor. Click OK.
- Rename the new instance
Sensor. Click Apply.

- Click on the New UDT Instance
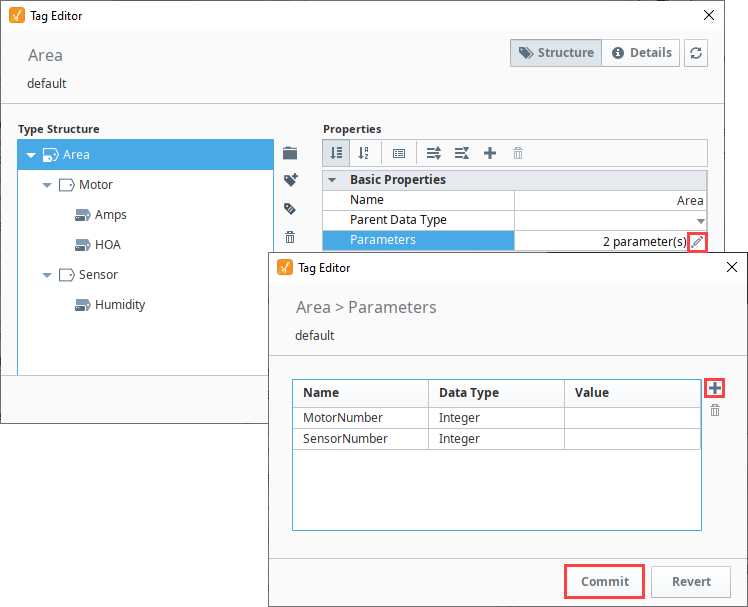
- With the Tag Editor still open, you'll notice that both the Motor and Sensor UDTs were added. For every UDT that you add inside another UDT, those UDT instances have parameters that need to be specified. In this example, the Motor UDT has the
MotorNumberparameter, and the Sensor UDT has theSensorNumberparameter. You must pass a value into the each of these UDTs (Motor and Sensor) from the parent UDT (Area). To view the parameters for each UDT instance, select each UDT instance (Motor and Sensor) and click the Edit icon.
icon.
- Now that you know what parameters are in each UDT instance, go to the Area UDT, and click the Edit icon next to the Parameters property. The Parameters window will open.
- Click on the Add
 icon to add the
 MotorNumberandSensorNumberparameters, then click Commit.
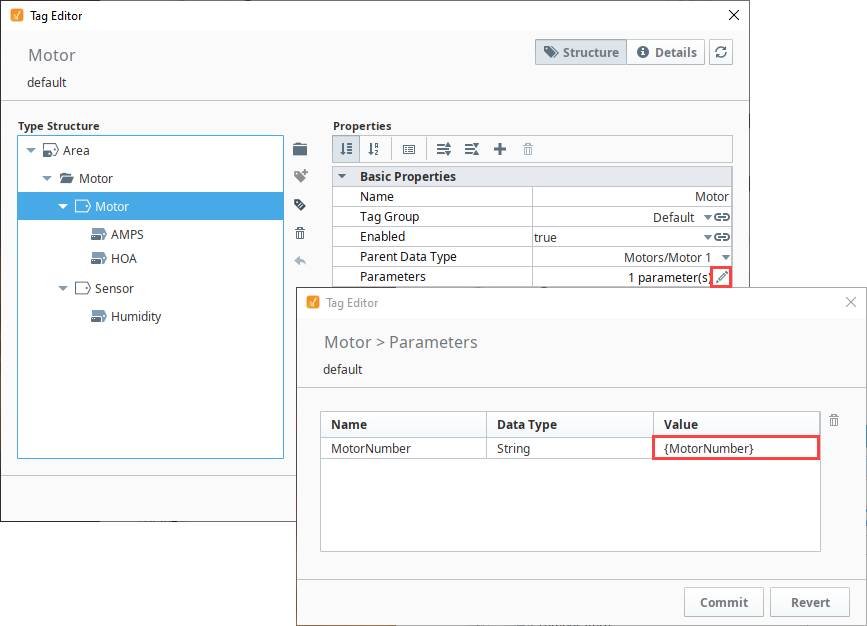
- Now we need to pass these values into the UDT instances by adding a reference. Select the Motor UDT, and click the Edit icon next to the Parameters property.
- Enter the reference for MotorNumber:
{MotorNumber}. Click Commit.If Multiple Data Types Use the Same ParameterIn the event data types use the same parameter, you only need to enter it once in the new data type (i.e., Area).
- Do the same steps to add a reference to the Sensor UDT. Select the Sensor UDT and click the Edit icon next to the Parameters property. Enter the reference for SensorNumber:
{SensorNumber}. Click Commit. - Click OK.