Alarm Associated Data
What is Alarm Associated Data
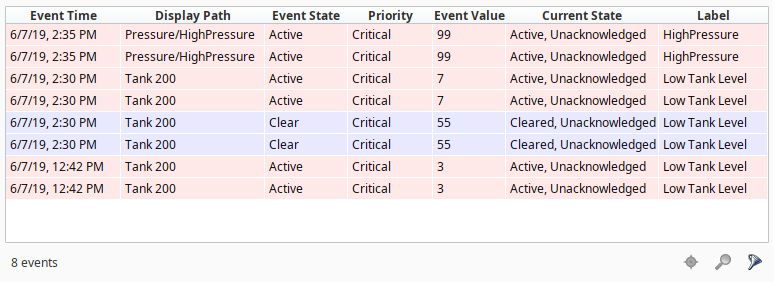
Every alarm in Ignition has alarm properties associated with it as it moves throughout the system, like active time, clear time, who acknowledged the alarm, time the alarm was acknowledged, priority, and display path. You can extend the list of alarm properties by adding your own associated data or custom properties to an alarm you already configured. Values can either be static or dynamic. Static properties are great for filtering alarms. Dynamic properties will often be bound to other Tags or an expression. Regardless of the whether a value is static or dynamic, these values will be attached to the alarm event as it moves through the system, and the values will be available from the Alarm Status system, the Alarm Journal system, and the Alarm Notification system.
Associated Data values are always saved as strings. You can typecast these values to any other data type using Expression bindings or through Scripting.
It's easy to go back to an existing alarm and add associated data.
Creating Associated Data for both Static and Dynamic Properties
For this example you can use an existing alarm you already configured or create a new alarm if you don't have one.
- Right-click on your Tag and select Edit Tag. This example uses a WriteableInteger OPC Tag, but any alarm-capable Tag will suffice.
- In the Tag Editor, scroll down to Alarms, and next to 'No alarms,' click on the Edit
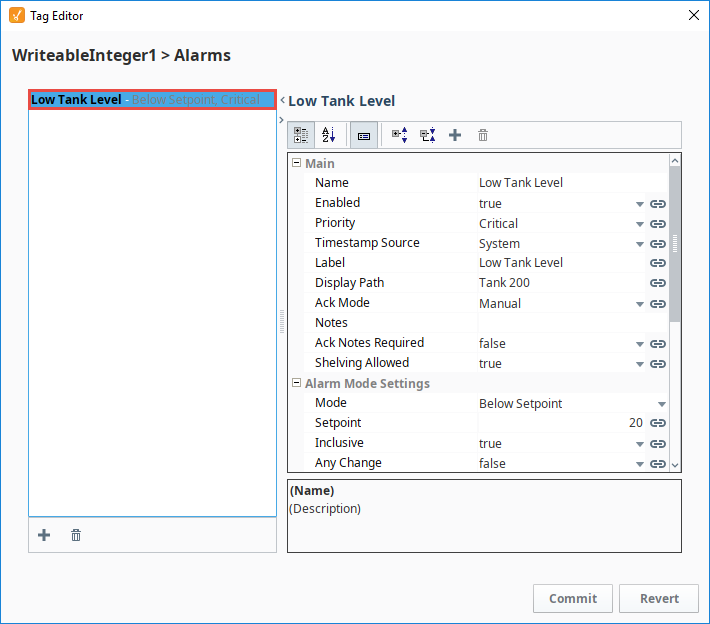
 icon and click on your alarm. The Tag below already has an alarm named ' Low Tank Level.' Select the alarm to open the Alarm UI.
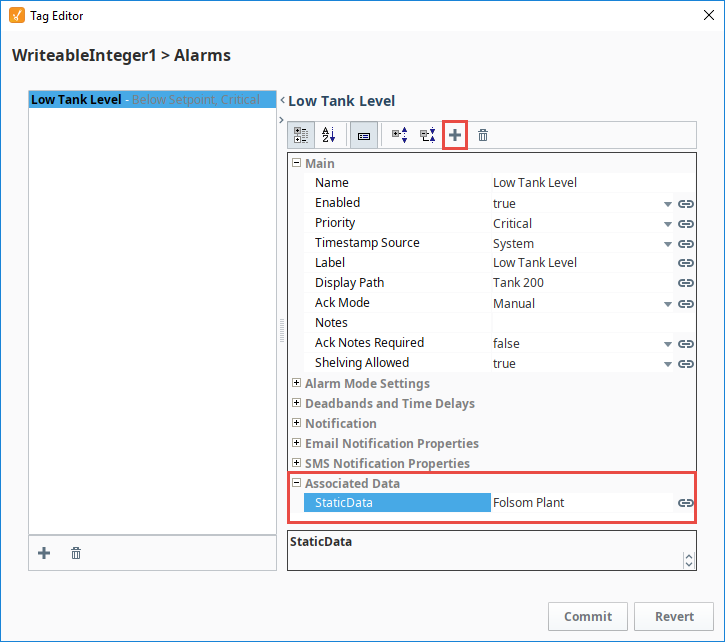
- Click the Add
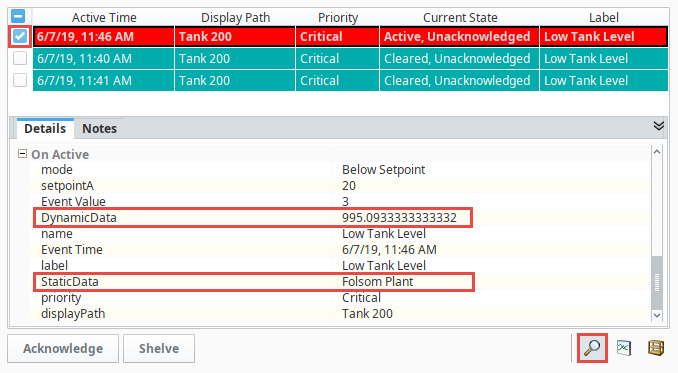
 icon above the alarm properties to add new associated data for the alarm. Scroll to the bottom of the property list, and you'll see a new associated data property was added. By default, the new property name is called 'New Data.' Double-click the property name to rename it to something more meaningful. In this example, make the associated data property a static value. We renamed ours to 'StaticData' with a value of 'Folsom Plant' and press enter to submit.
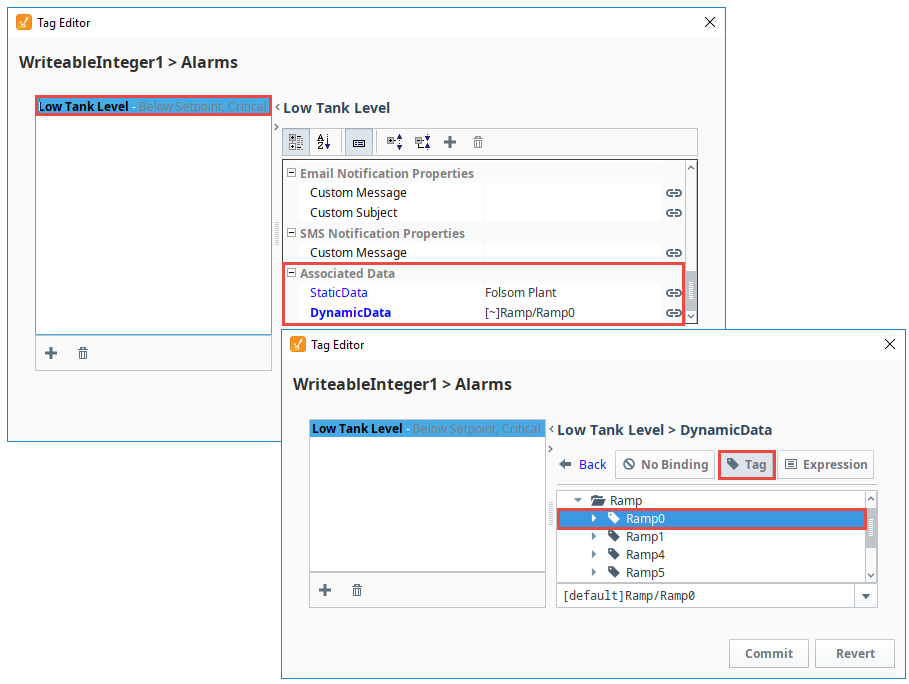
- Now, let's create another Associated Data property with a dynamic value. Click the Add icon above the alarm properties.
- Scroll down to the bottom of the property list and rename your 'New Data' property to 'DynamicData' and bind it to a Tag using the binding
 icon on the right side of the window. This example uses a Ramp0 OPC Tag.
 - Click the 'Commit' to submit the Tag selection, and then click OK to save your Tag edits.
- When the alarm goes active, Ignition stores the values of the associated data with the alarm. You can view the details of the alarm in the Alarm Status Component along with the new associated data properties. To view the Details of the alarm, check the box of the alarm you want to see, and click on the magnifying glass at the bottom of the window to open the Details window.
Alarm Grouping
Grouping alarms in Ignition is an important concept. Instead of seeing every alarm in a single view, often times, you may want to view alarms for a particular area of your plant, or for a specific set of alarms.
There are a several ways to group alarms. One way is to use a folder structure which requires you to organize your Tags into a hierarchy. Another way is to use the Display Path field in the alarm configuration. The third way, and the most recommended way, is to use associated data. It's a common design practice to associate alarm groupings on the associated data of the alarm.
Creating an Alarm Grouping
This example uses the WriteableInteger Tag that we used in the example above.
- Use an existing alarm that you already configured. If you don't have one, create a new alarm.
- Right-click on your Tag and select Edit Tags. In the Tag Editor, scroll down to Alarms, and next to 'No alarms,' click on the Edit icon and click on your alarm. Click the Add icon above the alarm properties to add new associated data for the alarm.
- Scroll to the bottom of the property list, and you'll see a new associated data property was added. In this example, make the associated data property a static value, and rename 'New Data' to 'Group' with a value that represents your Group (i.e., Production).

- Click Commit to save your alarm edits, and then press OK. The alarm will now always have the 'Group' designation associated with it. This can be used for filtering or part of your alarm pipeline notifications.
- Before you can use the Alarm Journal to filter on your new associated data property, edit the 'filterAlarm' Extension Function to include your new associated data property by selecting the Alarm Journal component, and right clicking on Scripting. Under the Extension Functions folder, click on filterAlarm, then click on the Enabled checkbox to enable the script. Edit the script to add your new associated property and property value. You can copy the new code below to add to your filterAlarm script.
filterAlarm scripting function
group = alarmEvent.get("Group")
if group == "Production":
    return True
return False
- Open the Alarm Journal component and filter on your associated data. The Alarm Journal Table shown below displays all the alarms that are associated with the group, Production.