Alarm Journal
By default, current alarm data is only stored in memory, and a finite number of events are retained for each alarm. Ignition can be configured to store alarm data into a SQL database with an Alarm Journal Profile. The journal can store basic data about alarms that have occurred, such as their source and timestamp, associated data on the alarm, and the values of the alarm's properties at the time the event occurred. The Alarm Journal is used by the Alarm Journal Table component, and can be accessed through scripting functions and direct database queries.
The Gateway can have more than one Alarm Journal. Alarm Journals have options to filter which Alarms are stored in the journal. Therefore, by having more than one Alarm Journal configured on the Gateway, it is possible to store some alarms in one journal and different alarms in another journal.
Each journal stores alarms based on the filters you set up and can prune data automatically after a set time limit. Alarm Journals can store data in one of three ways, and store data indefinitely unless a Data Pruning value is set:
- In a database, using an existing database connection from the Gateway
- Remotely, using another Ignition Gateway's Alarm Journal Profile
- Internally, storing alarm information into the Ignition install directory
It is strongly encouraged to set a Data Pruning value for Internal Alarm Journal Profiles. Otherwise, it could cause your computer to run out of hard drive space.
You must have an Alarm Journal Profile created and have a valid database connection to use the Alarm Journal Table.
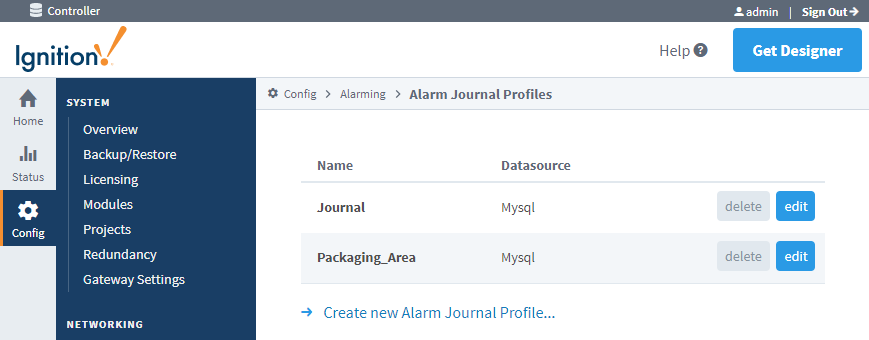
Create an Alarm Journal to Log Events to an External Database
-
Go to the Config section of the Gateway webpage.
-
Choose Alarming > Journal from the menu on the left.
-
Look for the blue arrow and click on Create new Alarm Journal Profile.... The Alarm Journal Profiles screen will be displayed.
-
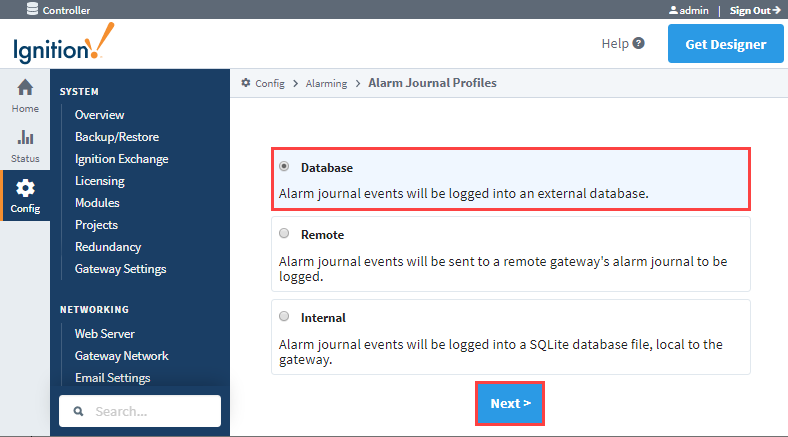
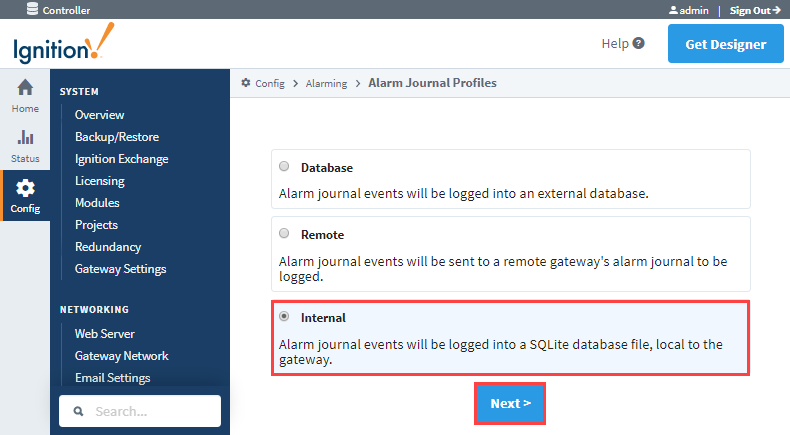
You have the option of logging Alarm Journal events to an external database, logging locally, or sending them to a remote Gateway's Alarm Journal. In this example, select Database, and click Next.
-
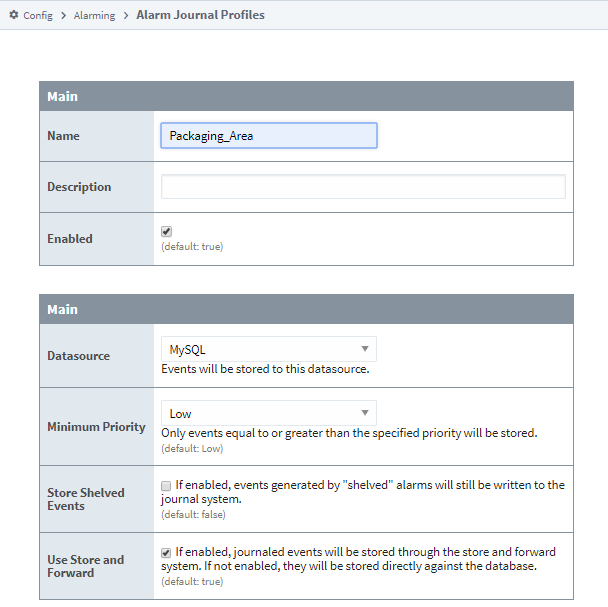
Enter the Name of your Alarm Journal profile. The default name is Journal. Most of the fields have default settings. Refer to the journal properties table below for setting descriptions, and update as necessary.
-
Once you are finished, click the Create New Alarm Journal Profile button at the bottom of the page. Afterwards, the tables will be created for you once an alarm event occurs.
If you only have one alarm journal specified on your Gateway, then you do not need to specify the journal name on the Journal Name property. Ignition will set this for you. If you have more than one alarm journal created, then you need to provide the name of the journal you'd like to query in the Journal Name component property of the Property Editor.
Create a Remote Alarm Journal Profile
Utilizing the Gateway Network, Remote Alarm Journal Profiles allow one Ignition Gateway to send local alarm events to a remote Gateway for journal logging. This type of profile is useful in cases where alarm events need to be recorded by multiple Alarm Journal Profiles. In addition, this type of profile is useful in Hub and Spoke architectures as it allows the hub to record the alarm events from each spoke.
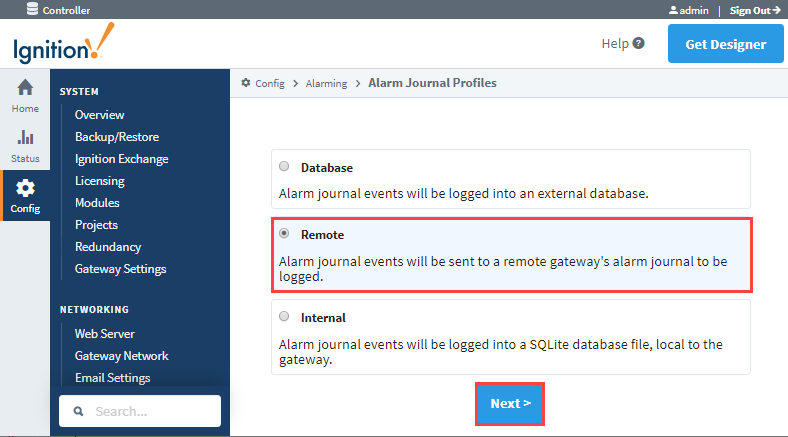
Just like configuring Alarm Journal events to be logged into a database, it is done from the Gateway Webpage, Config > Alarming > Journal.
-
To automatically send your Alarm Journal events to a remote Gateway's Alarm Journal, select Remote, and click Next.
-
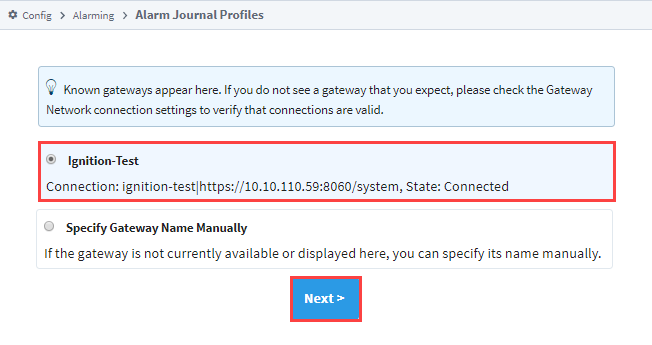
A list of known Gateways will be displayed. If you don't see a Gateway that you expected to see, check your Gateway Network settings to verify that the connections are valid. You also have the option to specify a Gateway manually. This example selects a valid Gateway. Click Next.
-
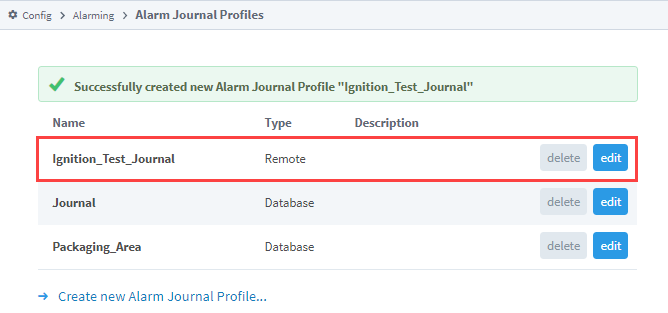
If an Alarm Journal exists on the remote Gateway, the fields will automatically populate. The name of the Gateway and the Alarm Journal Profile name will appear in the Name field prefaced with the Alarm Journal Profile name,(i.e., Ignition_Test_Journal), as shown in the following example. Click Create New Alarm Journal Profile.
-
You will receive a successful message stating your new Alarm Journal Profile was created.
Remote Gateway Alarm Journal Properties Table
Main
| Name | Description |
|---|---|
| Name | The default name, is the name of the Remote Gateway and Alarm Journal. |
| Enabled | Whether the journal profile is enabled. Defaults to true. |
| Description | Description of the journal profile. Optional |
| Query Only | New in 8.1.5 If set to true, allows the Alarm Journal to opt out of being used for storage. When set to true, all alarm events will be discarded by the given journal. |
Remote Gateway
| Name | Description |
|---|---|
| Gateway Name | Name of the Remote Gateway. |
| Alarm Journal | Name of the Alarm Journal on the Remote Gateway. |
Advanced
| Name | Description |
|---|---|
| Use Store and Forward | New in 8.1.23 If enabled, Alarm Journal events will be stored through the Store and Forward system. If not enabled, they will be stored directly against the remote Gateway. Default is true. |
Create an Internal Alarm Journal to Log Events Locally
Ignition Gateways can now create an Internal Alarm Journal Profile that stores Journal entries locally. Go to the Gateway Webpage, Config > Alarming > Journal to create the Internal Alarm Journal Profile.
-
Click Create new Alarm Journal Profile....
-
Select Internal to have your Alarm Journal events logged locally.
-
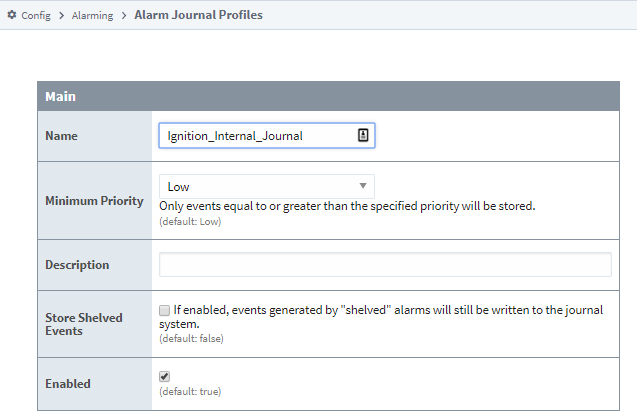
Enter the name of your Alarm Journal Profile and update any settings as required, then click Next.
-
You will receive a successful message stating your new Alarm Journal Profile was created.
Alarm Journal Component
The Vision and Perspective modules feature built-in components that can automatically retrieve events recorded in an Alarm Journal. See Vision - Alarm Journal Table and Perspective - Alarm Journal Table for more information.
Alarm Journal Profile Properties
The following properties are available to both Database and Internal type Alarm Journal Profiles, unless otherwise noted. Since Remote Alarm Journal Profiles simply configure the alarm events to be logged to an existing profile, they have separate settings.
Main
| Name | Category | Description |
|---|---|---|
| Name | Main | The default name is Journal. |
| Datasource | Main | Events are stored to this datasource. (Only available on Database type profiles) |
| Enabled | Main | Whether the journal profile is enabled. Defaults to true. |
| Description | Main | Description of the journal profile. |
| Query Only | Main | When enabled, the Alarm Journal will not store alarm events. |
| Use Store and Forward | Main | Enabled by default, which means the Alarm Journal events will be stored through the Store and Forward system. If not enabled, they will be stored directly against the database. This system protects data from being lost due to temporary database connectivity issues. (Only available on Database type profiles) |
Events
| Name | Category | Description |
|---|---|---|
| Minimum Priority | Events | Only events equal to or greater than the specified priority will be stored. The default is Low. You can set the priority to be: Diagnostic, Low, Medium, High, and Critical. |
| Store Shelved Events | Events | Not enabled by default. If enabled, events generated by shelved alarms will still be written to the journal system. |
| Store Enabled & Disabled Events | Events | New in 8.1.8 When enabled, events generated by enabling or disabling alarms will be stored in the journal. This includes cases where the Enabled property on an alarm is toggled, as well as cases where a tag's Alarm Eval Enabled property is changed. This property additionally relies on setting the Perspective/Vision Alarm Journal Table properties for the enabled and disabled events. |
Event Data
| Name | Category | Description |
|---|---|---|
| Static Config | Event Data | By default, it is not selected. If selected, will store the values of static alarm configuration. That is, the alarm properties that are not bound. These do not change during evaluation, only when a user modifies them in the Designer, and so they are not stored by default. |
| Dynamic Config | Event Data | If selected, will store the values of dynamically bound alarm configuration properties. The value of these properties can change at any time, and the values at the time of the alarm are captured on the alarm event. |
| Static Associated Data | Event Data | If selected, will store the values of non-bound associated data (properties created by the user) properties on alarm that do not change during execution. |
| Dynamic Associated Data | Event Data | If selected, will store the values of dynamically bound associated data (properties created by the user) properties. |
Data Filters
The three data filter properties (Filter by Alarm Source, Filter by Display Path, and Filter by Display Path or Source) interact via logical AND, meaning an alarm must meet the criteria for all given values for it to be logged in the Journal. It is recommended to avoid using all three properties simultaneously on the same Journal.
For example, if a journal has values for all three properties, and an alarm only meets the requirements for Filter by Alarm Source and Filter by Display Path or Source, but not Filter by Display Path, then the alarm will not be logged to the Journal.
| Name | Category | Description |
|---|---|---|
| Filter by Alarm Source | Data Filters | Only events matching the source will be stored. Multiple sources to match can be comma separated. Leave blank to store events from all sources. |
| Filter by Display Path | Data Filters | Only events matching the display path will be stored. Multiple display paths to match can be comma separated. Leave blank to store events from all display paths. |
| Filter by Display Path or Source | Data Filters | Only events matching the display path, if defined, will be stored. Multiple matches can be comma separated. If no display path is defined, only events matching the source will be stored. Leave blank to store all events. |
Refer to the Filtering Alarms section on the Alarming page for more information on Display Path and Source syntax.
Data Pruning
| Name | Category | Description |
|---|---|---|
| Enable Data Pruning | Data Pruning | If selected, the system will automatically delete data after the specified time period as set by the Prune Age and Units below. Default is false. Note: Since the data is stored directly in a database, an administrator is free to manually delete data at any time. |
| Prune Age | Data Pruning | The number of Prune Age Units to store data for. i.e., 1 year, 5 hours, etc. The default is 1. |
| Prune Age Units | Data Pruning | The type of Prune Age Unit. Default is Years. You can choose the unit to be Milliseconds, Seconds, Minutes, Hours, Days, Weeks, Months, or Years. |
Advanced Properties
These settings apply to Database Alarm Journal Profiles only and allow you to specify your own table names. This is especially useful when trying to use multiple alarm profiles within a single database.
| Name | Description |
|---|---|
| Table Name | The table name for the core event table. The default is alarm_events. |
| Event Data Table Name | The table name for event data associated with alarms. The default is alarm_event_data. |
Database Table Definitions
The Alarm Journal system will automatically create the necessary tables for you, and scripting functions can be used to query the system without having to know about the table structure. However, understanding the structure of the Alarm Journal tables can be useful for accessing the data in situations where SQL queries are more convenient.
Alarm Events (alarm_events)
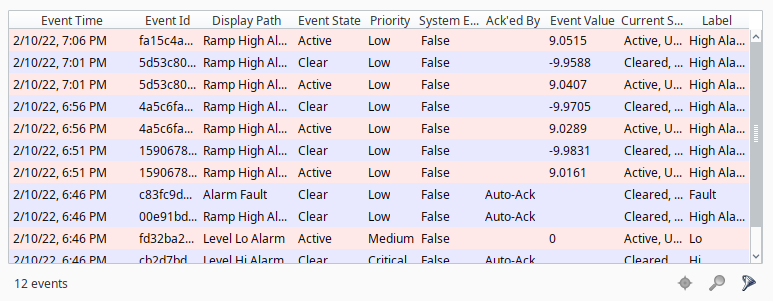
This table stores the core data for each event that occurs. An event is a transition for an alarm between active, cleared, or acknowledged. Additionally, other events may be stored in this table that aren't directly related to an alarm, such as a system shutdown event. This table defines a primary key id, that is used as a foreign key by the Alarm Event Data table, which stores additional information for each event.
You can filter which alarms are logged to the Alarm Journal and Alarm Events table. See the Data Filters section for more information.
| Column Name | Data Type | Description |
|---|---|---|
| id | integer | A unique integer id for each event entry event |
| eventid | string | The UUID of the alarm event that this individual event is related to. Each alarm event (one particular active/clear/ack cycle of a defined alarm) receives a unique id in order to distinguish it from other events from the same source. |
| source | string | The qualified path of the entity that generated the alarm event. See below for more information about qualified paths. |
| display path | string | The value set for the Display Path of the alarm. Generally a user defined, friendlier version of the source. |
| priority | integer | The priority or severity of the alarm:
|
| eventtype | integer | The type of transition represented by this event:
New in 8.1.8 The following values were added in 8.1.8:
|
| eventflags | integer | A numeric bitmask flag field providing additional information about the event. See the example below for how to adjust the eventflags value into a more readable format.
New in 8.1.8 The following bit was added in version 8.1.8:
|
| eventtime | datetime | The time of the event. |
Example - eventflags Property
The following example helps format the eventflags property's value into a more readable format. The script uses a Named Query to get the most recent alarm's eventflags value and prints the result as a list of strings, corresponding to their bit value. This example assumes you have at least one Alarm Journal alarm event.
SELECT alarm_events.eventflags
FROM alarm_events
ORDER BY eventtime desc
LIMIT 1
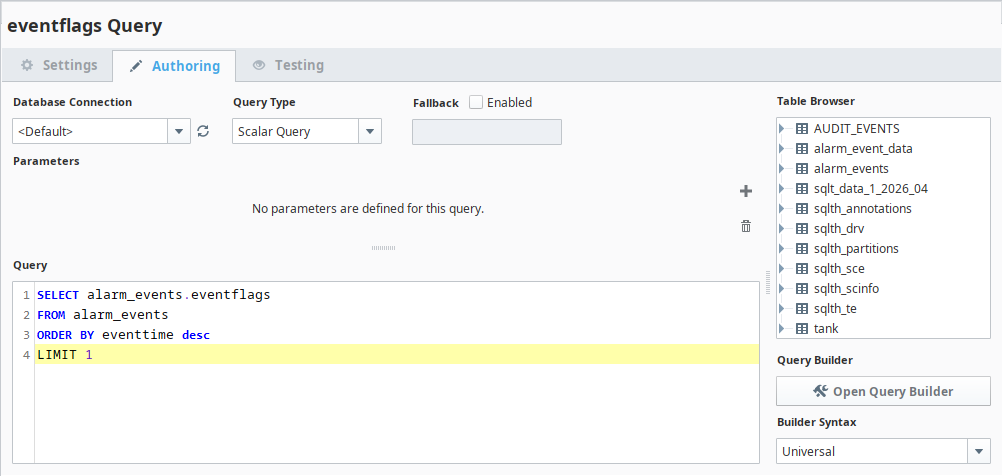
Notice that we are using a Scalar Query for the Query Type, since errors for the script below may be thrown if the wrong Type is selected.
# Import the OrderedDict data type from the collections module
from collections import OrderedDict

# Declare a variable for Named Query result
event_flags = system.db.runNamedQuery("eventFlagIntValue")

def convert_event_flags(eventflags):
    """
    Converts an integer representing event flags to a binary string and interprets each bit.

    The function formats the `eventflags` integer into a 6-bit binary string. Bits are then assessed
    from least significant to most significant (right to left) to determine the status of various flags.

    Parameters:
    - eventflags (int): The integer value of the event flags.

    Returns:
    - OrderedDict: A dictionary that includes the original integer value, the binary representation,
      and boolean status for each event type based on the corresponding bits in the binary string.
    """

    eventflags_bin = format(eventflags, '06b')
    return OrderedDict([
        ("int_value", eventflags),
        ("binary_value", eventflags_bin),
        ("System Event", bool(int(eventflags_bin[5]))),
        ("Shelved Event", bool(int(eventflags_bin[4]))),
        ("System Acknowledgement", bool(int(eventflags_bin[3]))),
        ("Acknowledged Event", bool(int(eventflags_bin[2]))),
        ("Cleared Event", bool(int(eventflags_bin[1]))),
        ("Enabled", bool(int(eventflags_bin[0])))
    ])

# Print the result
print convert_event_flags(event_flags)
Alarm Event Data (alarm_event_data)
This table stores the properties associated with an alarm event. The individual event is referenced through the ID column, against the alarm event table.
| Column Name | Data Type | Description |
|---|---|---|
| id | integer | The id that corresponds to the alarm event in the alarm_events table. |
| propname | string | The name of the property. May be one of the common alarm properties (a configuration setting), or the name of an associated data property. |
| dtype | integer | The data type of the property, indicating which data column should be used:
|
| intvalue | integer | The corresponding value columns for the property. Unused columns will receive null values. |
| floatvalue | float (double) | The corresponding value columns for the property. Unused columns will receive null values. |
| strvalue | string | The corresponding value columns for the property. Unused columns will receive null values. |
Qualified Paths
A qualified path in Ignition is a path to an object, described by various annotated components. Each component has a type identifier and a value, separated by a colon (:), and each component is separated by colon-forward slash (:/). For example, an alarm is identified by alm:Alarm Name. It usually exists under a tag, in which case, its fuller path would be tag:Path/To/Tag:/alm:Alarm Name. Paths can be built up further depending on the level of specificity required by the situation.