Alarming Schedules
The Alarm Notification system uses schedules to determine which users should be notified about an active alarm by looking at the users defined in the notification block. This means that notification messages are sent only to active users based on the defined schedules.
You can set a schedule for each user in the Alarm Notification system and utilize On-Call Rosters to create user groups. For example, suppose you have alarms that should be sent to all supervisors. You can put all of the supervisors in one On-Call Roster and the scheduling system will automatically notify only those supervisors who are on shift (based on their individually set schedules) when the alarm goes active.
You can also utilize Alarm Notification Profiles to determine how to send alarms to users, such as over email, SMS, voice, or Twilio. See the Notification Profile Types page for more information.
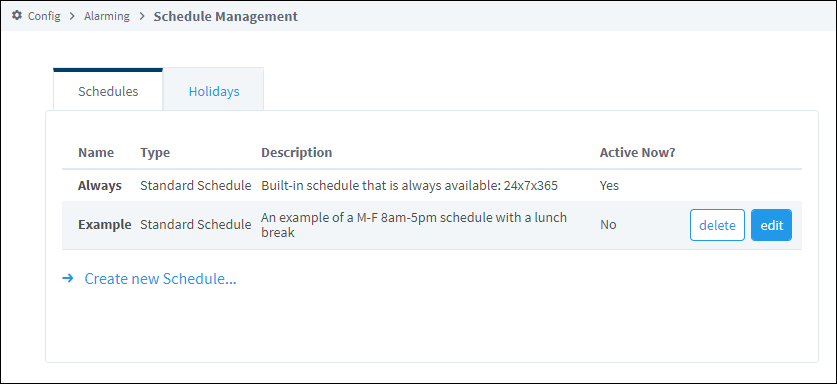
From the Schedule Management > Schedules tab, you can see the names of all configured schedules, their available descriptions, the type of schedules, and if they are currently active under the Active Now column. An alarm will be listed as Inactive when the current day and time don't match the schedule settings, or if Observe Holidays is enabled on a configured holiday. Holidays can be configured on the Schedule Management > Holidays tab or by using the system.user holiday functions.
Within the Schedules tab, you will see an Always and Example schedule.
- Always: A built-in schedule that is active 24/7.
- Example: A pre-existing example schedule consisting of Monday to Friday, 8am to 5pm, with a lunch break.
Define a New Schedule
-
Go to the Config tab of the Gateway and scroll down to Alarming > Schedules.

-
The Schedule Management page is displayed. Click on Create new Schedule.
-
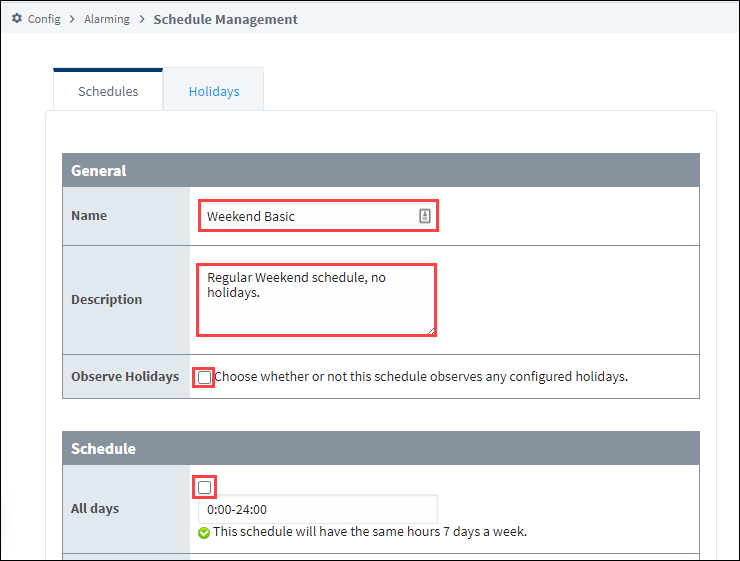
For our example, we'll set up a new Standard schedule. Enter a schedule name, description, and set the hours:
- Name: Weekend Basic
- Description: Regular Weekend schedule, no holidays
- Observe Holidays: No (Unselect this option)
- All days: No (Unselect this option)
- Weekdays: No (Unselect this option)
- Saturday: Yes (Select this option)
- Sunday: Yes (Select this option)
-
Click Add Schedule.
If you want to ensure users are unable to log in when their assigned schedule is not active, you can select the Schedule Restricted option for the user's corresponding User Source. The user will then be denied any login access for attempts made outside active hours.
Standard Schedule Properties
A schedule defined by hours of operation on each day, with repeating options.
General
| Name | Description |
|---|---|
| Name | The name of the alarm schedule. |
| Description | The description of the alarm schedule. |
| Observe Holidays | When enabled, this schedule will be inactive on any configured holidays. By default, this setting is enabled. |
Schedule
At least one schedule option is required to be configured to create the alarm schedule. By default, all selections will be set to 24 hours a day.
A schedule is active based on the Gateway's system time, not a user's local time.
| Name | Description |
|---|---|
| All Days | This schedule will have the same hours seven days a week. This option is selected by default. No other options can be selected when this option is selected. |
| Weekdays | This schedule will have the same hours Monday-Friday, but will have no hours on the weekends. No other options can be selected when this option is selected, except for All Days, which will override this option. |
| Monday | Determines the Active hours of the alarm for every Monday. This option can be configured with any of the other individual day selections. |
| Tuesday | Determines the Active hours of the alarm for every Tuesday. This option can be configured with any of the other individual day selections. |
| Wednesday | Determines the Active hours of the alarm for every Wednesday. This option can be configured with any of the other individual day selections. |
| Thursday | Determines the Active hours of the alarm for every Thursday. This option can be configured with any of the other individual day selections. |
| Friday | Determines the Active hours of the alarm for every Friday. This option can be configured with any of the other individual day selections. |
| Saturday | Determines the Active hours of the alarm for every Saturday. This option can be configured with any of the other individual day selections. |
| Sunday | Determines the Active hours of the alarm for every Sunday. This option can be configured with any of the other individual day selections. |
Repeating
| Name | Description |
|---|---|
| Repeat/Alternate | Repeats an alternating schedule, determined by the Daily or Weekly settings below. Default is Off. If you set to anything other than Off, and you do not specify a starting day, the schedule will never be active. |
| # Days/Week On | Sets the number of days or weeks on. Default is 1. |
| # Days/Week Off | Sets the number of days or weeks off. Default is 1. |
| Starting At | Pick a date that defines the starting day or week for the repetition. For example, suppose you had a one week on, one week off schedule, and you picked a Monday of some week. The schedule would be active for that week, and would inactive on the following Monday. This pattern will then repeat indefinitely. |
Composite Schedule Properties
A schedule defined by the composite of two other schedules. This type of schedule will be active whenever either of the two assigned schedules are active.
| Name | Description |
|---|---|
| Name | The name of the alarm schedule. |
| Description | The description of the alarm schedule. |
| Schedule One | The first schedule configurations to apply to this schedule. |
| Schedule Two | The second schedule configurations to apply to this schedule. |
Configure Holidays
Holidays associated with a schedule's Observe Holidays setting can be created, edited, and deleted on the Holidays tab of the Schedule Management page. To create a holiday, select Create new Holiday and enter the relevant Name, Date, and Repeat Annually values. Holidays can be edited or deleted at any time using the Edit and Delete buttons.
Holiday Properties
| Name | Description |
|---|---|
| Name | The name of the holiday. |
| Date | The date of the holiday. Accepted format is YYYY-MM-DD. A Calendar icon is available to make entering a date easier. |
| Repeat Annually | Repeats this holiday on the same day each year when checked. By default, this setting is checked. |
Manage User Schedules from the Vision Client
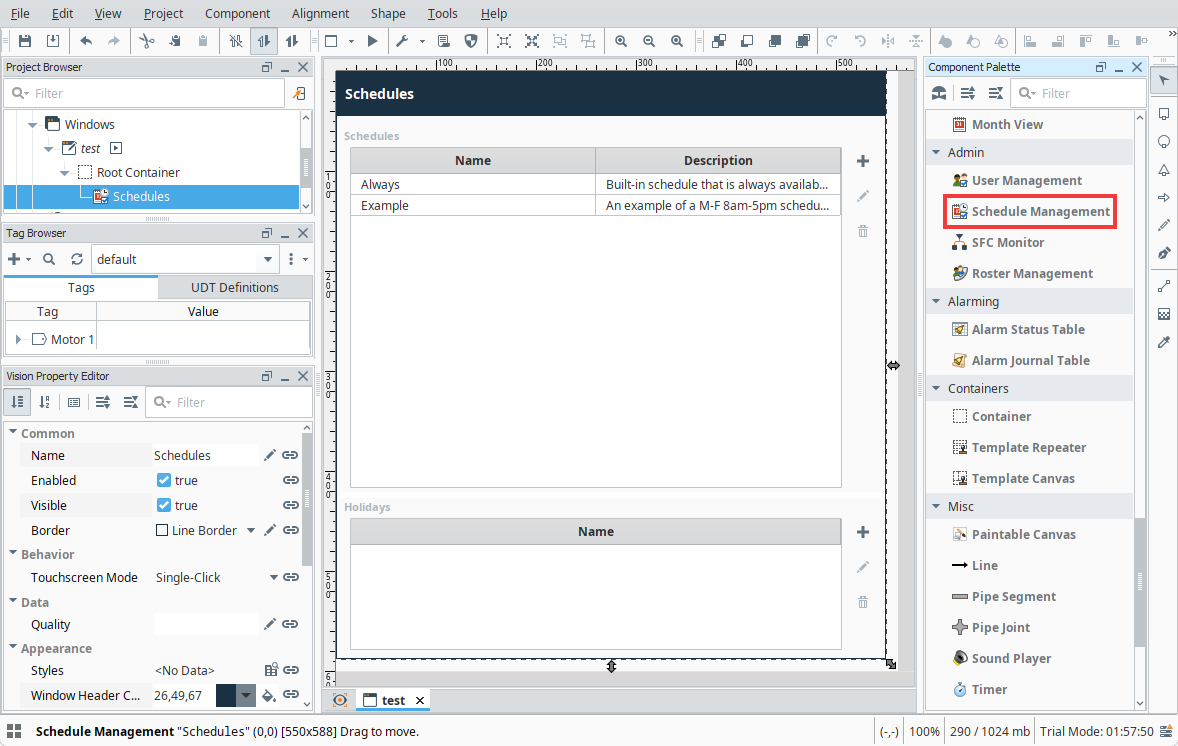
There are a few ways to manage user schedules from the Vision Client. The first is to use the Schedule Management component on a window. This component allows you to quickly and easily manage the schedules from the Vision Client.
For more granular control, you may instead want to use scripting to manage the schedules. This may offer a more granular control at the click of a button. There are a number of system functions that allow you to create, read, edit, and delete schedules or holidays from a user source using scripting (i.e., system.user.addSchedule, system.user.getHoliday, etc.). To learn what system functions are available for user scheduling and holiday scripting, refer to the system.user in the Appendix.
# This code creates a new schedule by using an old schedule but setting observe holidays to true.
mySchedule = system.user.getSchedule("WeeklySchedule")
if mySchedule != None and mySchedule.getType() == "basic schedule":
    mySchedule.setObserveHolidays(True)
    mySchedule.setName("NewWeeklySchedule")
    system.user.addSchedule(mySchedule)