Managing Users and Roles
Users and Roles
Security is based on the roles that are assigned to specific users. Roles do not have any structure or hierarchy by default, but it can be created. You can create a hierarchy based on users with a greater role being assigned all matching lesser roles.
There isn't a built-in restriction to the number of roles a user can have, so each user can be assigned many roles or none at all.
It's important to think about the different roles in your project and how they affect the security of your project. For instance, what level of access a particular area of a project needs may determine the functional type roles that you create, and the different users assigned to each role.
When using role-based security in a project, the project stores the name of the role as a string. This means that if you were to modify the name of the role in the Gateway, the role-based security in your project will not update to reflect the new name, and instead will try searching for a role with the original name. Be very careful when modifying the names of roles.
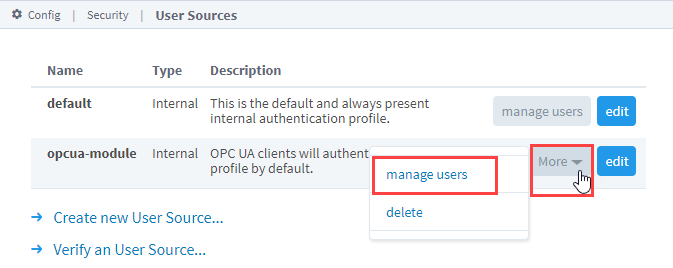
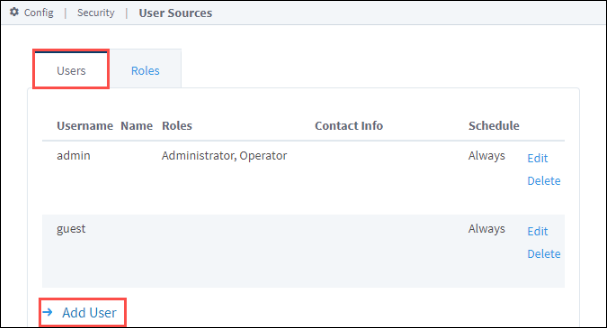
You can manage users and roles using either the Gateway interface, or using the User Management component inside the Designer or Client. This section shows how to manage users and roles using the Gateway interface under Config > Security > Users, Roles. Click on the manage users link for the User Source you want to administer.
Adding or modifying a role in the Users, Roles section of the Gateway will not impact or change roles located in the Security Levels section, as they are separate entities within Ignition. You will need to update the roles in the Security Levels section separately from the roles in Users, Roles.
Manage Users
User Sources support managing the users and roles from within Ignition to varying degrees. Some User Sources are fully manageable, meaning that you can administer the users, roles, contact info, and so on from within the Ignition Gateway, as well as inside a Vision Client. Other User Sources do not support this at all or only partially support it. Make sure you understand how and where the administration takes place before you choose a User Source type.
Often, it is desirable to let some management or administrative users of a Vision project manage other users without having to log into the Gateway's Configure section. To do this, you can simply use the built-in User Management Component that comes with the Vision Module.
Create a Role
When a project is first created, the Administrator role is the only role available. Additional roles can be added from the User Sources page on the Gateway.
-
On the Gateway Webpage, go to the Config section.
-
Navigate to Security > Users, Roles.
-
Click on the manage users link for the User Source you want to manage.
-
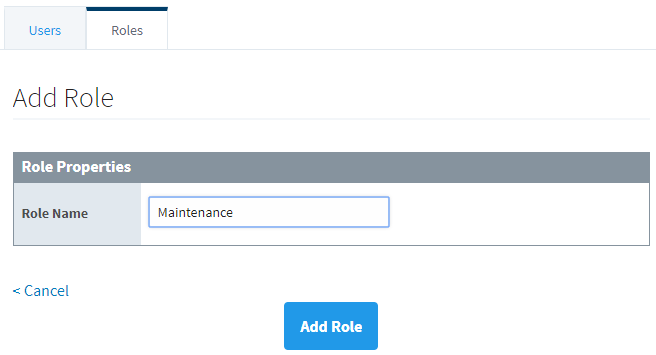
Click the Roles tab. Look for the blue arrow at the bottom, and click the Add Role link.
-
Name the role by entering it in the Role Name field, and click on the Add Role button. The role is now available to be associated with specific users.
Assigning Roles
Although it is not required for a user to have a role, be aware users without role assignments might not have access to an area of the project that requires a role.
Existing Users
-
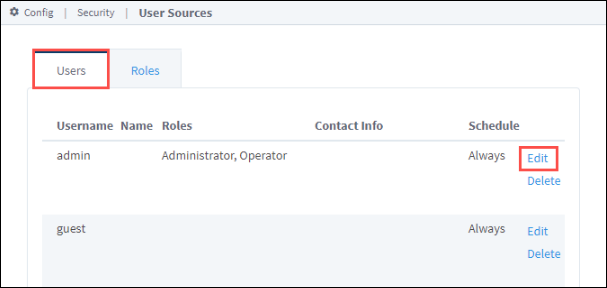
On the Gateway Webpage, go to the Config tab, and navigate to Security > Users, Roles to access the User Sources page.
-
Click more > manage users for the User Source you want to manage.
-
Click the Edit link for the User you want to edit. The User Settings page is displayed.
-
Select the role(s) that you want this user to have from the supplied Roles list.

-
Click Save Changes. The user now has the privileges associated with the selected role(s).
New Users
-
On the Gateway Webpage, go to the Config tab, and navigate to Security > Users, Roles to access the User Sources page.
-
Click on more > manage users for the User Source you want to manage.
-
Click Add User to add a new user. The User Settings page is displayed.
-
Enter the user's properties, including the roles you want this user to have.

-
Click Add User. The user now has the privileges associated with the selected role(s).
Role Hierarchy
Often you might want to have one role that includes all the permissions for another role, i.e., Supervisor can do everything that Administration and Maintenance roles can do. In the Designer, access to components can be restricted to specific security roles. You can give any Supervisor both of the Administration and Maintenance.
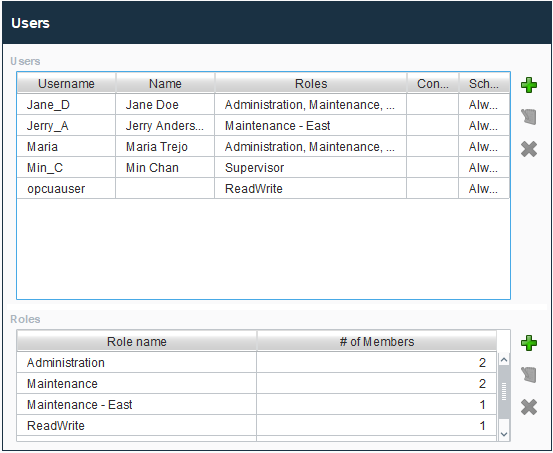
User Management Component
Ignition has a special User Management component in the Vision Module that allows you to add, modify, and delete users and roles (and more) inside the Designer and the Client. By default, changes to a User Source may not be made from this component to prevent users from locking themselves out of the Gateway, or give themselves access to the Gateway. You can override this behavior by enabling the Allow User Admin property located under the Gateway's general security settings. Once the Allow User Admin property is enabled, the User Management component is simple to set up and use.
-
In Designer, go to the Project Browser and then to Vision.
-
Create a new Window or open an existing one.
-
Drag a User Management component to your window. This component will automatically point to the default user source being used by your project. You can change the User Source property if needed.
-
If you already have some users and roles set up using the Gateway Webpage, you will see them in the User Management component. If you don't have any users or roles set up, you can create them here. Use the icons on the right side to add, edit, or delete a user or role.
-
To add a new user, put the Designer in Preview Mode. Click the the plus (
 ) icon next next to the user section.
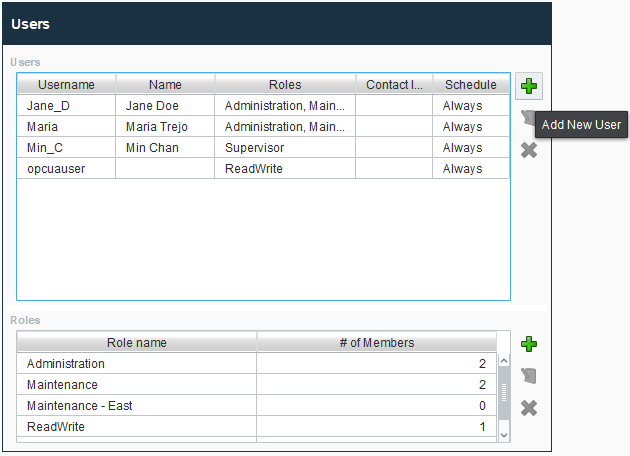
-
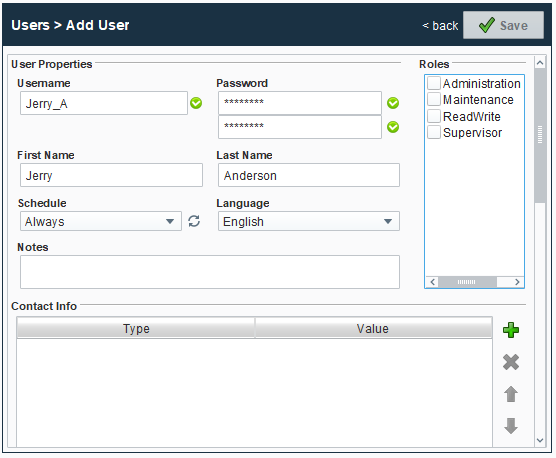
The Add User window will open. At a minimum, enter the Username and Password. All other properties are optional. When finished, click Save.
-
To add a new role, make sure the Designer is in Preview Mode. Click the the plus (
) icon next to the role. The Add Role window will open. -
Enter the name of the new role. Click Save.

-
Now you can see the user and role that were just added in the User Management window.