Secure Communication (SSL/TLS)
Inductive Automation recommends enforcing secure communication in Ignition using digital certificates. The Ignition Gateway web server can provide modern end-to-end security using Transport Level Security (TLS) technologies. This protects externally-originated connections such as: Perspective sessions, Vision clients, Designers, and Ignition web configuration. Users should be familiar with the browser padlock icon (secure session) from online banking, shopping, or medical portals. TLS assures users of the distant end identity and offers protection from attackers and eavesdroppers through strong encryption. This configuration is different from Gateway-originated outbound communication such as database and device (OPC UA) connections, alarming, and web services (REST) calls, which are secured separately and have configuration that depends on distant nodes.
Ignition versions 8.0.4 and later default to TLS versions 1.2 and 1.3 with a valid certificate. Older versions of Ignition should be upgraded to offer protection against known vulnerabilities. If you are looking for additional security settings, check out the Ignition Security Hardening Guide and the Let's Encrypt Guide for recommendations.
Enabling Force Secure Redirect
Normally, Clients, Sessions, Designers, and Web browsers that communicate with the Gateway will do so over an HTTP. However, you can force these communications to be redirected to the more secure HTTPS.
-
Go to the Config section of the Gateway Webpage.
-
Choose Networking > Web Server from the menu on the left.
-
Select the checkbox for Force Secure Redirect, and click the Save button at the bottom of the page.
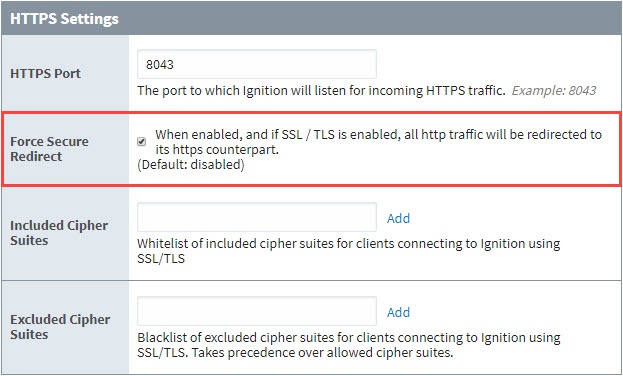
When enabled, all requests between the host Gateway and any Clients, Sessions, Designers, or web browsers will be redirected to the HTTPS port (by default, port 8043), and thus encrypted. However, you will likely want to install a security certificate signed by a certificate authority.
Note that although the Gateway Network may share the same port as HTTP traffic, Force Secure Redirect settings will not apply.
Adding a CA Signed Security Certificate
We are not able to ship a real certificate with Ignition because security certificates have to be obtained individually from a Certificate Authority (CA). Ignition supports certificates from both your organization's internal CA, as well as commercial CAs (Verisign, GoDaddy, Comodo, etc.). In either case, the procedure for how to install a certificate is listed below.
After you have added a certificate, the KeyStore will automatically refresh every 15 minutes. You can disable this in the ignition.conf file by altering the ignition.ssl.refresh entry (Set to 0 to not refresh).
Get a Certificate Signing Request
Since SSL/TLS requires the installation of a security certificate, filling out the form below will generate a certificate signing request (CSR) to provide to a certificate authority.
-
Go to the Config tab of the Gateway Webpage and choose Networking > Web Server.
-
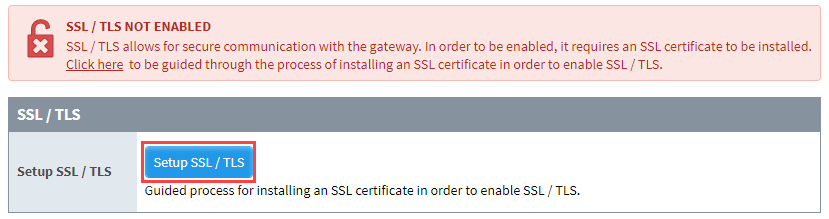
You'll see a warning message indicating that SSL/TLS is not enabled.
-
Click on Setup SSL/TLS.
-
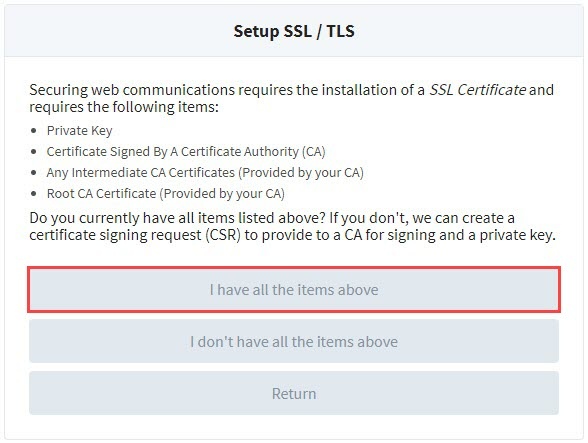
Click on the I don't have all the items above button. The Create Certificate screen is displayed.
-
Fill in the required fields on the screen, then click the Generate Certificate Signing Request button. This can be brought to a Certificate Authority.
Basic Details
| Field | Definition |
|---|---|
| Common Name | Full DNS name (required). This is typically what you type in your browser URL bar in order to navigate to this Gateway, for example: yourdomain.com. |
| Organization Name | Name of company (required). For example: Inductive Automation. |
| Organization Department | Department or section (required). For example: Engineering. |
| Email address. For example: your@email.com. | |
| Country | Typically an ISO 3166 2 character code (required). For example: US. |
| State/Province | State, province or region, for example: California. |
| Locality (City) | Name of city. For example: Folsom. |
| Street | Street number and street name. For example: 90 Parkshore Dr. |
| Postal Code | Postal Code Example: 95630. |
| Key Type | The algorithm of the key pair which will be generated for the self signed certificate. Options are RSA or EC. Recommended: RSA. |
| Key Size | The strength of the generated Key. Recommended: 2048 bits. |
| Expires in | The number of days the generated Certificate will be valid. This number will only apply to a self-signed certificate. The certificate authority will determine a final expiration date as needed for the CA signed certificate. |
Subject Alternative Names
| Field | Definition |
|---|---|
| IP Addresses | The IP addresses of all the servers you plan on installing the certificate. Click the Add button for each additional IP address. Changed in 8.1.17 In versions 8.1.17 and newer, click the Add IP Address button for each additional IP address. |
| DNS Names | DNS names which map to the list of IP addresses above. Click the Add button for each additional DNS name. Changed in 8.1.17 In versions 8.1.17 and newer, click the Add DNS Name button for each additional DNS name. |
Demonstrate Proof of Ownership over your Domain
After providing a CSR to your CA and before your CA issues a new domain-validated (DV) certificate, your CA will require you to demonstrate proof of control over the domain(s) used to access the Ignition Gateway Web Server. These domains should be set as the subject common name and/or subject alternative names in your CSR. Your CA will require you to perform additional actions and to provide additional information if you are seeking an organization validation (OV) class certificate or an extended-validation (EV) certificate. See the Wikipedia article on Public Key Certificates and consult your CA for more details.
Methods for determining control over a domain varies based on the CA. Typical methods include:
- Responding to email sent to the email contact in the domain's whois details
- Responding to email sent to a well-known administrative contact in the domain, e.g. (admin@, postmaster@, etc.)
- Publishing a DNS TXT record
- Publishing a nonce provided by an automated certificate issuing system
The first three methods are performed out-of-band as far as Ignition is concerned. Let’s drill a little bit deeper into the fourth method. Typically, the CA will provide a randomly generated cryptographic string of data which may only be used once. This value is called a “nonce”. The CA expects you to configure your web server to serve the nonce as a special HTTP resource referenced using a well-known path. Once you configure your web server to serve this resource, you give your CA permission to make an HTTP request with a URL containing the domain you are trying to validate as the hostname component of the URL (which should resolve to an IP address of the host running your web server), an agreed-upon port (usually standard HTTP port 80 or HTTPS port 443, though sometimes this is configurable), and the well-known path as the path component of the URL.
There exists software purpose-built to stand-up a temporary web server for the purpose of exposing the special nonce value to the CA. The idea is that this web server is only listening for HTTP requests until you confirm that the CA has issued an HTTP request to the server and has validated the nonce value as correct, then the web server is shut down. In some cases, using such software is not possible if the Ignition Gateway is already listening on whatever port is required by the validation method. In these cases, shutting down the Ignition Gateway for the purpose of starting up one of these other tools would cause potentially unacceptable downtime.
To work around the downtime issue mentioned in the previous paragraph, Ignition supports two open standard specifications which accomplish the fourth validation method mentioned above. The first is the ACME Protocol’s “HTTP Challenge”, detailed in section 8.3 of RFC 8555 (ACME is the protocol used by Let’s Encrypt). Ignition’s web server will map HTTP requests with a path pattern of /.well-known/acme-challenge/<challenge-nonce> to files located at $GATEWAY_HOME/.well-known/acme-challenge/<challenge-nonce> (where $GATEWAY_HOME is the path to the home directory of your Ignition Gateway installation). No Gateway restart is required to start serving new files recently added to the above directory to the web. The challenge-nonce placeholder is the nonce value provided by the ACME server which should be base64-url-encoded.
The second method is defined as the “Agreed-Upon Change to Website v2” process and procedure of validation of domain authorization or control, detailed in section 3.2.2.4.18 of version 1.81 of the CA/Browser Forum’s Baseline Requirements for the Issuance and Management of Publicly-Trusted Certificates. Ignition’s web server will map HTTP requests with a path pattern of /.well-known/pki-validation/<challenge-file> to files located at $GATEWAY_HOME/.well-known/pki-validation/<challenge-file>. Again, no Gateway restart is required to start serving new files recently added to the above directory to the web. The challenge-file placeholder in this case is arbitrary–check with your CA for more detailed instructions as to what the value should be.
For both methods above, it is best practice to stop exposing the challenge value to the web by deleting the file on the Gateway filesystem as soon as the CA is done verifying your control over the domain.
These standard challenge mechanisms can be used to automate certificate renewal–in fact, that’s what the ACME Protocol and Let’s Encrypt is all about. To learn more about how to use Ignition with ACME and Let’s Encrypt, see the Let's Encrypt Guide for Ignition.
Install Security Certificates
Once you have an SSL certificate, it needs to be added to Ignition.
-
Go to the Config tab of the Gateway Webpage and choose Networking > Web Server.
-
You'll see a warning message indicating that SSL/TLS is not enabled. Click on the Click here link.
-
The Setup SSL/TLS screen is displayed. Review the following list:
- Private Key
- Certificate Signed By A Certificate Authority (CA)
- Any Intermediate CA Certificates (Provided by your CA)
- Root CA Certificate (Provided by your CA)
-
If you have the items, click on the I have all the items above button. If you don't have all the items, click on the I don't have all the items above button, and follow the previous procedure, Get a Certificate Signing Request.
-
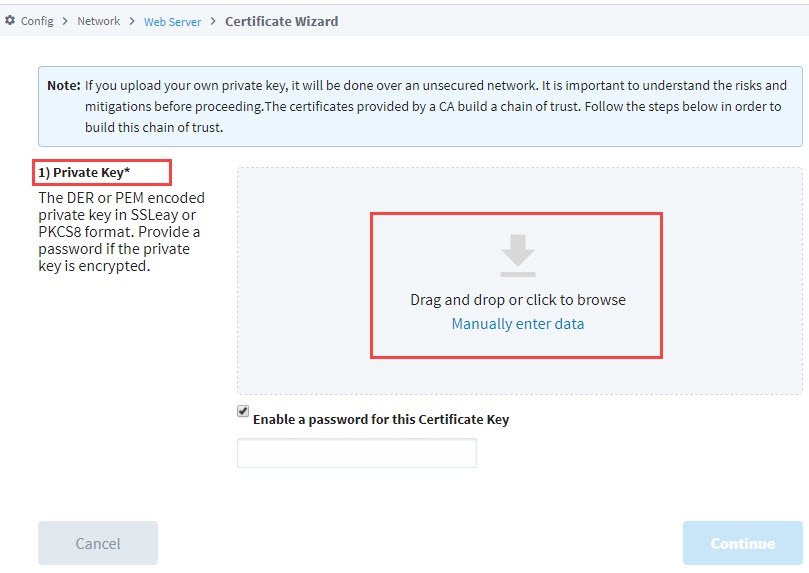
The Certificate Wizard is displayed. The first step is to import your private key in one of the following three ways.
- Drag and Drop your certificate from your computer onto the screen.
- Click anywhere on the grey box to browse for the private key.
- Click Manually enter data button to type in the private key information.
-
If the private key is encrypted, click the checkbox to enable a password for this certificate and enter the password in the field. Click Continue.
-
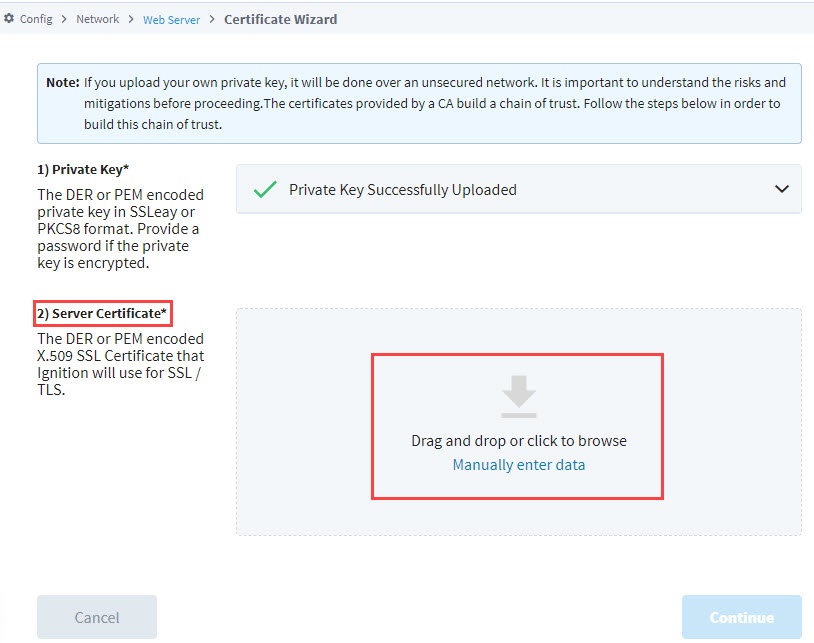
The next step is to import the server certificate. This is the The DER or PEM encoded X.509 SSL Certificate that Ignition will use for SSL/TLS. Drag and drop the certificate file, browse for it, or manually enter the data.
-
The next step is to import the certificate chain. This gives you the Intermediate CA Certificate. Drag and drop the certificate file or bundle, browse for it, or manually enter the data. You'll see a message that the Intermediate CA Certificate was successfully uploaded.
-
Finally, import the root CA certificate. You can drag and drop the certificate file, browse for it, or manually enter the data. You'll see a message that the Root CA Certificate was successfully uploaded.
-
Click the Continue button.
-
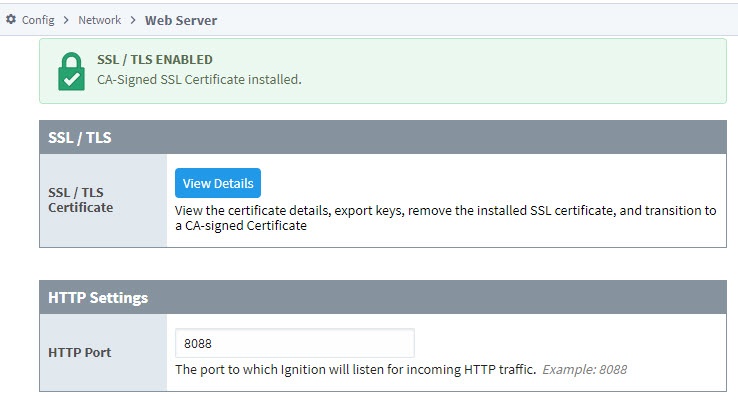
You'll see a confirmation message that the certificate is installed and SSL/TLS is enabled.
-
If you have a redundant installation, you'll need to repeat this procedure on your backup server.
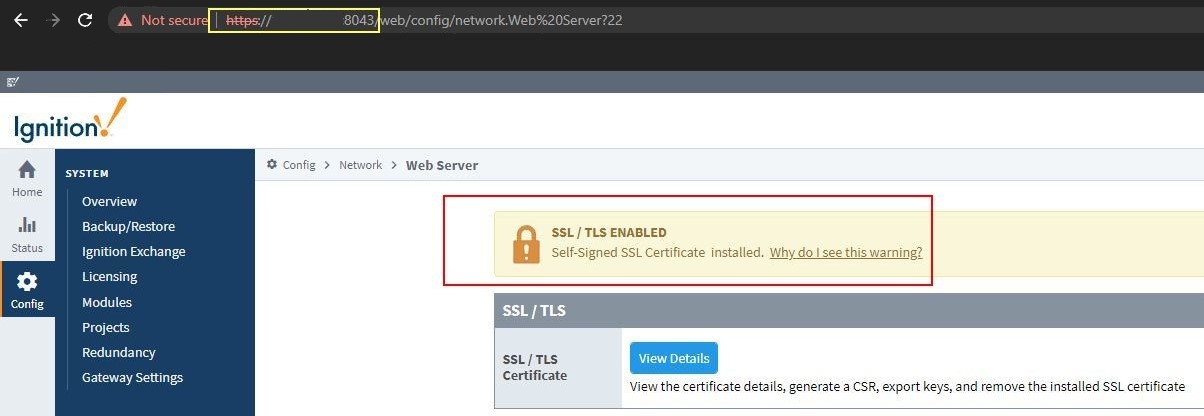
What is a Self-Signed Certificate?
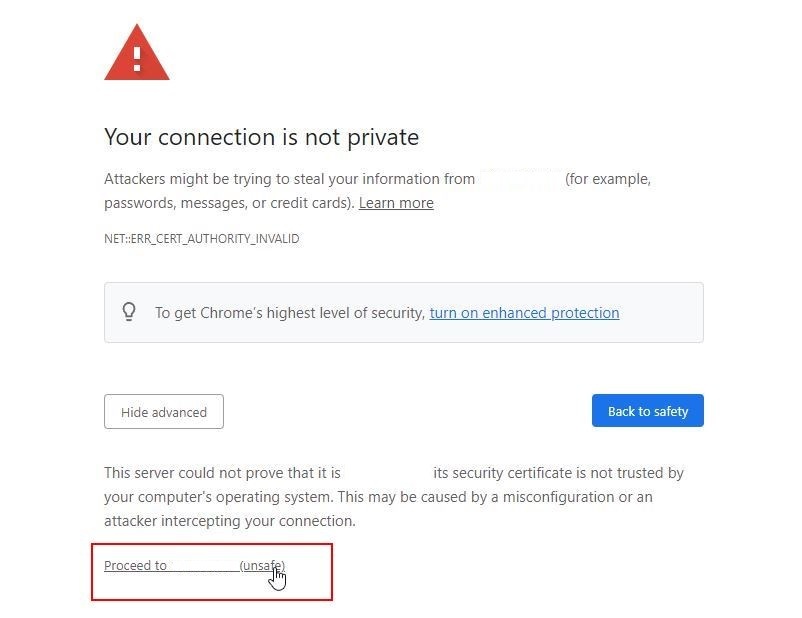
SSL/TLS can still be setup without a CA signed certificate by installing a self-signed certificate. This gives you the encryption benefits of SSL, but not the identity validation, and it isn't a "real" certificate. When a self-signed certificate is used to enable SSL/TLS, a web browser will display warnings to users that they shouldn't trust the website. Users will then have to choose to proceed to the "unsafe" connection through Advanced options.
How to Install a Self-Signed Certificate
-
Go to Config section of the Gateway Webpage.
-
Choose Networking > Web Server from the menu on the left.
-
Under SSL/TLS click on Setup SSL/TLS.
-
Select “I don’t have all the items above”.
-
Under the Basic Details section, fill in all of the required fields (*). This includes the Common Name, Organization Name, Organization Department, and Country.
noteThe Common Name is typically what you input into your browser URL bar in order to navigate to this gateway. If you do not have a dedicated domain for your gateway, use the IP address.
-
Under Subject Alternative Names, enter in the IP Address along with any DNS associated with your gateway server.
-
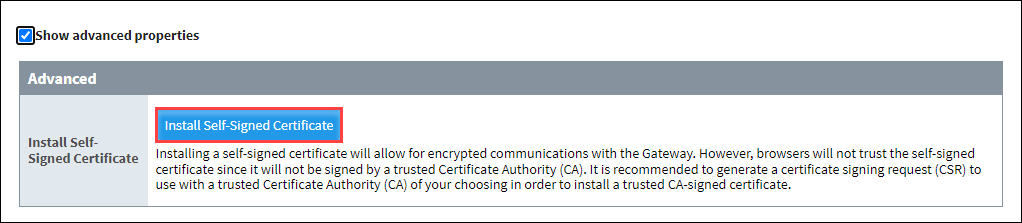
Select Show Advanced Properties and click on Install Self-Signed Certificate.
-
This will take you to a page that displays the privacy warning that all connections will now see.
-
SSL/TLS is now enabled on your Gateway. The URL for your gateway now uses HTTPS and port 8043, which is the default port for SSL.