User Grants
A User Grant is a way to directly assign a user to a Security Level, even if they do not meet the requirements of the Security Level Rules. User Grants essentially act as an override to the original rules of the Security Level.
User Grants are accessed from the Gateway Webpage Config section in Security > Identity Providers. Users can be added and edited using the buttons in the Users table so that Security Levels can then be granted to them.
When adding, editing, and deleting users in User Grants, you are only modifying the User Grant (whether the user is granted permission that overrides the Security Rules). The user is not changed in the Identity Provider.
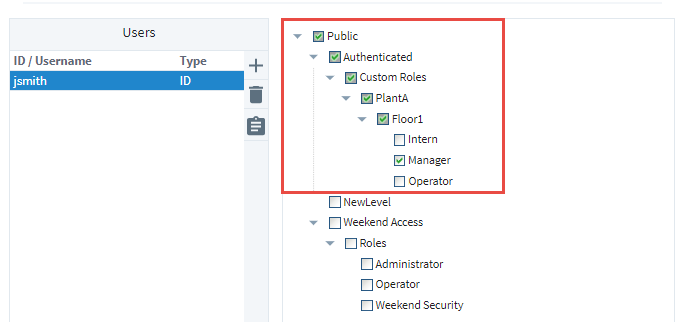
Users are identified by either their username or their ID from the provider response document. Once you have identified a user, you can assign them any number of grants to Security Levels. Selecting a level will automatically select all security levels above it. The User Grants can only be applied to a user after they authenticate with the Identity Provider, though the grants do not have to be for levels within the Authenticated branch.
The system can't validate any user created here against actual users in the Identity Provider (IdP). Instead, the username or ID needs to be entered exactly, including case-sensitivity, and when a user logs in, the system will check to see if they match any of the configured usernames/IDs to give User Grants to.
Configuring a User Grant
There are two parts to configuring a User Grant: Adding a user then applying User Grants.
-
From the Gateway Webpage Config tab, click on Security > Identity Providers. The screen will refresh and you will see a list of all your IdPs.
-
Choose the IdP and click the More button to see the actions in the dropdown list.
-
Select User Grants.

-
To add a new user, click the Add
 icon.
icon. -
Choose how you will identify the user; either with a username or an ID. Click Confirm to save the changes.

-
With the user created and highlighted in the Users table, select Security Levels to grant them when they Authenticate with this Identity Provider.
-
Click Save.
Now you can test this user through the Test Login and Logout screen to verify the new roles have been assigned.