Pipeline Blocks
Pipeline blocks are the building blocks for the Alarm Pipeline Notification system. Each block has an input and zero or more outputs. Each block has its own unique functionality and performs a specific action for the pipeline, such as sending a notification, setting a property, or evaluating an expression.
Let's look at the different pipeline blocks that come with the Alarm Notification system. There are eight blocks above your Pipeline Workspace that you can choose from to build your alarm notification pipeline.
Pipeline Blocks
The Pipeline Blocks are described individually in this section, but here is a brief overview:
-
Notification Delivers a notification through the selected Notification Profile (i.e., Email, SMS and Voice).
-
Delay Blocks the alarm event for the specified amount of time.
-
Splitter Forwards a single event concurrently to multiple other blocks.
-
Switch Evaluates a non-boolean Expression, and forwards to an output based on the result.
-
Expression Evaluates an Expression that results in either 'True' or 'False,' and forwards the event to that output.
-
Set Property Evaluates an Expression, and sets the result as a runtime property on the alarm event.
-
Jump Forwards the alarm event to a different pipeline.
-
Script Executes a task outside the pipeline.
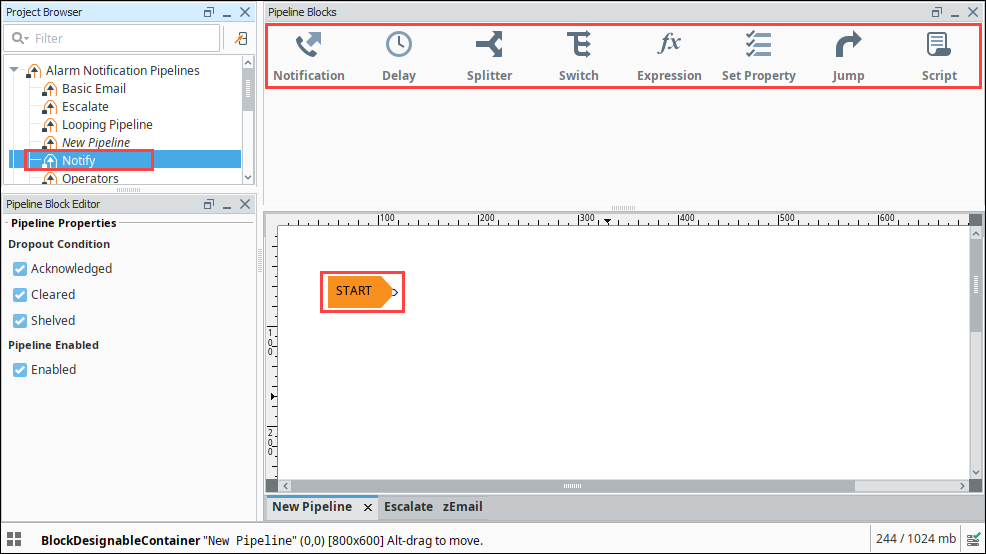
Start Block
When you create a new pipeline, you always get a Start block placed in your Pipeline Workspace. You cannot delete the Start block because it represents the entry point for alarm events into the pipeline.
Notification Block
The Notification block is the block that controls the actual notification. When an alarm event reaches this block in the pipeline, some sort of notification will go out. In it, you can set up what type of notification it will use and who it will notify. You can learn more about the Notification block by going to the Notification Block page.
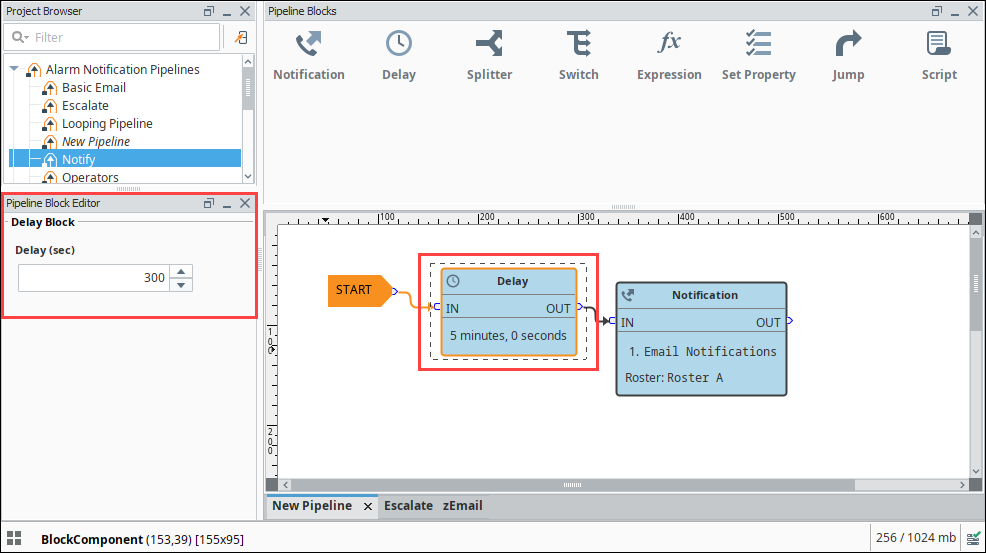
Delay Block
The Delay block simply blocks alarm events for a specified period of time before moving them to the next block. They are generally used to wait for the dropout condition to become satisfied for an alarm.
For example, a 5 minute delay might be used to give operators viewing control screens a chance to acknowledge, and only send notifications if they haven't (the "active delay" deadband on the alarm could be used to delay the alarm as well, but in that case it wouldn't actually be active, and therefore not displayed, for the delay time).
Delays are often also used to control flow in a pipeline. For example, in an "escalation" scenario, a notification block might be used to send emails. Since emails are sent instantly, and acknowledgment occurs "asynchronously" (the user must see the email and click the link or log into the system), a delay block could be used to provide time for the user to acknowledge, before moving on to a voice notification block. There is no practical limit to how long a delay can be. The delay is calculated independently for each event entering the block, meaning that each event will be held for the specified time.
Click the Delay block and a spinner will appear in the Pipeline Block Editor. You can specify the number of seconds to delay. In this example, if you enter "300" seconds, the alarm will wait 5 minutes before sending the notification to Roster A.
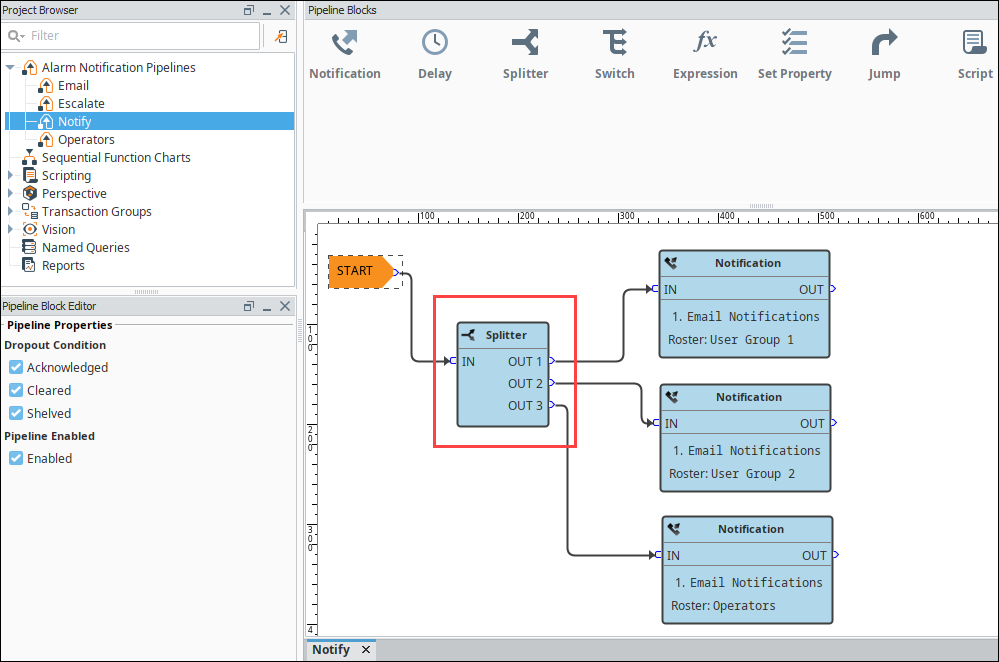
Splitter Block
The Splitter block simply forwards a single alarm event to multiple outputs at the same time. It creates a copy of the alarm event for each output and executes the alarm notifications along multiple paths in parallel. You can specify as many outputs as you want. If care is not taken, it is possible to end up with an exponential number of alarm event copies active in the pipelines at one time. Since each notification block operates on a specific on-call roster, splitters are useful for delivering events to multiple notification blocks at once as shown in this example.
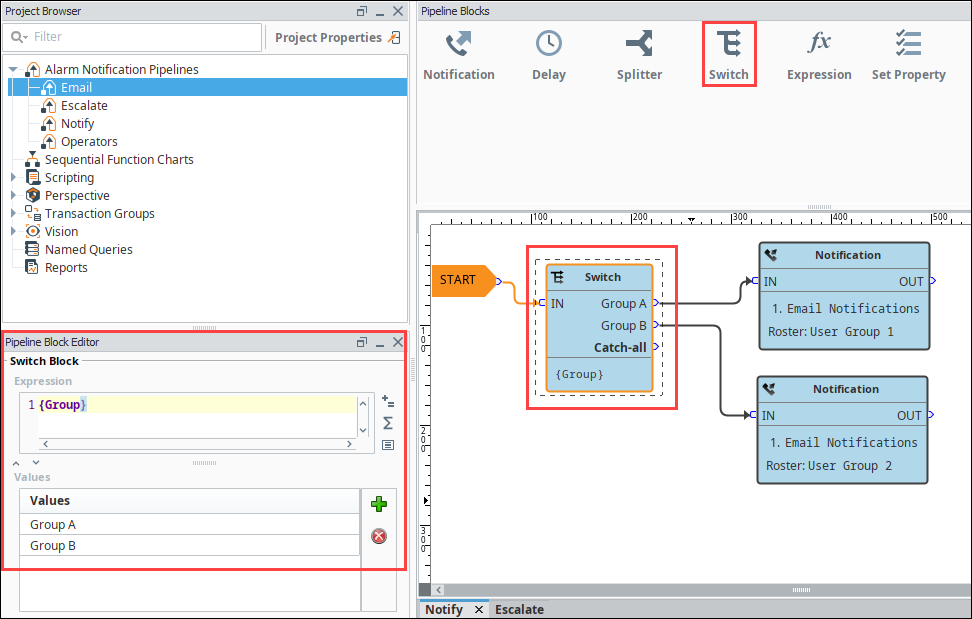
Switch Block
The Switch block evaluates a non-boolean expression and forwards it to an output based on a given result. It can be a number or string, and it will be looked up against a defined list of expected results. If a match is found, the alarm will follow that path, otherwise the "Catch-all" output is used.
You can create an expression and even use the alarm event's priority, associated data, value and more. The following example has associated data for the Group that they belong to with "Group A" and "Group B" values. The Switch Block will evaluate the expression results against these defined values, and if a match is found, the alarm will follow that path. If neither of the values are met, the Catch-all output will be used.
This example demonstrates that a pipeline can send out an alarm to two different lists of people based on the group.
Expression Block
The Expression block contains an Expression which is evaluated against each alarm that enters it. The result is expected to be a boolean value, either True or False and forwards the alarm to the specific output. The Expression executed by the block is written in the same syntax as other Expressions in Ignition. However, in this context, it is possible to refer directly to properties of the alarm event that is being evaluated by using the standard {path} reference syntax. In addition, the following functions are available to quickly determine the state of the alarm.
Examples
isActive()
This single function returns whether the current event is active or not. An Expression block like this could be used to then dispatch to an "active" pipeline, and a "clear" pipeline (both the active and clear pipeline settings on the alarm would be set to this dispatch pipeline). This kind of setup allows you to later modify how actives are handled vs. clears in one place, without having to modify many alarms.
toInt({priority})>2 && {displayPath} like "*East Area*"
This block would forward all High and Critical alarms from the "east area" to the true path. The others would go to false, which may not actually be bound to another block, making this Expression block act like a filter.
isPropertyDefined("isEscalated")
This Expression checks if a property exists on the event. The isEscalated property is not a system defined property. Instead, in this example, it might be set using a Set Property block before forwarding back to the start of the pipeline. The first time through, this Expression would fail, but the next time, it would pass, and the "escalated" behavior could be executed.
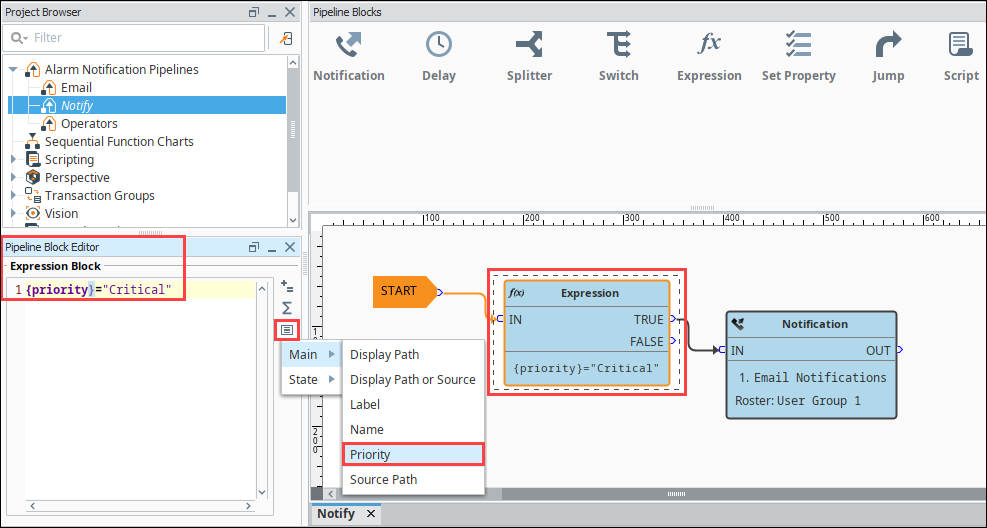
In the Pipeline Block Editor, you can select the Alarm Properties from any of the icons in the Expression block. This example uses an expression to check to see if the priority is Critical, and if so, the alarm notification will follow the True path. If it is not Critical, it will follow the False path. As you can see, the False output is not configured. You don't have to configure every output if you don't want to.
{priority}="Critical"
Set Property Block
The Set Property block allows you to define or redefine a property on the alarm event. The value is created from the Expression Block, which can refer to other properties or the same properties. Typically, the Set Property Block is used as a counter for the number of times the alarm has been looping or notifying people in your on-call roster. Settings modified in this way will only exist while the alarm is in the pipeline, they will not be stored to the journal, or show up in the status table.
Examples
If you want to attempt notification up to three times before stopping, you could create a pipeline that looked like [Notification Block] > [Set Property] > [Expression], with the Expression looping back to the notification block (perhaps with a delay in between).
The Set Property block would look like:
Property Name: counter
Expression: coalesce({counter}, 0) + 1
Note that the first time the block is hit, the counter property will not exist, and therefore the value will be null. The coalesce function returns the first non-null value, allowing us to start with 0. Another way to write this might be:
if(isPropertyDefined("counter"), getProperty("counter"), 0)+1
The getProperty() function is functionally equivalent to simply referencing the property in brackets (that is, {counter}).
The Expression block in this example would simply be: {counter}<3.
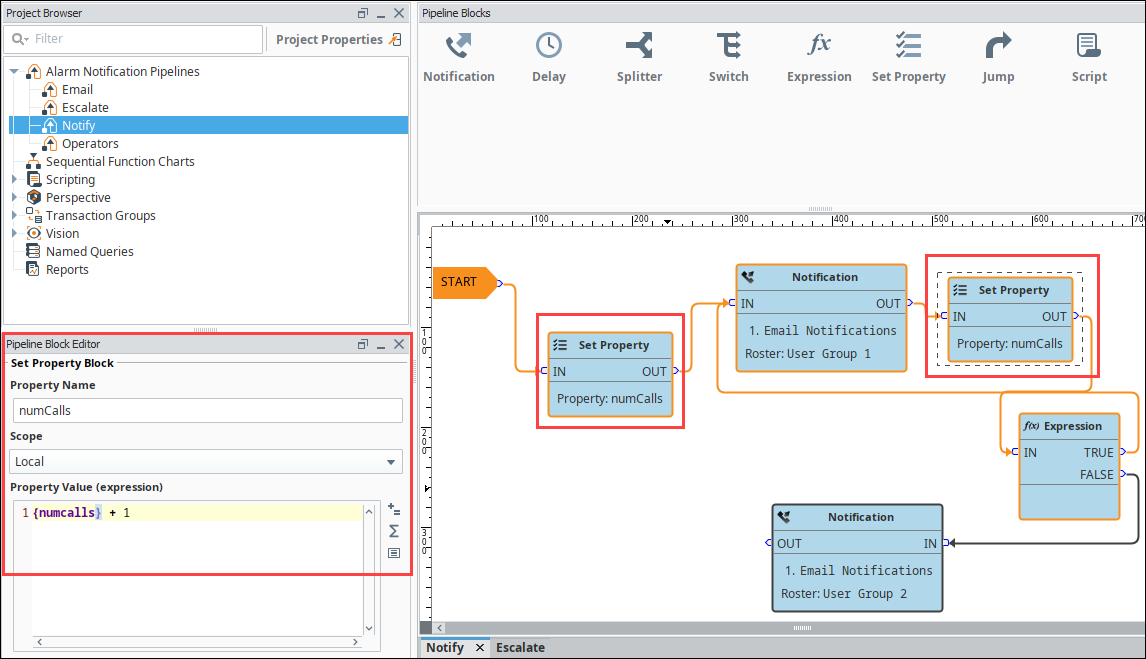
Here is another example where the operators are notified of an alarm event 3 times before being escalated to the Production Supervisors. Drag two Set Property blocks to your pipeline workspace. Assign the first Set Property block to a Property Name numCalls and a Property Value of "0". The second Property Block you need to increment the counter. Enter {numCalls} + 1 as shown in the Pipeline Property Editor. Each time the alarm goes through this block, the numCalls variable increments by "1". If no one acknowledges the alarm, it is sent to the Production Supervisor's on-call roster.
Jump Block
The Jump block forwards an alarm event to a different pipeline. You can breakup a pipeline into several different pipelines and use the Jump Block to go back and forth between pipelines. This is perfect for an escalation pipeline because often times they can become one massive pipeline, and the Jump block can make the escalation pipeline less complicated and more compact.
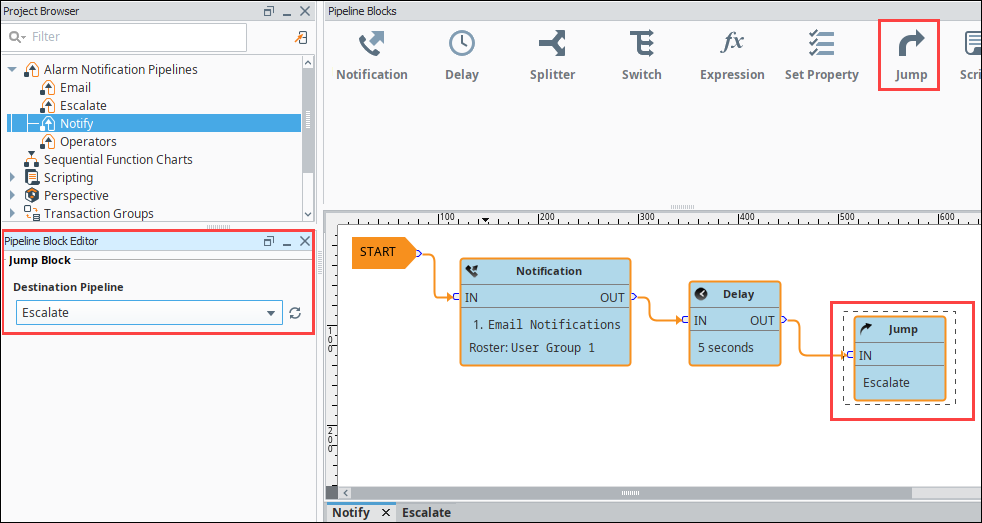
In the Pipeline Block Editor, enter the Destination pipeline called Escalate.
In this simple example, the Jump block forwards the alarm to the Escalate pipeline and ends there.
Script Block
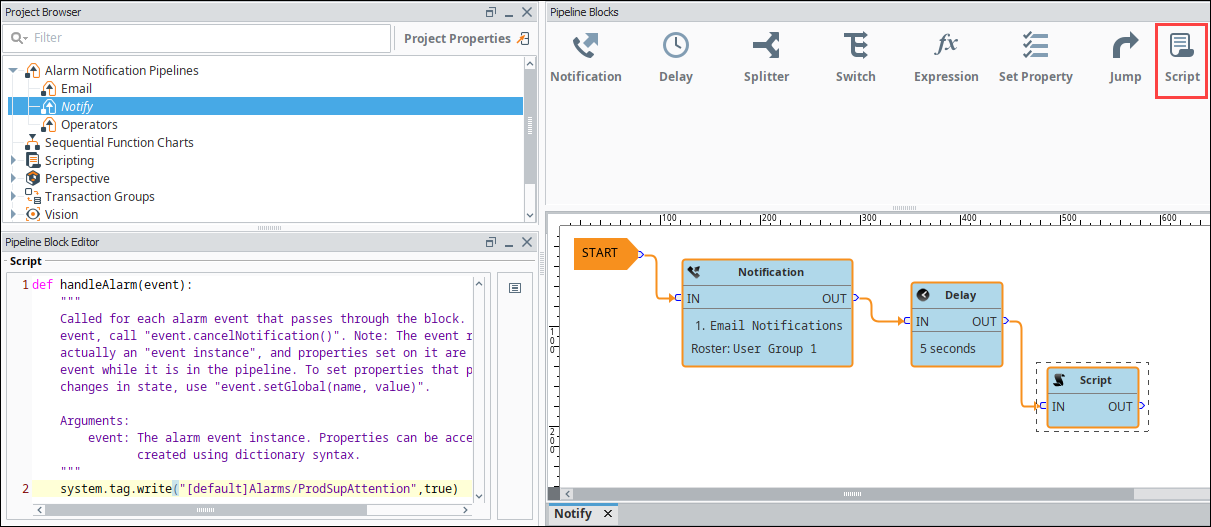
The Script block allows you to execute a task outside the pipeline like writing to another alarm tag or database. In this example, the Script block was used to notify the production supervisors of an alarm using another alarm tag as shown in the Pipeline Block Editor.
The script block provides access to an event object, which is simply a ScriptableBlockPyAlarmEvent object.
In the next sections, you will see how to use a combination of these different pipeline blocks to create your own unique pipelines.