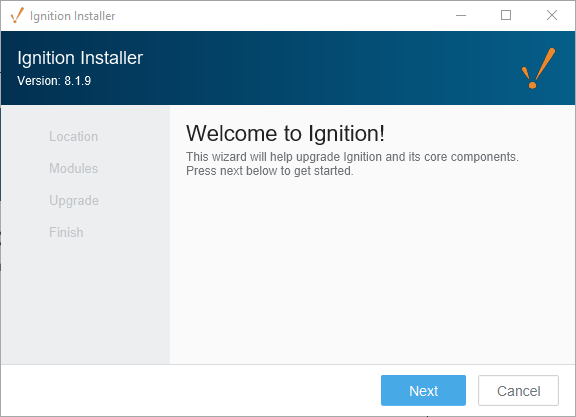
Installing and Upgrading Ignition
The installation process for Ignition is designed to be as simple as possible. You can find installers on our Downloads page: https://inductiveautomation.com/downloads/ignition/.
The Downloads page has the dedicated Installers (called "installer" for all major operating systems) and ZIP files. Both options install Ignition, but the installers are generally easier to use. Download an installer and head to the appropriate section below. For information on ZIP file installation instead, refer to the ZIP File Installations page.
Make sure your system meets our minimum system requirements (also found on our Downloads page).
The installer now provides timestamped logs for installs and upgrades in the logs directory. Timestamped uninstall logs are stored in the root install directory.
Learn how to verify that your installation of Ignition is genuine at the bottom of this page.
Software Bill of Materials
A Software Bill of Materials in SPDX 2.2 (JSON) format is now included when installing Ignition. The SBOM can be found in the installation directory at SBOM.txt. Third Party Licenses and Copyright Notices can be found at Notice.txt, also located in the installation directory.
Install Ignition
- Download an installer from our Downloads page.
- Run the installer.
- Windows Installations
- Linux Installations
- macOS Installations
The steps on this page detail installing Ignition in a graphical environment. If you're attempting to install Ignition on a headless server, you can use the same installer, but you'll likely want to refer to the Command Line Installations page for details on command line arguments, which allow you to do things like run the installer in unattended mode.
Downloading the Installer Without a Web Browser
On headless Linux systems, you can download the installer directly from the command line instead of through a browser. For example, on Ubuntu you can use wget:
wget --referer=https://inductiveautomation.com/downloads/ignition
https://files.inductiveautomation.com/release/ia/<VERSION>/<BUILD>/ignition-<VERSION>-linux-64-installer.run
Replace <VERSION> and <BUILD> with the values for the version you want to install. See the Ignition Downloads page for the latest links.
Installing on Headless Linux Distros
When installing Ignition on a headless Linux Distro, you'll want to install the fontconfig package for Debian/Ubuntu distributions, as some Ignition features use the package. This must be installed prior to the Gateway for everything to work correctly.
sudo apt-get install fontconfig
Make the Installer Executable
Before you can run the installer on Linux, you must first make the installer executable. From terminal:
$ chmod +x NAMEOFINSTALLER.run where NAMEOFINSTALLER is the name of the installer executable, typically following the ignition-x.x.x-linux-64-installer naming scheme.
Now, you can run the installer:
$ ./ignition-x.x.x-linux-x64-installer.run
Caution: Your desktop environment may have some graphical interface to make the installer executable. Check your desktop's documentation for more details.
There is a known issue with running the installer on macOS prior to 8.1.31. If you're receiving warnings about being unable to open the installer, see our Knowledge Base Article.
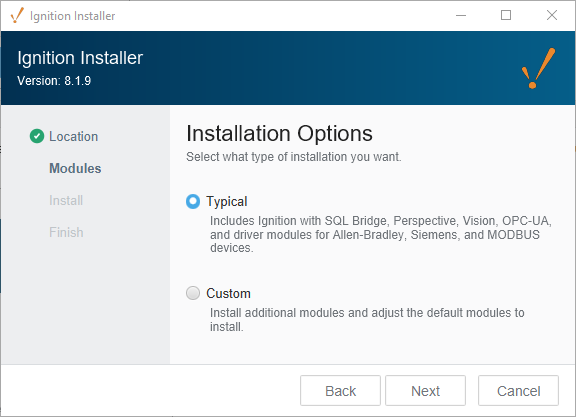
- Select the installation type and follow the steps in the installation wizard. The Typical option includes a selection of many popular modules. Additional modules can be added after the installation, so we will use the Typical option for now.
 :::
:::
In most cases you can use the default settings in the installer. This section describes what each setting does.
-
Default Installation Directories This determines the installation directory. You're free to pick the directory you wish. See the Ignition Default Installation Directories section below for the default paths.
-
Gateway Service Name (Windows Only) This field allows you to choose the service name of Ignition, as it appears in the operating system's service listing.
-
Installation Options Allows which modules are included in your base installation. Your choices are Typical and Custom. The Typical option will use a select list of commonly used modules. The Custom option allows you to install specific modules. In most installations the Standard option will suffice, but do note you can always add modules and remove modules after the installation process.
-
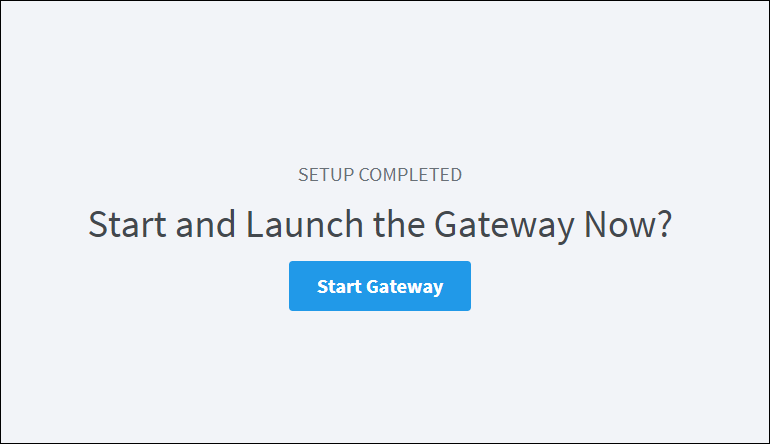
Start Ignition Now Once the installer finishes, you'll be provided with an option to start the Gateway immediately. In most cases this is the desired option. You would only opt out of this choice if you didn't want the Gateway to start once the installer finishes.
Once finished, a web browser will open, and start off the System Commissioning process.
- Install As a Service (Linux and MacOS only) Allows you to install Ignition as a service, allowing you to manage certain actions via command line. It is recommended to opt into this setting. For Windows systems Ignition is installed as a service by default as it is a requirement for Ignition to run.
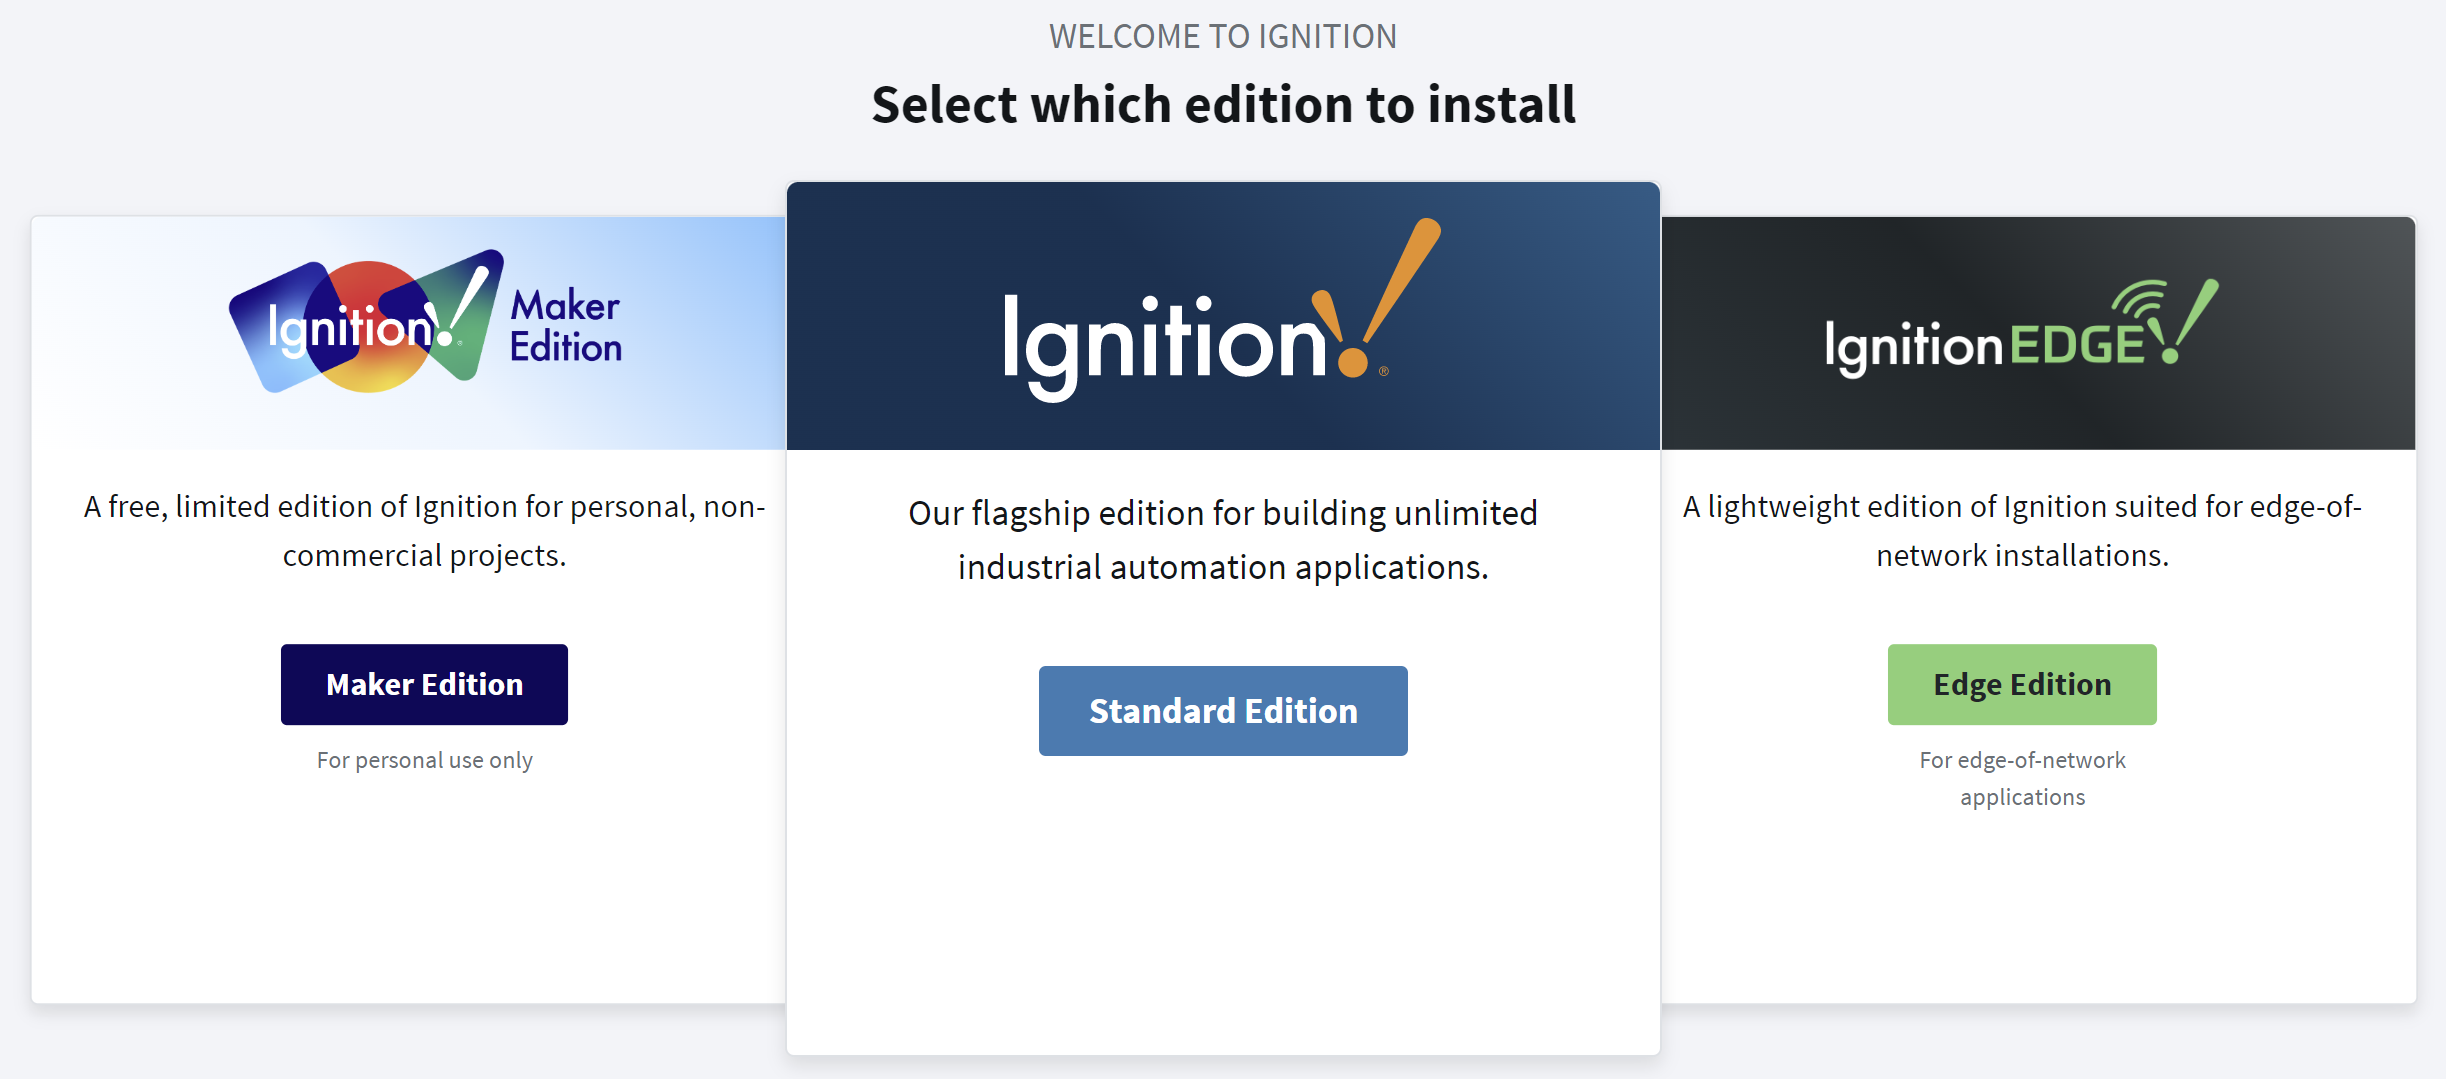
- After the installation wizard finishes, a web browser will open and start the commissioning process. At this point you'll need to select your edition.
-
Standard Edition - Unlimited edition of our flagship platform. Designed for commercial use.
-
Edge Edition - A lightweight edition of Ignition suited for edge-of-network installations.
-
Maker Edition - A free, limited edition of Ignition for personal, non-commercial projects.
-
Follow the steps in the commissioning process to complete installation. The System Commissioning process is a series of steps that further configure your Gateway. This process begins after installation or upgrading. In addition, it can be re-triggered via a password reset with the Gateway Command-Line Utility.
-
New in 8.1.1Set the Gateway Network Port
As of 8.1.1, commissioning can now set the Gateway Network port in addition to the HTTP and HTTPS port.
Clean installs of Ignition will check the default ports for their availability. If no ports are available, the Gateway will iterate that port number until one is found that is available. These ports can be modified during the commissioning process.
Existing or upgraded Gateways will not search for available ports, and will result in a faulted Gateway.
noteBy default, Linux will not allow you to run on port 1024 and below. If you need to run on one of these ports, such as port 80, you can add the
CAP_NET_BIND_SERVICEcapability to your systemd service configuration override file. -
Activate License (Maker Edition Only) When installing Maker Edition, you'll be asked to provide a License Key (an 8 digit string) and an Activation Token (a considerably longer string). Both of these can be acquired for free from your Inductive Automation account: https://account.inductiveautomation.com/.
-
Create a User This step asks you to create an initial user. This user will have full access to Ignition, although you're free to modify this user later. You'll need this user account to make changes to Ignition at all, so make sure you remember these credentials. Otherwise you'll need to perform a password reset: see the Gateway Command-Line Utility page.
-
HTTP Configuration Allows you to specify the ports Ignition uses. By default, HTTP is 8088, and HTTPS is 8043.
-
Once you finish the commissioning process, your service will start.
Ignition Default Installation Directories
The default directories for each operating system are listed below.
C:\Program Files\Inductive Automation\Ignition
/usr/local/ignition
/usr/local/bin/ignition
MacOS and Linux Installation Directory
Mac and Linux installations contain a ignition.sh file and ignition-util.sh file, which both contain some configuration parameters for the installation. Modifying these files is not advised, unless directed to by a member of our support team. Instead, an ignition.conf file, which is also located in the installation directory, should be used instead.
Additionally, during installation on Mac and Linux, the installer will create a sudoer file at /etc/sudoers.d/99-<serviceName>, with the service name being Ignition-Gateway by default. This ensures the Gateway can be restarted without an interactive login. In most cases, the sudoer file does not need to be modified or maintained. However, more information can be found in the ignition-util.sh file in the installation directory.
Quick Start Configuration
Once the installation process has finished, you'll be redirected to the Gateway Webpage. From there you'll be asked to opt into the Quick Start configuration, which makes several configuration changes to the system. Quick Start can only be enabled upon a new installation.
The following changes are made once Quick Start is enabled:
- Creates an internal SQLite database connection.
- Configures a device connection to a Programmable Device Simulator instance, and adds Tags from the simulator into a Tag provider.
- Configures an internal alarm journal.
- Creates a sample project.

Start or Stop Ignition
After installing with the Installer, Ignition will have a service representing it on the operating system. By default Ignition will start when the system starts, but you can manually start and stop the system with the following terminal commands:
## The examples below assume "Ignition" is the service named used during installation
## (which also happens to be the default service name).
## You may need to modify the examples below using your system's service name.

net start Ignition
net stop Ignition
/usr/local/ignition/ignition.sh start
/usr/local/ignition/ignition.sh stop
/usr/local/ignition/ignition.sh restart
## The examples below use the default installation directory

/usr/local/bin/ignition/ignition.sh start
/usr/local/bin/ignition/ignition.sh stop
/usr/local/bin/ignition/ignition.sh restart
Upgrade Ignition
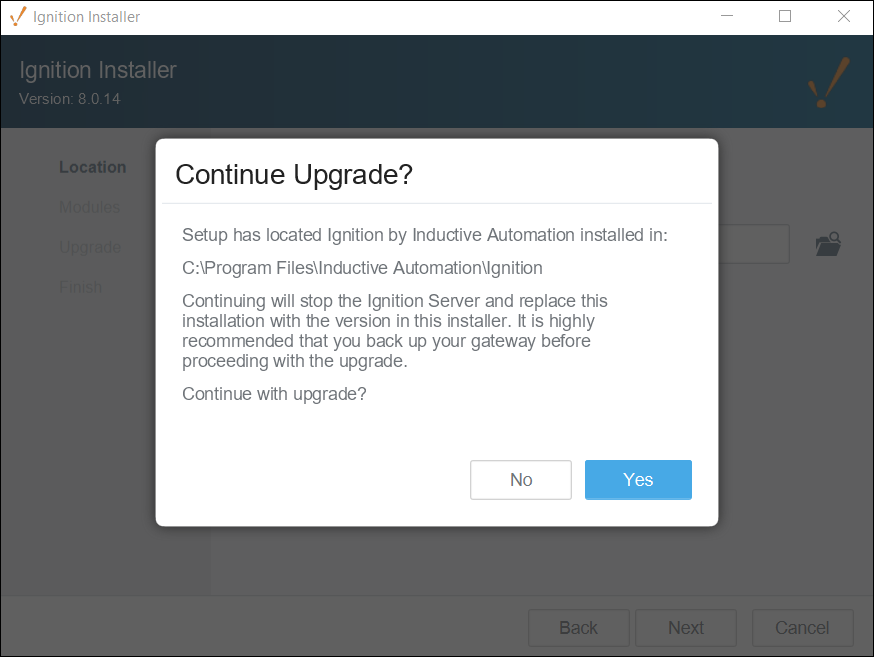
Upgrading Ignition is as easy as running the installer. When you run the installer from the same directory as a previous install, our installers are able to detect that Ignition is already installed. If Ignition is already installed, the installer will ask if you would like to proceed with the upgrade. A wizard takes you through the upgrade in a similar workflow as installation workflow.
Before completing the upgrade process, it is strongly advised to take a Gateway backup of your system first.
Ignition installers can be used to upgrade any edition of Ignition (i.e., Edge, Maker, or Standard) with the exception of ARM as that will require a ZIP installer for upgrading.
Older versions of the Linux installer would place files across multiple different directories. Running an 8.0.14+ installer will move all those files to the specified installation directory, and symbolic link folders from the original directory will be created.
Sometimes new versions of Ignition will incorporate new JDBC drivers, which are used to connect to SQL databases. When upgrading Ignition, the JDBC drivers will not be upgraded. The reason being, is that you should only need to change the JDBC driver if you upgrade your database. See the JDBC Drivers and Translators page for more details.
During the upgrade process, the Gateway will have to restart, so make sure to account for downtime when upgrading.
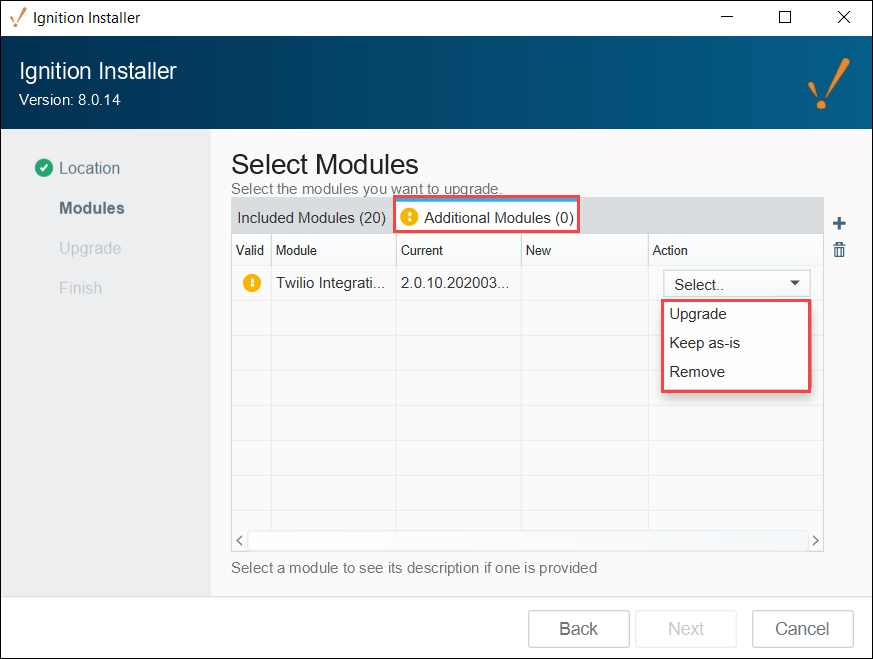
When you upgrade Ignition, you'll also be given the option to update any additional modules you currently have installed, including Third-Party modules. On the Select Modules screen, there is a tab for the modules included in your version of Ignition, and a tab for Additional Modules you may be using. Under the Action column, you can choose to upgrade or remove the module or leave it unchanged.
Updating License for an Upgrade
If you are updating from one major version to the next (i.e, upgrading from version 8.0.# to version 8.1.#) , you will need an updated license. You can do this before upgrading so there is no unlicensed time after the upgrade.
-
Let us know. You can reach Inductive Automation by phone at (800) 266-7798. Some Major upgrades include new modules or have modified the functionality of pre-existing modules. If your license needs to be updated, call us and we can guide you through it. If you are updating from one version to the next, or from 7.0.0 all the way to the latest version, we can talk you though what is different and what new functionality is available. See the New in this Version page for more specifics about what was updated in the various versions.
noteIf your license is covered by a support plan, you have Upgrade Protection which automatically keeps your platform and module versions up to date in our system. Refreshing your license on your Gateway will synchronize the license on your server with the updated license on our activation servers.
-
Reload your license. Once your license is updated in our system, go to your Config section of the Gateway webpage, and click System > Licensing. Click on the Update License icon . For for a detailed guide on reloading a license, see updating a License on this page. If you are coming from an older version, the Gateway may look different. Don't worry, all this functionality is still there, but you may have to un-activate then re-activate instead if the Update License button is missing.
Upgrading a Redundant Pair
Ignition Versions 8.1.17+
When performing the upgrade locally, we recommend upgrading the Backup first. The Master will be unaffected and remain active during this process. After the upgraded Backup comes online, the Master can fail over to the Backup. It's also recommended to use Manual Recovery Mode to control when the Master takes over again. The active Backup can collect redundancy sync info, while the Master goes down for upgrade. Then, once both Gateways are on the same version again, the redundancy sync data can be passed from the Backup to the Master.
If the upgrade will be performed remotely using the Enterprise Administration Module, upgrading the Backup Gateway first allows the EAM controller to manually tell Clients/Sessions to communicate with the newly upgraded Backup Gateway, even though the Master will be a different version, allowing time to upgrade the Master.
- Navigate to Config > System > Redundancy on your Master Gateway.
- Click Configure and set the Recovery Mode to Manual. This keeps the Master Gateway inactive after it has been upgraded and allows you to decide when the Master Gateway can take over.
- Click Save Changes and click Confirm.
- Upgrade and start your Backup Gateway.
- After the Backup Gateway has started again, navigate to Status > System > Redundancy on your Master Gateway.
- Select Force Failover to set your Backup as your active Gateway.
- Upgrade and start your Master Gateway.
- Navigate to Status > System > Redundancy on your Master Gateway.
- Confirm that the Master Gateway and Backup Gateway are connected.
- Select Assume Control to set your Master Gateway as your active Gateway.
Ignition Versions Prior to 8.1.17
If upgrading version 8.1.0-8.1.16, following the recommended process above will still successfully upgrade your system, but based on how you resume your Master control, you may have duplicated data from the slight overlap of having both Gateways up. Alternatively, you can use the following procedure to upgrade without disrupting your redundancy setup:
- Navigate to Status > System > Redundancy on your Master Gateway.
- Select Force Failover to set your Backup as your active Gateway.
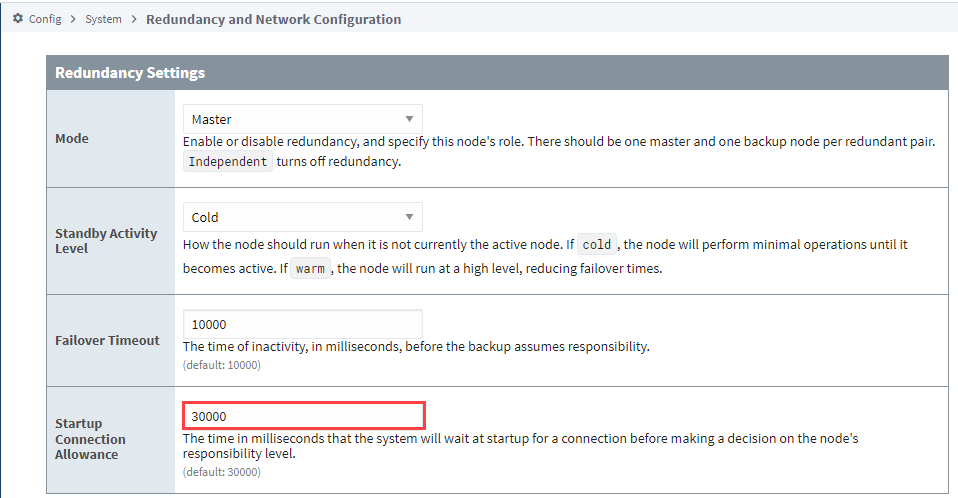
- Navigate to Config > System > Redundancy on your Master Gateway.
- Adjust the Startup Connection Allowance setting to a large number. This will allow the Master to sit in the undecided state and not become active after being upgraded. Note the original value so you can reset it at the end of this process.
- Upgrade and start your Master Gateway.
- Wait for the Master to fully initialize and become ready to take back over.
- Shut down your Backup Gateway.
- Navigate to Config > System > Redundancy on your Master Gateway.
- Change the Mode setting to Independent.
- Change the Startup Connection Allowance setting to 0.
- Select Save Changes.
- Select Confirm.
- Now, change the Mode setting back to Master.
- Select Save Changes.
- Select Confirm.
- Upgrade your Backup Gateway.
- After the upgrade is complete, verify your Backup Gateway is connected and your redundancy is active.
- Navigate to Config > System > Redundancy on your Master Gateway.
- Return the Startup Connection Allowance setting to the original value.
Reset the Password
To reset the main password for the user with full privileges, use the Gateway Command-line Utility (gwcmd) utility. The 'gwcmd' utility triggers system commissioning, and prompts the user to reset the username and password for the main user (with full privileges) after the Gateway restarts. Linux and Mac OS platforms also use the 'gwcmd' utility for password reset. For more information, see the Gateway Command-line Utility - gwcmd page.
Uninstall Ignition
Uninstalling Ignition will remove any projects or Gateway level configurations you made. If you wish to preserve anything, make sure to take a Gateway backup first.
To uninstall Ignition, run the uninstaller file. This file can be found in the main Ignition installation directory, for example:
C:\Program Files\Inductive Automation\Ignition\Uninstall.exe
/usr/local/ignition/Uninstall.app
/usr/local/bin/ignition/Uninstall.run
Verify that Ignition Software is Genuine
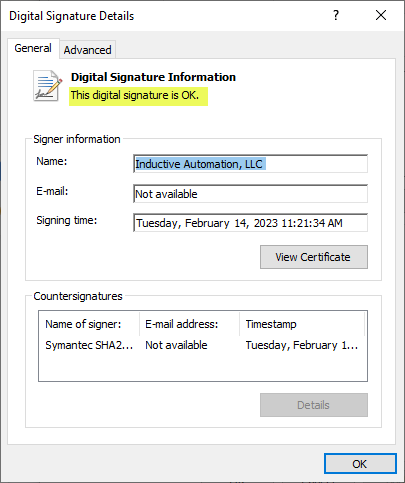
Code signing is applied to installers to help the OS prevent the installer from being run if it has been tampered with. Notarization is an additional step on macOS that works with Apple’s systems to validate that the software has undergone their malicious code scanning.
Name of signer: Inductive Automation, LLC
CN = DigiCert Trusted G4 Code Signing RSA4096 SHA384 2021 CA1
- Windows
- macOS Installations
- Linux Installations
View verification of the digital signature on Ignition’s installer on Windows in the User Account Control popup when running the installer. It can also be viewed in the Digital Signatures section of the file Properties dialog.
- Right-click on the installer and select Properties.
- Under the Digital Signatures tab, select the signature from the Signature list and click Details.

- If the text "This digital signature is OK" appears under the General tab, the installer is genuine and has not been manipulated.
On macOS, verification of the digital signature of the Ignition installer can be done using the codesign utility from the terminal:
codesign -dvv <path to mounted installer.app file>
Linux does not support a standardized certificate verification method. Linux users should verify that the download is authentic by comparing the hash of their file to the Inductive Automation website.
Verify the Download is Authentic by Hash Comparison
The Ignition automated build process writes a precalculated fingerprint (hash) to the download site allowing users to verify the authenticity of the download file. On the Downloads page, click sha-256 to view the hash for your selected installer file. You may also copy this hash to your clipboard for comparison.

A SHA256 hash of the downloaded installer package can be compared to the values on the website with terminal commands such as:
Get-FileHash path\to\installer
sha256sum /path/to/installer
Verify an Ignition Module Download is Authentic - Advanced
Ignition modules are collections of files and resources that are loaded and run by the Ignition Platform. Inductive Automation publishes a number of modules and third-party authors can also create modules through the Ignition Module SDK. In order to help verify file integrity of these modules, code signing is applied to ensure that the contained files and resources within the module package have not been tampered with.
Verification of a given Ignition module’s code signatures is handled automatically by the platform. The following manual verification steps (requires openssl) are listed below to provide a fuller understanding of the mechanisms at play:
- Extract the .modl file as a zip file into a working directory.
- Observe the contained certificates.p7b file which is a PKCS#7 package containing the certificate chain used for generating the signatures for each of the files within the .modl package.
- Observe the contained signatures.properties file. Each line contains a path to a file within the .modl package and a base64-encoded signature for the file.
- Extract the public key `signingPublicKey.pem from the certificates.p7b file with the following steps:
- openssl pkcs7 -outform PEM -in certificates.p7b -print_certs > certificates.cer
- openssl x509 -pubkey -noout -in certificates.cer > signingPublicKey.pem
- Decode the base64 content for a given file (from signatures.properties) into a signature file, e.g. signature.sign.
- Verify the signature of the file with the following:
- openssl dgst -sha256 -verify signingPublicKey.pem -signature signature.sign <file from .modl>
- Observe a Verified OK message indicating that the signature from signatures.properties for the respective file is correct.
System Rollback
Downgrading Ignition is not a supported use case of the Ignition upgrade, and can lead to unexpected problems. If you need to roll back to a previous version of Ignition, it is recommended to instead perform a clean reinstallation and restore a Gateway backup from the same version or older. When reinstalling Ignition, the Ignition service should first be uninstalled, and the Ignition installation directory itself should be deleted.