Using the SECS/GEM Module
Getting Started Tutorial
This tutorial will get you up and running with a demo project that uses the SECS/GEM Module.
Download and Installing the the Module
Go to the Downloads page and under the Device Connectivity section, download the SECS/GEM Module. Once the module is downloaded to your computer, install the module. This is done in the normal way that Ignition modules are installed by going to the Gateway webpage and selecting Configure > System > Modules. See the Installing or Upgrading a Module page for more information.
Before getting started, it's a good idea to establish a naming convention when setting up your SECS/GEM mdoule so you know at a glance what elements are related to each other. This is helpful when you have multiple pieces of equipment, simulators, databases, and equipment connections with keeping these elements organized.
Configuring the Database Connection
To set up a database connection in Ignition that you want to use with the SECS/GEM Module, go to the Config section on the Gateway Webpage. Scroll down to Database > Connections. The Database Connection name that is configured for this example is called SecsGem.
The SECS/GEM Module has been tested with MySQL, SQL, and Oracle Servers. The SECS/GEM Demo project that you will upload later as part of this tutorial currently only supports MySQL. More information about configuring a database connection can be found in Connecting to Databases.
Configuring the Simulator
The SECS/GEM Module can directly interact with a piece of equipment, but we can also use the built-in simulator. This tutorial will assume you are using a simulator. To configure a simulator, refer to the example below.
Example - Setting Up the Simulator
The instructions below will walk you through configuring the simulator. Most of the vaules can be left as defaults to get you up and running quickly.
-
Go to the Gateway webpage and select Config > SECS/GEM > Simulator.
-
On the Simulator page of the Gateway, click on the Create new Simulator link.
-
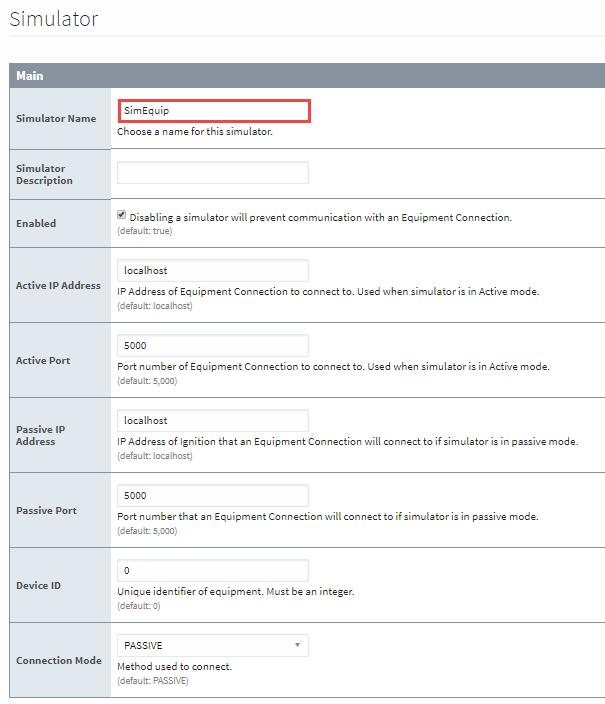
Simulator Name - enter the simulator name (ie., SimEquip).
-
Active Port - use the default port number of 5000. The port number needs to be unique if you're using multiple simulators.
-
Passive Port - use the default port number of 5000. The port number needs to be unique if you're using multiple simulators.
-
Device ID - use the default ID of 0. Each piece of equipment must have a unique device ID, and must be an integer.
-
Connection Mode - use the default Passive mode. The Connection Mode is a property that is configured in both the Simulator and Equipment Connection settings, and cannot be set to the same method. Alternating mode can be used, in which case, it will switch between Active mode and Passive mode until a connection is made.
-
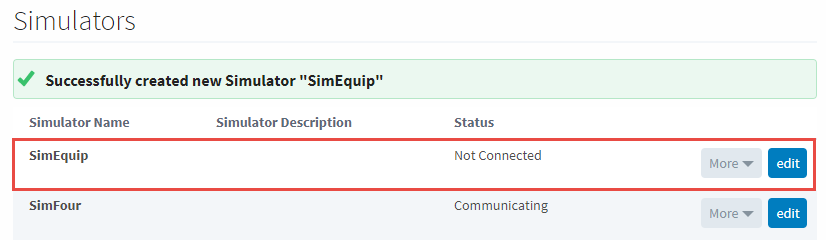
Click on the Create New Simulator button once you entered all your configuration settings. The window will refresh telling you the simulator was created successfully, and the status will toggle back and forth between "Connecting" and "Not Connected" until an equipment connection is created.
For more information on configuring a simulator, refer to the SECS/GEM Simulator page.
If you do not have a SECS/GEM Module license installed, the simulators and equipment connections will cause communication to be stopped when the Gateway Trial Mode expires in 2 hours. Reset the trial mode on the Gateway webpage to resume equipment and simulator communications. You can find more information about Trial Mode on the About the Trial Period page.
Creating an Equipment Connection
Once the simulator is configured, (or if there is an actual piece of equipment you wish to connect to), a connection to the Equipment must be made on the Config > SECS/GEM > Equipment section of the Gateway Webpage.
When creating the equipment connection, most of the settings can be left as the default values for this tutorial. Use the following instructions to configure the equipment connection.
- On the Equipment Connections page, click on Create new Equipment Connection....
- On the Add Equipment Connection Step 1: Choose Type page, select Ethernet/HSMS Connection, and click Next.
- On the Equipment Connection page:
-
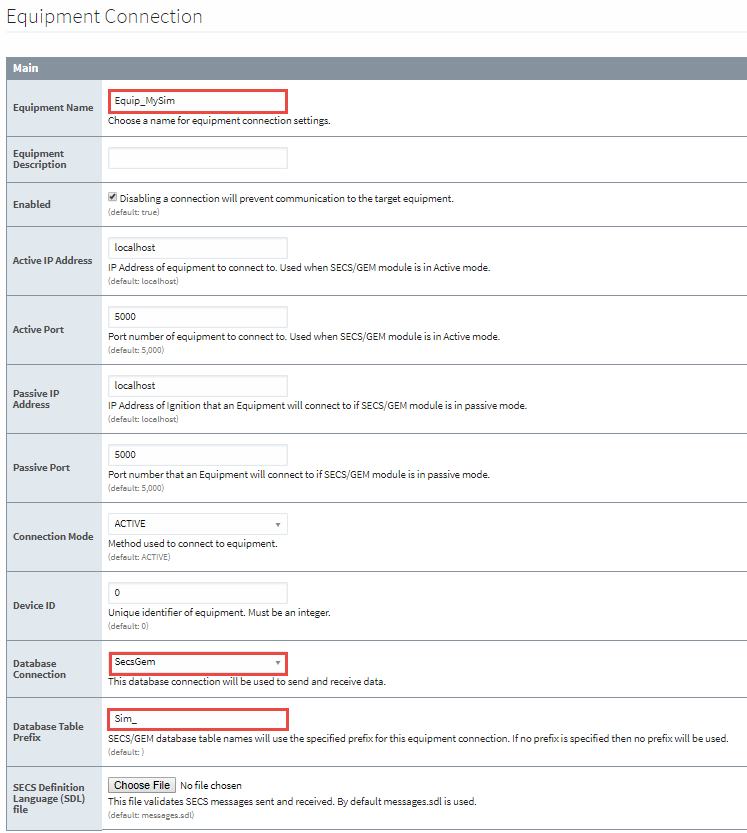
Equipment Name - enter the equipment name (i.e., Equip_MySim).
-
Enabled - default set to true. Enables communication to the target equipment.
-
Active IP Address - use the default of localhost.
-
Active Port - use the default port number of 5000. The Active Port number must match the port number used in the simulator configuration setup (i.e., 5000).
-
Passive IP Address - use the default of localhost.
-
Passive Port - use the default port number of 5000. The Passive Port number must match the port number used in the simulator configuration setup (i.e., 5000).
-
Connection Mode - use the default Active mode.
-
Device ID - the default ID is 0. Each equipment requires a unique identifier, and must be an integer.
-
Database Connection - enter the database connection name (i.e., SecsGem). This is the database name that was configured in Configuring the Database Connection step.
-
Database Table Prefix - enter a table prefix (i.e., Sim_). This is the prefix that will be prepended to each of the database table names that are automatically setup when the connection is made. If no prefix is specified, the table will still get created. The advantage of using a prefix is it helps keep database tables organized, and it is used to differentiate one equipment's tables from another equipment's tables. It also allows you to filter a project based on the prefix.
-
SECS Definition Language (SDL) File - use the default file messages.sdl. Validates sent and recieved messages.
-
Once all the configuration settings are entered, click on the Create new Equipment Connection button. The Equipment Connection will try to connect to the simulator that you setup in Configuring the Simulator section. The window will refresh showing a status of "Connecting" until the equipment connection is created.
-
More information connecting to a tool can be found on the SECS/GEM Equipment Connections page.
Equipment Connection Status
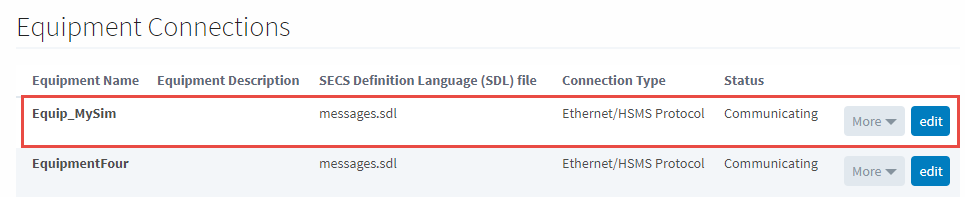
The status of the Equipment Connection is shown in the Status column on the Equipment Connections webpage. When the status changes to "Communicating", the Equipment Connection successfully connected to the simulator.
Download and Restore the Demo Project
At this point, the bare minimum requirements to start utilizing the SECS/GEM module have been met. However, there is a free SECS/GEM Demo Project available from the Ignition Exchange that can be very helpful. This demo project contains resources that allow you to start interacting with the SECS/GEM module.
The demo project can be found here: SECS/GEM Demo Project.
You can learn more about the Ignition Exchange, such as how to import the demo project, on the Ignition Exchange page.
Using the SECS/GEM Demo Project
Once you restored the demo project, launch a client from the Gateway Webpage under the Home section to begin using the module. For more information, refer to the page on Launching Clients.
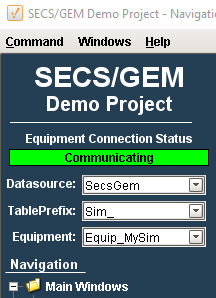
When the client is open, there will be three dropdown menus at the top left of the application. From the dropdowns, make the appropriate selections. If you followed the tutorial, the selections are shown below.
-
Datasource: select the database connection (i.e, SecsGem)
-
TablePrefix: select the TablePrefix (i.e., Sim_).
-
Equipment: select the name of your Equipment Connection (i.e, Equip_MySim).
You should now be able to view and send SECS messages in the application. You can get started by clicking on the Establish Comm menu item under the Navigation tree, and then by clicking on the Send S1F13 button. You will see some messages populate the Search & Display table.
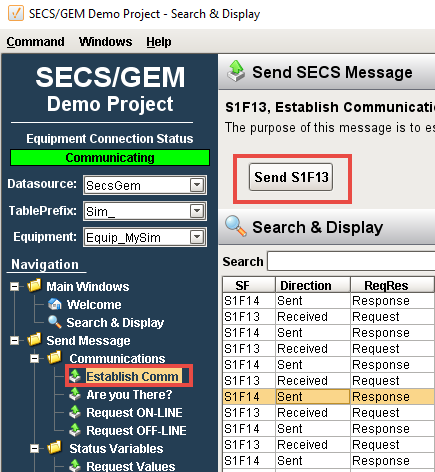
Display Tabs
The Display Tabs allow you to see the detailed SECS messages associated with each request and reponse. There are five Display Tabs: Simple, Tree, Table, JSON, and Python. Select any request or response from the Search and Display table and toggle the Display Tabs to view the SECs messages in their respective formats.
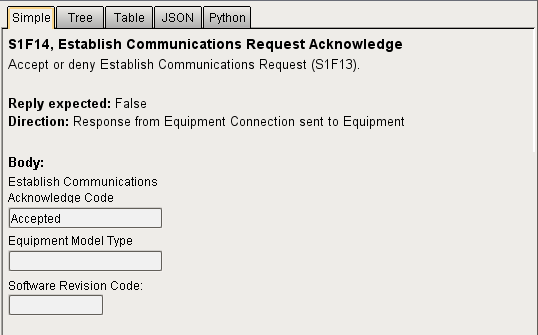
The Display Tabs below show the detailed response message (S1F14) returned back from the Establish Comm request (S1F13).
Simple Tab
Tree Tab
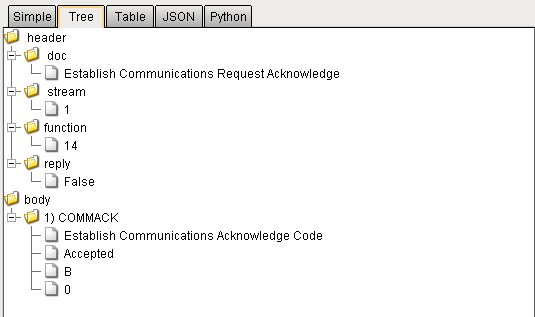
Table Tab

JSON Tab

Python Tab
