Notification Block
As the name suggests, the Notification Block is responsible for sending notifications. Each notification block can target multiple notification profiles, which represents different methods of notification, but it will only notify the user on the first profile that the user has contact information for. So having a notification block with both email and sms listed will first attempt to contact a person with the profile type listed first. If that fails because the user does not have contact information for that profile type, it will try the second profile. Each type of notification profile will have its own relevant properties for configuration, although some features are common to all profile types. The various profiles will also behave differently, according to their capabilities, in regards to how notifications are ordered. For example, the Email profile is capable of sending a message to many recipients at once, while the SMS and Voice notification profiles must step through each contact sequentially.
There are two required settings for notification blocks: the Notification Profile and the On-Call Roster. The profile will dictate the method through which notifications occur, and the on-call roster will dictate who receives the notifications. The on-call roster provides an ordered list of contacts, which will first be pared down according to each user's schedule. The resulting contacts will be notified in order, based on how the profile operates. The settings displayed will depend on the type of profile selected.
Notification
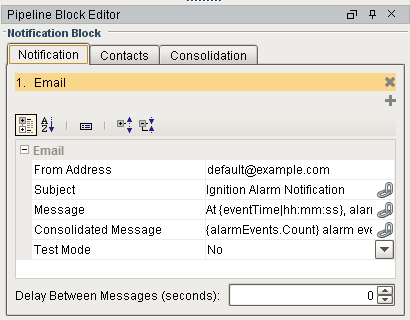
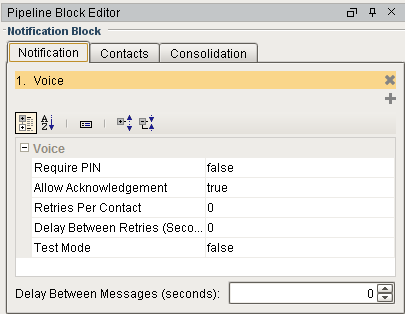
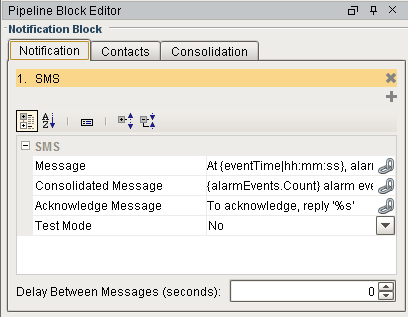
The notification tab allows you to select which notification profile you would like to use of the ones that you have currently configured in your gateway. The settings that can be configured differ, depending on the type of notification profile selected. However, all of the notification types share a setting, outside of the property area called Delay Between Messages. This property allows you to set a delay that will happen in between each notification. So if your delay is set to 30 seconds on an email notification, it will email the first person in the roster and then wait for 30 seconds before emailing the next person. It is set to zero seconds by default.

Email Settings
-
From Address - Email address used for the "From" field.
-
Message - The body of the email. Like the subject, may refer to properties of the alarm. Message supports HTML formatting. Simply add the
<html>tag at the beginning of Message property. An end tag(</html>)is not required.<html>This is my message. <br>That was a line break. -
Consolidated Message - The message sent when consolidation is turned on, and more than one alarm is being sent. Can refer to properties, and additionally support a special expansion syntax of "
{{ ... }}", where everything inside of the double curly braces will be repeated for each alarm in the consolidation group. -
Test Mode - If enabled, logs to the console each time an email would be sent, instead of sending the actual email.
Voice Settings
- Require PIN: If true, the user will need to enter their PIN in order to ehar the alarm notification messages. The user's PIN is defined in the user management section of the Gateway. If false, then anyone will be allowed to hear the messages after answering the phone.
- Allow Acknowledgement - If flase, users will only be allowed to listen to alarms, not to acknowledge them.
- Retires Per Contact - The number of retry attempts per contact per alarm. The default is set to 1.
- Delay Between Retries - Introduces a delay between calling each contact, for each alarm.
- The pipeline dropout conditions are checked regularly between calls and while waiting, so this would provide time for the alarm to drop out before calling the next person.
- The delay is only enforced after following a "successful" call (a call that was answered). Unanswered or errored calls will move on to the next contact right away. Note that long delays can block other alarms in the call queue.
- The delay is applied to all contacts for a particular alarm. For most phone systems, a delay of at least 1 second is advised.
- The system must have time between each call to hang up properly before dialing again.
- Test Mode - If enabled, messages will be logged to the console indicating when and to whom calls would have been made, without actually making a call.
SMS Settings
- Message - The message to use for single events.
- Consolidated Message - Like email, the message to use when multiple events are sent together, due to the block's consolidation settings.
- Delay Between Notification - As with voice, a delay between each message sent, to give the recipient time to acknowledge and prevent further notification.
- Test Mode - If enabled, logs messages that would have been sent to the Gateway console, and does not actually send them.
- New in 7.9.1Acknowledge Message - When two-way SMS notification is enabled, this property allows for the configuration of the acknowledgment instructions the users receive in the notification. The '%s' will be replaced by the user's acknowledgement code.
Message Properties
Both the email and SMS notification types have a few different message settings. There are properties that contain alarm values that can be used in these message settings. To use the property, place "{}" around it. The table below contains all of the properties available to them.
| Property Name | Property Display Name | Description |
|---|---|---|
| Count | {AlarmEvents.Count} | The number of alarm events that are in the pipeline. Typically used with alarm consolidation. |
| Maximum Priority | {AlarmEvents.MaxPriority} | The maximum priority of the alarms in the pipeline. Typically used with alarm consolidation. |
| Minimum Priority | {AlarmEvents.MinPriority} | The minimum priority of the alarms in the pipeline. Typically used with alarm consolidation. |
| Display Path | {displayPath} | The display path of the alarm. |
| Display Path or Source | {displayPathOrSource} | The display path of the alarm, or the sourcepath if no display path was defined. |
| Name | {name} | The name of the alarm. |
| Priority | {priority} | The priority of the alarm. |
| Source Path | {source} | The source path of the alarm. |
| Ack Time | {ackTime} | The time when the alarm was acknowledged. |
| Ack'ed By | {ackUser} | The username of the person that acknowledged the alarm. |
| Ack'ed By (Name) | {ackUserName} | The name of the person that acknowledged the alarm. |
| Acked? | {isAcked} | A True or False on if the alarm is acknowledged. |
| Active Time | {activeTime} | The time the alarm went active. |
| Active? | {isActive} | A True or False on if the alarm is active. |
| Clear Time | {clearTime} | The time the alarm went to a cleared state. |
| Clear? | {isClear} | A True or False on if the alarm is cleared. |
| Current State | {state} | The current state of the alarm. (Active, Unacknowledged/Active, Acknowledged/Cleared, Unacknowledged/Cleared, Acknowledged) |
| Event State | {eventState} | The state of the alarm event. (Active, Acknowledged, Cleared) |
| Event Time | {eventTime} | The time that the alarm event occurred. Can format the time to a specific format like: . |
| Event Value | {eventValue} | The value of the tag for the alarm event. |
| Is Shelved? | {isShelved} | Is the alarm shelved. |
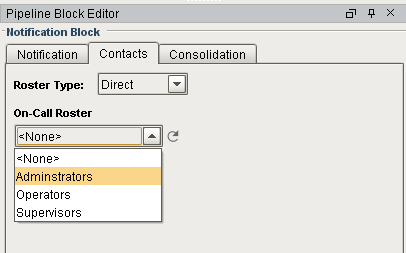
Contacts
From the Contacts tab, you can specify who you want to send the alarm notification to by specifying what roster type you want to use. There are three different ways to setup a roster:
- Direct - Set a specific roster to use.
- Expression - Set up an expression that will determine which roster to use.
- Calculated - Use scripting to build a roster within the pipeline.
Each has different advantages, so it's important to understand the difference so you can select the method that best fits your needs.
Direct
The Direct roster type is the simplest to set up and use, but also the least flexible. Any On Call Rsoter defined on the Gateway can be used directly.
Expression
The Expression roster type makes it possible to dynamically choose a single, predefined roster from within the pipeline. The expression can make use of Tag values, alarm properties, and associated data. The alarm properties are accessible from the Alarm Properties (![]() ) button located on the right side of the panel. Associated data can be manually entered using the
) button located on the right side of the panel. Associated data can be manually entered using the { and } characters. A list of rosters is available from the On-Call Rosters (![]() ) button.
) button.
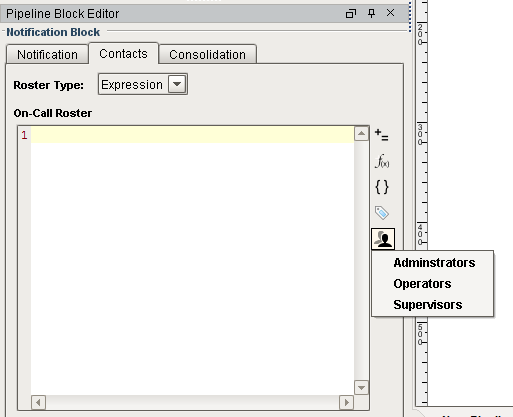
The expression below checks for associated data named "Group" on the alarm. If the value is equal to "A", the Group A roster is used, otherwise the Group B roster will be notified.
if({Group}= "A","Group A","Group B")
When Should I Use Quotation Marks on the Roster Name?
It is recommended to always place quotation marks around roster names. However, it is not always required for notifications to be sent out successfully.
If the expression consists of only the name of the roster, then quotes can be omitted. For example, specifying that a Notification block should always use the roster named "Operators" could look like the following with quotes:
// This expression will evaluate successfully.
"Operators"
Which would return the string Operators, a valid Roster.
In this scenario, quotation marks could be removed. This normally causes a syntax error, because strings in expressions must be encased in quotation marks. However, in this case, the Notification block will assume you simply typed out the name fo the roster, so the following example will also successfully use the Operators roster:
// This will fail to evaluate as an expression, so the block will instead look for a roster named "Operators",
// and the users will still be notified.
Operators
If the expression is any more complicated than the above example, such as using an expression function, then quotation marks must be used. The following example would check the priority of the alarm. If the alarm's property was "critical", then the High Priority Roster would be notified. For all other properties, the Low Priority Roster would be used.
// This expression will evaluate successfully.
if({priority} > 3, "High Priority Roster", "Low Priority Roster")
In this scenario, if the quotes were removed from the roster names, the expression would fail with a syntax error:
//This expression will fail, so all the text is assumed to the name of a Roster
if({priority} > 3, High Priority Roster, Low Priority Roster)
When this expression fails, the Notification block will assume that the text is actually the name of a roster, and will attempt to use a roster named **if({priority} > 3, High Priority Roster, Low Priority Roster)**. For this reason, it is a good idea to always place quotes around Roster names, as well as check your expressions for syntax errors.
Calculated
The Calculated roster type allows you to use scripting to create a roster at that time using scripting. This becomes extremely useful for situations when you are not sure who should be contacted at the time. Instead of creating an on-call roster for each possible combination of users, you can determine who needs to be notified in the script based on the circumstances of the alarm, and then build the roster to fit that scenario. While this is extremely powerful and offers the most flexibility, it is the most difficult to configure, so you should only use it when absolutely necessary.
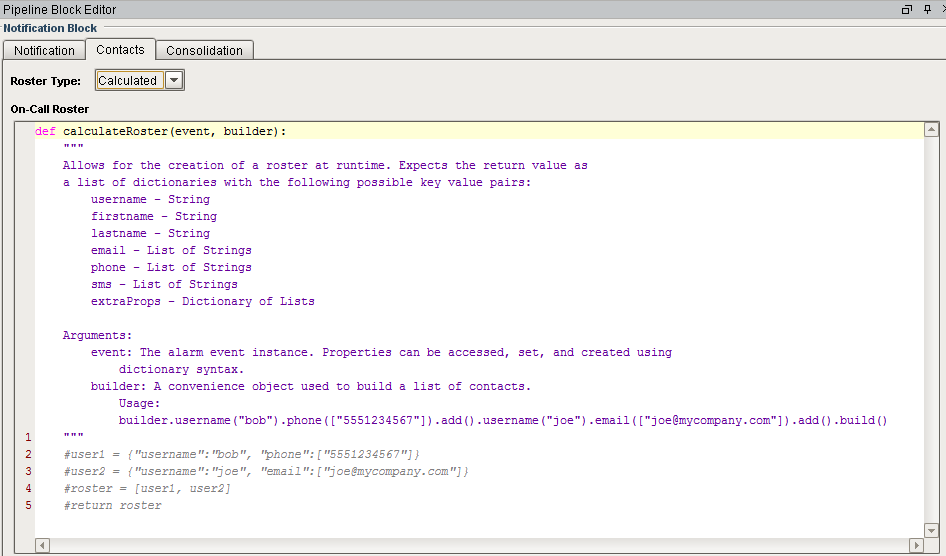
The Calculated roster type requires a return value which is a list of dictionaries, where each dictionary is a set of contact information. The contacts that you use are specific to that instance, meaning neither the user nor contact information have to exist on the Gateway. This can either be done manually, by putting together dictionaries with the appropriate contact info and then placing them into a list, or you can use the builder to put together the list for you. Both end up with the same results, so we advise that you use the one that you find easier. The builder has a set of methods which align with the key:value pairs the dictionary is expecting.
| Name | Description | Datatype |
|---|---|---|
| username | A username for this particular user. Note: this can be anything that you want, the user does not have to exist in the Gateway. This will be used for acknowledgement and auditing purposes, so it is important you create meaning usernames. | String |
| firstname | A first name for this particular user. | String |
| lastname | A last name for this particular user. | String |
| A list of possible email addresses for the user. | List of Strings | |
| phone | A list of possible phone numbers for the user for voice notification purposes. | List of Strings |
| sms | A list of possible SMS numbers for the user for SMS notification purposes. | List of Strings |
| extraProps | Extra properties that can be added to a user. This is useful when dealing with any third party functionality. | Dictionary of Lists |
User Data Created Manually
When putting together a dictionary manually, uou can use some or all of the properties listed in the table above. You can create as many dictionaries of users as you want, adding in as much or as little contact info. Once you have your dictionaries created, you then need to place them in a list. You then need to use that list as the return value, which the pipeline will use determine who to contact.
# create your user dictionaries
user1 = {"username":"mary", "email":["mary@company.com"]}
user2 = {"username":"john", "firstname":"John", "lastname":"Smith", "email":["john@company.com"], "phone":["1234567890"], "sms":["8905671234"]}

# create a list of the user data
userList = [user1, user2]

# return the user data
return userList
You can use this in conjunction with a database query to dynamically create a list of user information. See below for an example using the Builder.
User Data Created with the Builder
If you instead opt to use the builder, the builder object has a few extra methods that it can use besides what were listed above.
- add() - will add all previous info as a single dictionary.
- build() - will return the completed list of dictionaries.
The builder object is used by calling consecutive methods on it. Using the same info as the example above, you can add all of the contact info to the builder on a single line.
# Here, we are putting together contact information in our builder using one big string of code.
# Notice that even though it is one long string of code, we are adding both users.
# The first add() at the end of Mary's information acts as a divider between the details, adding hers first.
# The second add() at the end of the code will then add all of John's information.
builder.username("mary").email(['mary@company.com']).add().username('john').firstname('John').lastname('Smith').email(['john@comapny.com']).phone(['1234567890']).sms(['8905671234']).add()
While the above will work just fine, it may be a bit confusing to put together. However, you don't have to add all of the users at once like that. You can instead break it up, making sure to call add at the end of each user's information.
# Here, I still add all of the same contact information to my builder, but this time, I do it in two stages.
# The difference here is that I have to call builder again in the second line when adding John's information.
builder.username("mary").email(['mary@company.com']).add()
builder.username('john').firstname('John').lastname('Smith').email(['john@comapny.com']).phone(['1234567890']).sms(['8905671234']).add()
This can be really useful as it can allow you to add users one at a time, making use of flow control methods like a for loop. You can then use external information, such as database records or Ignition's built in user and security functions to determine who to add.
# This would grab a table from the database that contains a username, email address, and SMS number.
# We must specify the database connection name because this is in the gateway scope.
data = system.db.runQuery("SELECT username, emailaddress, smsnumber FROM user_info_table", "DB")

# loop through the returned query data
for row in data:
	# add users to the builder row by row
	# note the extra [] in the email and sms functions
	builder.username(row["username"]).email([row["emailaddress"]]).sms([row["smsnumber"]]).add()
Once you have all of the appropriate contact information added to the builder, you then call build() on the builder object. This will give us a new built object. We then return our userList as before. Using our example from above:
# get user information from the database
data = system.db.runQuery("SELECT username, emailaddress, smsnumber FROM user_info_table", "DB")

# loop through the returned query data
for row in data:
	# add each user to the builder
	builder.username(row["username"]).email([row["emailaddress"]]).sms([row["smsnumber"]]).add()

# use the builder object's build() function to create the finished list of data
userList = builder.build()
return userList
Consolidation
Notification consolidation allows you to limit the number of notifications sent by specifying a delay during which incoming events will be collected. When the delay expires, all events that have arrived during the period of time will be sent together to the notification profile. The manner in which the profile implements consolidation will vary, but in general the result will be a shorter message, or fewer messages, than would have occurred otherwise.
Consolidation is defined with two parameters:
- Delay - How long to wait after the first eligible alarm arrives. This setting forces a pause before sending a notification. The delay is used to protect against situations where an event might generate many alarms together. In other words, if an alarm comes into the Notification Block, it will be delayed for this amount of time in case there are other alarms arriving soon.
- Frequency - The max frequency with which the profile can send alarms. This setting forces a pause after sending a notification. The frequency is used to ensure that contacts aren't notified too often; for example, if an alarm is rapidly going in and out of the active state.
