Configuring Alarms
This page covers configuring alarms on tags and OPC items, alarm property reference, and alarm property bindings.
Alarms can be configured on Memory tags, Query tags, Expression tags, tags inside a UDT, OPC items in SQL Bridge (Transaction Groups), and System tags such as Gateway Performance and CPU Usage.
Dataset type tags are not supported by the Alarming system.
Configuring an Alarm on a Memory Tag
This example uses a Memory tag with an Integer data type.
-
In the Tag Browser, double-click a Memory tag to open the Tag Editor.
-
In the Categories panel, select Alarms.
-
Click the Add
 icon in the bottom-left corner of the window, or double-click the New Alarm item to add a new alarm.
 -
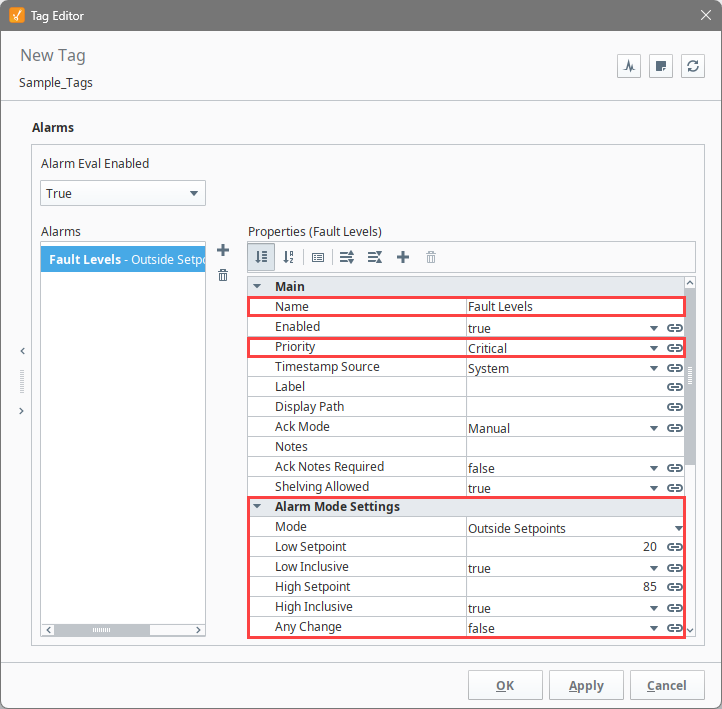
Configure the following alarm settings:
- Name: Fault Levels
- Priority: Critical
- Mode: Outside Setpoints
- Low Setpoint: 20 (alarm triggers when the value falls below 20)
- Low Inclusive:
true(alarm also triggers when the value equals 20) - High Setpoint: 85 (alarm triggers when the value rises above 85)
- High Inclusive:
true(alarm also triggers when the value equals 85)
-
Click Apply to save your alarm.
-
Click OK to save your tag edits.
Ignition will start monitoring the alarm immediately. The Alarm ![]() icon appears in the Tag Browser next to the tag name, indicating at least one alarm is configured on the tag.
icon appears in the Tag Browser next to the tag name, indicating at least one alarm is configured on the tag.
![]()
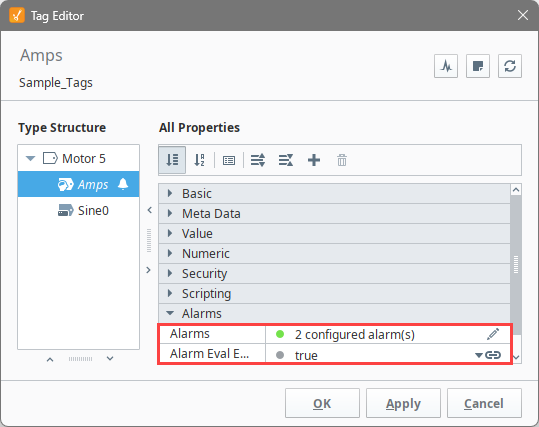
Configuring Alarms on Tags in a UDT
Alarms can be configured on tags inside a UDT so that when you create instances of that UDT, the alarms are automatically applied.
This example configures an alarm on the Amps tag of a Motor UDT.
-
In the Tag Browser, double-click a UDT to open the Tag Editor.
-
In the Type Structure area, click a tag.
-
In the Categories panel, select Alarms.
-
Click the Add
icon. -
For this example, configure the following settings:
- Name: Low Amps
- Priority: High
- Mode: Below Setpoint
- Setpoint: 30
- Inclusive:
true(alarm triggers when the value equals 30 or falls below)

-
Click Apply to save your alarm.
-
Click OK to save the UDT.
Once you create UDT instances, Ignition will start monitoring the alarm immediately.
Updates to the UDT and Overriding Alarm Settings
If an alarm in the UDT is updated, instances automatically receive the update. When alarm property values need to be unique for a specific instance, you can override alarm settings. Click the override button on the alarm UI in the Tag Editor (it turns green when active) and edit the properties and their values as needed. For more information, refer to Overriding Properties of the Parent UDT.
Configuring Multiple Alarms on a Single Tag
Tags can have multiple alarms configured, each with unique setpoints and other settings. Adding additional alarms follows the same process as adding the first. Click the Add ![]() icon in the alarm UI and configure the new alarm. This allows separate alarms to monitor different thresholds, such as both high and low setpoints on the same tag.
icon in the alarm UI and configure the new alarm. This allows separate alarms to monitor different thresholds, such as both high and low setpoints on the same tag.
Alarm Properties
Alarm properties control the behavior of each alarm. For a complete reference, see the Tag Alarm Properties page.
Configured alarms appear under the Alarms node of an alarmed tag in the Tag Browser.
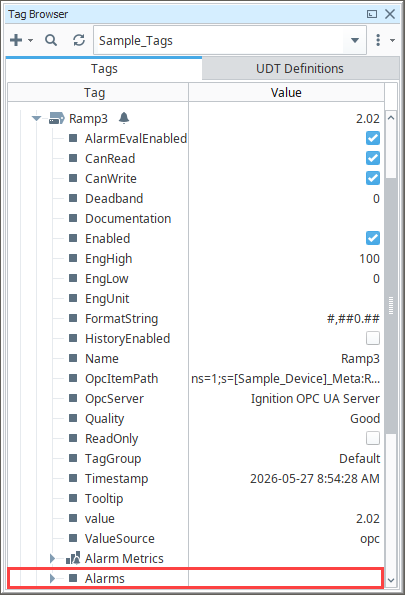
Expanding an individual alarm reveals its runtime attributes, which are accessible to Tag bindings and scripts.
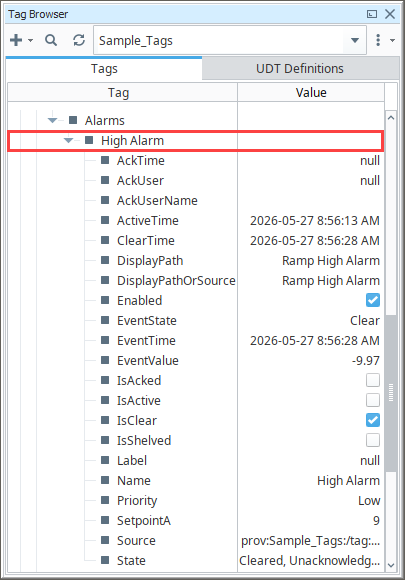
Setpoint and Enabled properties can be modified directly through tag attribute writes at runtime. For example, a Perspective component can bind directly to an alarm's setpoint attribute.
| Property | Description |
|---|---|
| Name | A unique identifier for the alarm. Supports forward slashes (/), though only the characters after the rightmost slash are displayed in alarm table components, the Tag Browser, and alarm scripting functions. To avoid confusion, avoid using forward slashes in alarm names. |
| Priority | The priority level of the alarm. Options include Diagnostic, Low, Medium, High, and Critical. |
| Display Path | An organizational path used to group alarms in alarm display components. |
| Notes | Supplemental notes or information about the alarm. |
| Enabled | Determines whether the alarm is active. Can be bound to a tag to toggle alarming at runtime. For example, this can disable alarms when production is stopped. |
Alarm Modes and Setpoints
Each alarm is configured with one mode and usually one or more setpoints. The mode determines how alarm activity is evaluated, while setpoints are the thresholds that determine when a tag is in an alarm state. Both work together to control when alarms become active and when they clear.
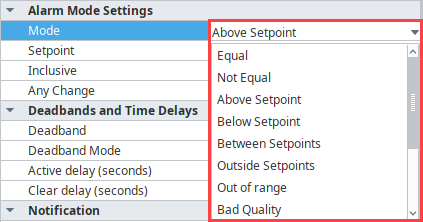
The available modes can be selected from the Mode dropdown.
| Property | Description |
|---|---|
| Mode | The condition that triggers the alarm (e.g., Above Setpoint, Below Setpoint, Between Setpoints, Outside Setpoints, Bit State, Bad Quality). For the full list, see the Alarm Mode Settings table. |
| Setpoint | The threshold compared against the tag's value. Usage varies by mode. |
| Low Setpoint | The lower threshold for range-based modes such as Between Setpoints or Outside Setpoints. |
| High Setpoint | The upper threshold for range-based modes. |
| Inclusive | When true, the alarm triggers when the tag value equals the setpoint. |
| Bit Position | Used with Bit State mode. Specifies which bit of an integer tag to monitor. |
A common PLC pattern is to pack multiple alarm conditions into a single integer tag, where each bit represents one condition. Ignition can read that integer as a tag through its OPC UA server, and the Bit State alarm mode lets you configure a separate alarm for each bit. The Bit Position property specifies which bit the alarm monitors.
For example, an 8-bit integer with a value of 142 has the binary representation 10001110. A tag holding this value can have up to eight alarms configured, one for each bit, each triggering based on the state of its assigned bit.
| Binary | Decimal |
|---|---|
| 10001110 | 142 |
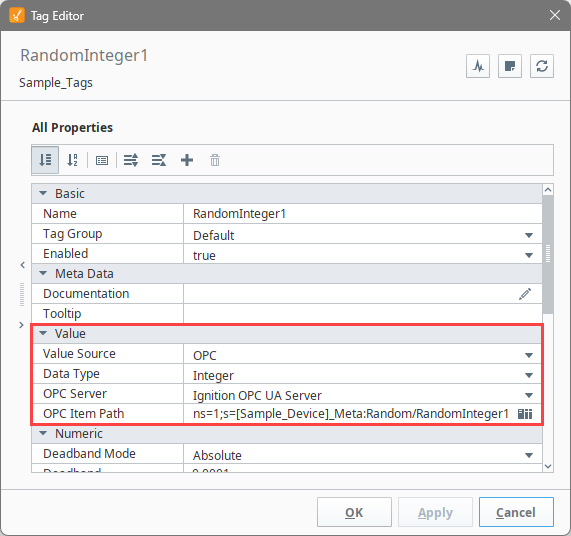
Configuring Alarms on Individual Bits
-
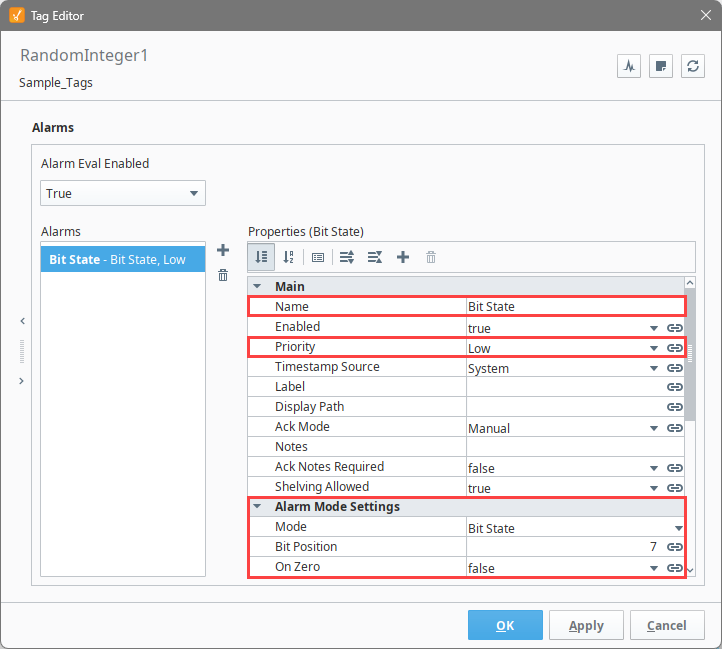
In the Tag Browser, double-click an integer tag to open the Tag Editor. In this example, we will use the RandomInteger1 tag.
-
In the Categories panel, select Alarms.
-
Click the Add
icon to add a new alarm. -
Configure the following alarm settings:
- Name: Bit State
- Priority: Low
- Mode: Bit State
- Bit Position: 7
-
Click Apply to save your alarm.
-
Repeat steps 3 through 5 for each additional bit, incrementing the Bit Position value as needed.
Deadband and Time Delays
The deadband value is interpreted by the Deadband Mode. All alarms are only evaluated after a tag's value changes, meaning the tag's own deadband is applied first. When the deadband is positive, an active alarm must clear its setpoint(s) by the deadband amount before the alarm transitions to cleared.
For example, a Between Setpoints alarm with a Low Setpoint of 45, a High Setpoint of 65, and a Deadband of 3 becomes active when the value is between 45 and 65, but only clears when the value falls below 42 or rises above 68.
The Active Delay property prevents alarms from triggering until a tag has remained in an alarm state for a set period of time. This is useful when a tag briefly and frequently enters and leaves an alarm state.
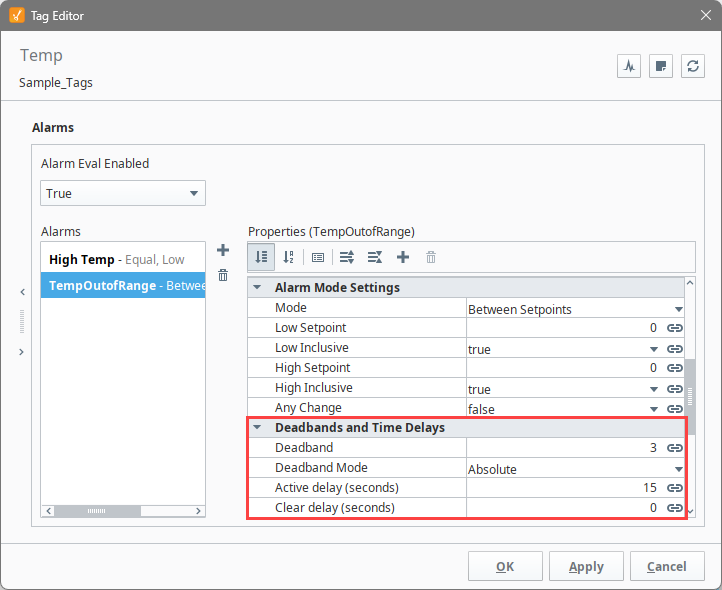
| Property | Description |
|---|---|
| Deadband Mode | Determines how the deadband value is applied. |
| Deadband | The amount by which an active alarm condition must clear its setpoint(s) before the alarm transitions to cleared. |
| Active Delay | The duration a tag must remain in an alarm state before the alarm is triggered. |
| Clear Delay | The duration a tag must remain in a cleared state before the alarm is marked as cleared. |
For more information, refer to the Reference Table on the Tag Alarm Properties page.
Associated Data
You can extend alarm properties by adding your own Associated Data, which are custom properties attached to a configured alarm. Values can be static or dynamic. Static properties are useful for filtering alarms; dynamic properties can be driven by another tag or evaluated with an expression. Associated Data values are attached to the alarm event, visible in real time, and recorded in the Alarm Journal.
Alarm Property Bindings
Many alarm properties are bindable and can be bound to other tags in the system, expressions, or UDT parameters. For example, you might bind the Enabled property to a tag representing whether your process is running, thereby disabling the alarm when production is stopped. Or, bind a setpoint to a tag that operators can adjust, allowing the setpoint to change at runtime.
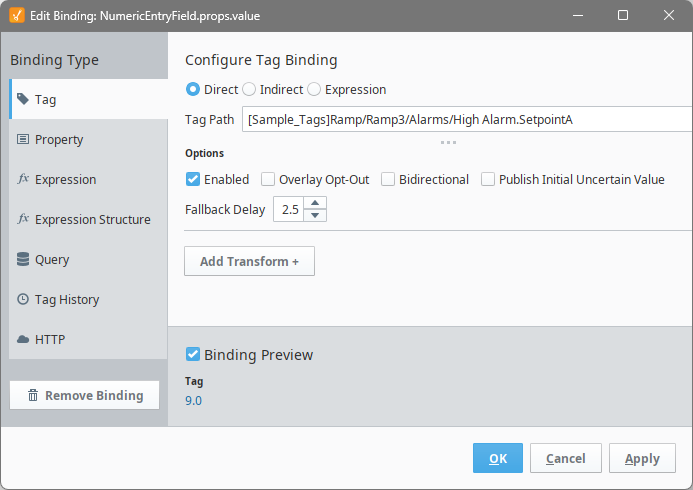
This example shows how to bind an alarm property from the Tag Browser in Perspective.
-
Double-click a tag to open the Tag Editor.
-
In the Categories panel, select Alarms. If no alarms exist, first create one using the steps in Configuring an Alarm on a Memory Tag.
-
Select the alarm. The screen refreshes with all alarm properties.
-
Find the property you want to bind and click the binding icon to open the binding editor.
-
Select a binding type from Tag, Expression, or UDT Parameter. The image below shows an Expression binding. The expression can reference the tag's value and other alarm settings. Enter your expression.
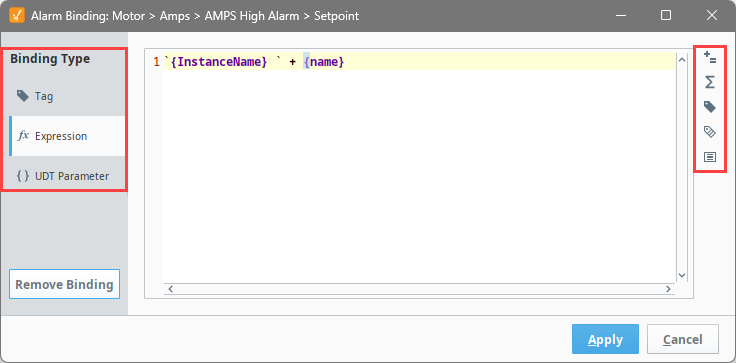
-
Once the binding is configured, click Apply.
-
Click OK to save the changes to the tag.
For more information on property bindings, see Property Bindings in Perspective and Property Bindings in Vision.
Alarms in Transaction Groups
Alarms can be added to OPC items in Transaction Groups, allowing alarms to be used without creating a tag in Ignition. An OPC item references a value on an OPC server through its OPC Item Path, the same path used when configuring an OPC tag with OPC as its Value Source.
In a Transaction Group, selecting an OPC item exposes an Alarming section in the item's properties. Adding and configuring an alarm on the item follows the same steps as adding an alarm to a tag.
Transferring System Tag Alarm Configurations
Although System tag configurations and alarms cannot be imported or exported through the Tag Browser, scripting can be used to extract them into a JSON format. The resulting .json file can be transferred to another system and used to configure the System tags there. See the Exporting and Importing System Tag Alarm page for examples.