Understanding Transaction Groups
Transaction Group Workspace
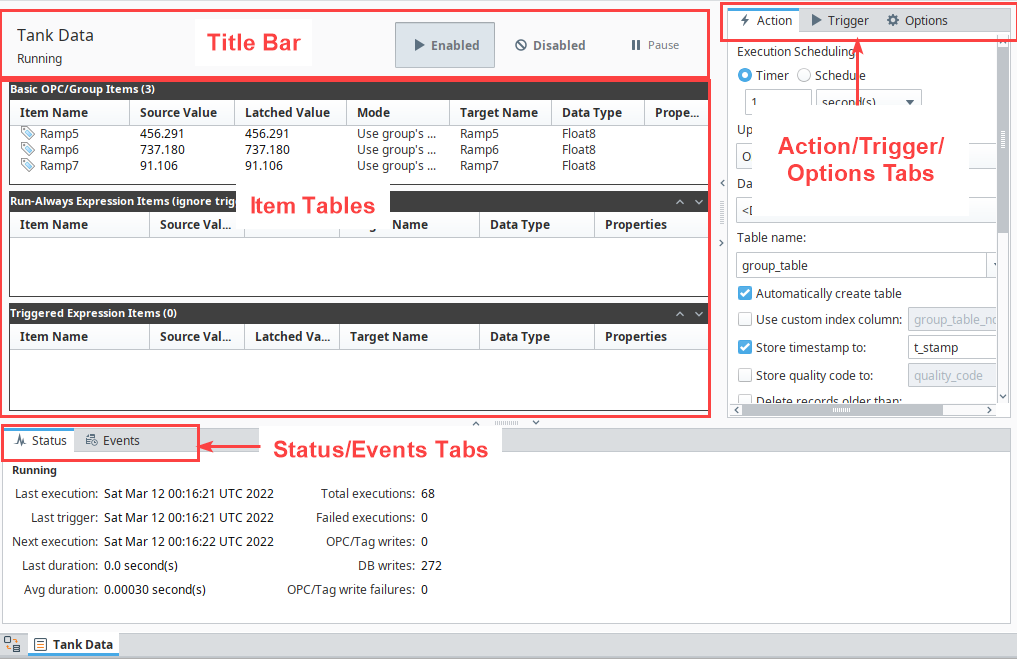
Transaction Groups are edited through the Ignition Designer. When a group is selected, you are presented with the transaction group workspace. The workspace is broken into several parts:
- Title bar - Shows the name of the currently selected group, as well as options to set it as Enabled or Disabled, and to Pause, if it's currently executing.
- Item tables - Shows all of the items configured in the selected group. Many settings can be modified directly through the display, the rest by double-clicking the item or selecting Edit in the context menu.
- Action / Trigger / Options tabs - Defines how and when a group executes. Holds most of the options that apply to the group in general, such as the update rate, and which data connection it uses.
- Status / Events tabs - Provides information about the executing group, including the most recent messages that have been generated.
Welcome Page
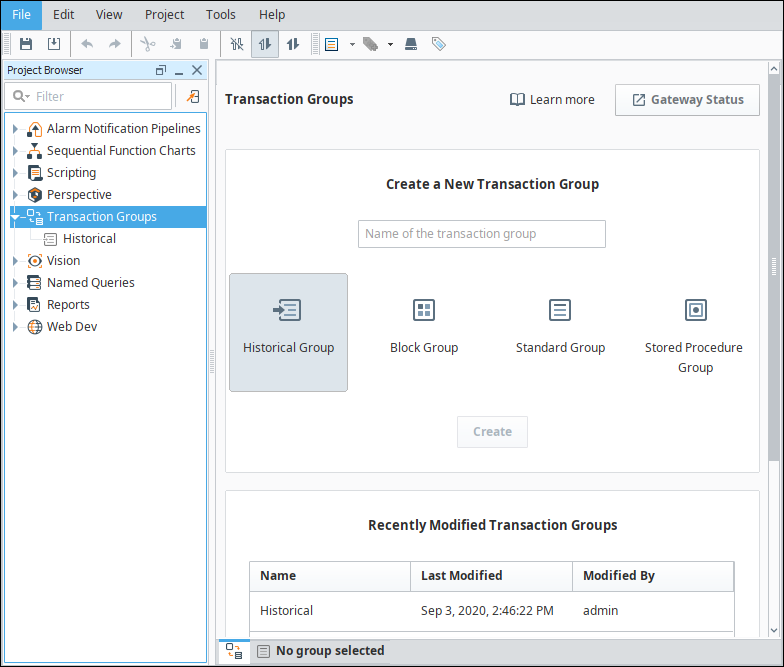
The Transaction Group Welcome page allows you to create any one of the four types of transaction groups. Each one of the transaction groups is basically a template to help you get started creating your transaction group. Once you select a Transaction Group, enter a name, and press 'create', and the specific transaction group template will open. All you have to do next is enter the tags for the values you want to collect. The Transaction Group Welcome tab will show you any recently modified transaction groups along with the date it was modified and who modified it. You can even double click on a recently modified chart and open it.
Items
Each Item (tag) in the Transaction Group consists of several properties, which are sorted by column. The key columns are the Source Values, Latched Values, and Target Name. The remaining columns are more straight-forward in their purpose. The Data Type column lists the data type of the group item while the Properties column displays any additional configurations made to the item, such as alarming or a specified function.
Source and Latched Value
The Source Value will be the value of the items source. This can be something like a tag or a direct OPC Item if writing to the database, but can also be the value pulled from the database if in DB to OPC mode. This value can change in between executions, depending on the source type. When the source is a tag, it will update as the tag updates, depending on how the Tag Group for the tag is set. However, if the source is an OPC Item, it will update only when the group executes, unless the OPC subscription rate is overridden in the group.
The Latched value will be the value that was written at execution. This can be the value that gets written to the database on execution in OPC to DB mode, or it can be the value that gets written to the tag in DB to OPC mode. The value will only change on execution of the group.
Target Name
In most cases, the Target Name is a column on the database table the Transaction Group is associated with. However, it is possible to have the Target Name 'Read-only'. When set to 'Read-only' the value of the item will not be tied to any columns in the database, but is still visible from the Transaction Group and can be used as a trigger.
Enabling Group Execution
In order for groups to be evaluated, they must first be enabled. This is done by selecting Enabled in the group title bar, and then saving the project. The group executing can be stopped by reversing the procedure and selecting Disabled before saving. If you want to quickly and temporarily stop the group's evaluation, toggle the Pause button. This will prevent execution until the group is enabled again, or until the system is restarted.

Transaction Groups exist in a project, but they execute in the Gateway space. This means that once your groups are enabled, they do not need (or use) Vision clients or Perspective sessions in order to run.
Editing Group Settings
Group settings may be modified at any time, regardless of whether or not the group is executing. Modifications will be applied when the project is saved, and the group will be started or stopped as required. Some changes such as modifying items may cause features like live values to appear to be incorrect. It is therefore important to notice the modified icon that appears next to the group, and to save often. If you would prefer to stop the group before making edits you can simply pause the group. Execution will begin again after the project is saved.
Action Items
The action settings of a Transaction group define how often the group will be evaluated, as well as important settings that apply to the group as a whole. They are found on the Action tab, the first of the tabs on the right side of the Transaction Group workspace.
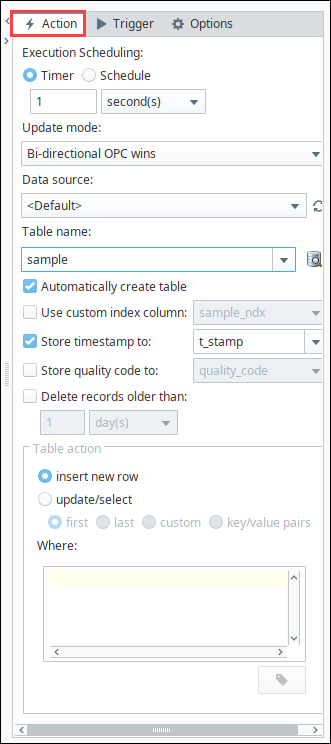
The Action settings vary for the different types of Transaction Groups, but a few settings are common to most of them:
| Setting | Description |
|---|---|
| Execution Scheduling | Despite the name, determines how often the group is evaluated. For a number of reasons, the group may not execute during the evaluation. The most common reason is the trigger, but see Execution Cycle below for more possible reasons why evaluation will exit.
|
| Update mode | For groups that support it, sets the default for how items are compared to their targets. Options are:
|
| Data source | The database connection name the group should use. Can be Default, which will use the default connection for the project. |
| Table name | Name of the table in the database that the group should interact with (reading or writing, depending on the Update mode and individual item Mode settings). The tables listed in this dropdown are determined by the Data source property. This setting allows you to type arbitrary names into it. If you type the name of a database table that doesn't exist, and the Automatically create table setting is enabled, then the group will attempt to create the database table on start. |
| Automatically create table | If enabled, the Transaction Group will attempt to create a database table once the group starts running, assuming one doesn't already exist as determined by the Table name setting. If the table already exists, then nothing happens. |
| Use custom index | If left disabled, the group will attempt to add an index column to the database table when the group starts executing. If enabled, the group will use the column selected in the adjacent dropdown, or create a new column if you type in a column name that doesn't exist on the table (requires the Automatically create table setting to be enabled). |
| Store timestamp | If enabled, will attempt to store a timestamp value to the column specified in the adjacent dropdown. If you type in a column name that doesn't exist on the table, the group will attempt to create the column on start, assuming the Automatically create table setting. |
| Store quality code | Stores an aggregate quality for the group along with the regular data. The aggregate quality is a bit-wise AND of the qualities of the items in the group. |
| Delete records older than | If enabled, and the group is running, this setting will make the group delete older rows in the table. Options are minute(s), day(s), month(s), and year(s). While enabled, a task will be created to check the database tables for older records. The rate this task occurs is determined by frequency configured on this property. If the configured frequency is:
New in 8.1.19 Transaction Groups using this property will use timestamps instead of the row index the record was inserted at when pruning. |
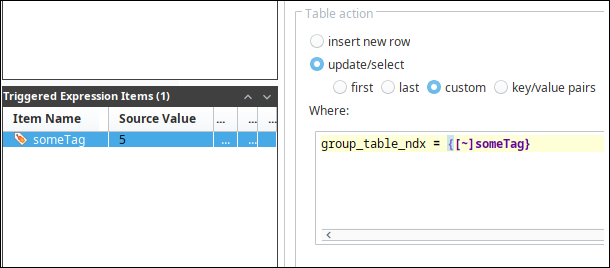
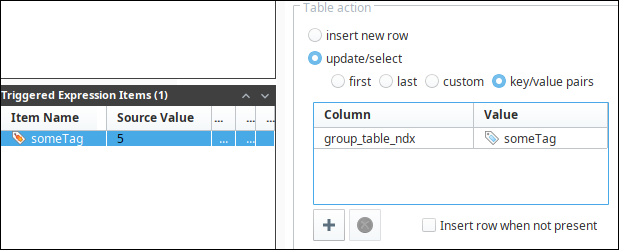
| Table Action | Defines which row will be targeted by the group.
|
Group Update Rate
Groups generally work on a timer. They are set to run at a certain rate. As they are running at that certain rate, they then check the rest of the settings. If the trigger conditions pass, the group is executed fully.
The Execution Schedule controls the rate at which the transaction group executes. On the Action tab of a group you selected, under Execution Scheduling, there are two options: Timer and Schedule. Timer, executes the group at a certain rate. Schedule, executes the group at specific times. When the Schedule option spans across a period of time, you must specify the rate at which the group executes during that time.
Timer
The Timer acts as the heartbeat of the transaction group and is evaluated at the provided rate. It can run at millisecond, second, minute, hour, or day rates. The Timer specifies the OPC tag subscription rate for the OPC tags. When a Timer is running the transaction group it first analyzes the tags inside the Basic OPC/Group Items section of the transaction group. Then it looks at the trigger configuration and evaluates for tag changes. Then it evaluates the specific trigger conditions and decides to execute on a trigger. Depending on the trigger settings, full execution may not occur, but the trigger will at least be evaluated at this rate. If the triggered condition is true, the transaction group proceeds to the Triggered Expression Items section of the transaction group. Only after this flow is complete, will the transaction group interact with the database, and for example, insert the tag values into the database.
Schedule
An important difference between the Timer and the Schedule options is that the schedule option will automatically align to the specified start time on the update rate. With Schedule mode, you are providing a list of time (or time ranges) that the group should run at. If the pattern specified includes a time range, a rate must be provided, and the group will evaluate as in timer mode during that period.
The schedule is specified as a comma separated list of times or time ranges. You may use the following formats:
- 24-hour times. "8:00, 15:00, 21:00", for execution at 8am, 3pm, and 9pm.
- 12-hour with am/pm (if not specified, "12" is considered noon): "8am, 3pm, 9pm"
- Ranges, "8am-11am, 3pm-5pm"
- Ranges that span over midnight, such as "9pm - 8am"
When using ranges, the execution times will be aligned to the start time. For example, if you specify a schedule of "9am - 5pm" with a rate of "30 minutes", the group will evaluate at 9, 9:30, 10, etc., regardless of when it was started. This is a useful difference compared to the Timer mode, which runs based on when the group was started. For example, if you want a group that runs every hour, on the hour, you could specify a 1 hour rate with a range of "0-23."
Execution Cycle
All of the Transaction Groups follow a similar execution cycle. The flow may differ based on the group's configuration, but the general cycle is always the same.
- Timer determines it is time to evaluate.
- Is the group paused? If so, end the cycle.
- Is the Gateway part of a redundant pair? If so, is it active? If not active, end the cycle. Groups only execute on the active node.
- Evaluate run-always items: OPC items, tag references, and expression items set to ignore the trigger (or items placed in the run always section of the Configuration window).
- Is trigger set/active? If there is a trigger defined, but it is not active, end the cycle.
- Evaluate "triggered" Expression items.
- If applicable, read values from the database.
- Compare items with their targets.
- Execute any writes.
- Report alarms configured on the executed items
- Acknowledge the trigger, if applicable.
- Write handshake value, if applicable.
If an error occurs at any stage besides the last stage, the cycle will end and a failure handshake will be written, if configured. The group will attempt execution again after the next update rate period.
When the "Bypass Store and Forward System" option is false, writing to a database from the Transaction Group will result in a successful execution if the database write enters the Store and Forward Pipeline.
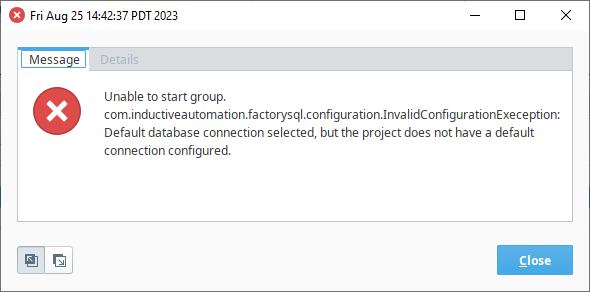
If the group errors due to a bad database connection, it will need to be manually restarted once the database connection is brought back.
Trigger Settings
The Trigger tab contains settings that modify how the group executes. The outcome of an execution is handled in the handshake section of the trigger section of the transaction group.
The table below is a list of Trigger and Handshake settings.
| Setting | Description |
|---|---|
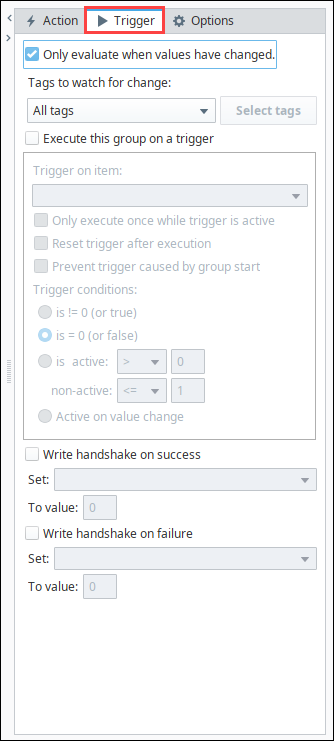
| Only evaluate when values have changed | Enabling this setting will cause the group to evaluate only if values or Tag qualities have changed. If the values have not changed, it will exit the evaluation. You have the option to monitor all Run-Always items in the group, or only specific ones.
|
| Execute this group on a trigger | Enables a trigger on a specific item in the group. The trigger item can be any Run-Always item, such as an OPC item, tag reference, or an Expression item set to "Run-Always" mode. Note: When using triggers in a Block Group, the intended trigger will need to be under Basic OPC/Group Items instead of Block Items order for the trigger to show in the Trigger on item dropdown list.
|
| Only execute once while trigger is active | The group will only execute once when the trigger goes into an active state, and will not execute again until the trigger goes inactive first. If unselected, the group will execute each cycle while the trigger conditions evaluate to true. |
| Reset trigger after execution | If using the "!=0" or "=0" trigger modes, the trigger can be set to write an opposite value after the group has executed successfully. This is useful for relaying the execution back to the PLC. |
| Prevent trigger caused by group start | If selected, the group will not execute if the trigger is active on the first evaluation of the group after enabling the group. Selecting this option will prevent initial executions caused by system restarts, or reenabling the group. |
| Trigger conditions | Set any of the following trigger conditions:
|
| Write handshake on success | Set the item and the value you want to see when the group executes successfully. |
| Write handshake on failure | Set the item and the value you want to see when an error prevents the group execution. |
To learn more about configuring Transaction Groups with the different trigger options, refer to the Trigger Options page.
Advanced Settings
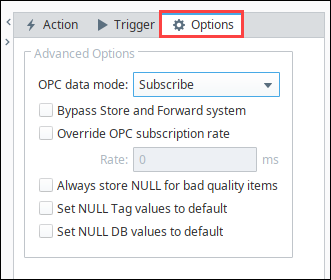
Transaction Groups offer several advanced settings that affect how execution occurs. These settings can be found under the Options tab for a group.
The table below describes the Advanced settings.
| Setting | Description |
|---|---|
| OPC Data Mode | Modifies how the group receives data from OPC. Options are Subscribe or Read.
|
| Bypass Store and Forward System | This setting is only applicable to groups that insert rows into the database. Causes groups to target the database directly instead of going through the store-and-forward system. If the connection becomes unavailable, the group will report errors instead of logging data to the cache. |
| Override OPC subscription rate | Specifies the rate at which OPC items in the group will be subscribed. These items are normally subscribed at the rate of the group, but by modifying this setting it is possible to request updates at a faster or slower rate. |
| Always store NULL for bad quality items | With this option set to True, it will force the group to store a NULL value when the item has a bad quality, instead of writing the bad quality value. |
| Set NULL tag values to default | If a NULL is read from the tag, it will instead use a default value to write to the database, depending on the type. This can prevent errors for database columns that do not accept NULL values. The default values are the same as the table above. |
| Set NULL DB values to default | If a NULL is read from the database, it will instead use a default value to write to the tag, depending on the type. This can prevent errors for OPC tags that do not accept NULL values. Not available in a Historical Group. Enabling the Set DB Values to Default setting on Block Groups will clear the latched value, setting the item to a default if the corresponding database value is Null. The following types will have the following corresponding values:
|
Troubleshooting
It may be helpful when troubleshooting or testing Transaction Groups to increase the default thread pool count. Refer to the Gateway Configuration File Reference - Thread Pool Counts for more information.
Events Tab
In the Events tab, the list of events will have a brief summary of the occurrence. Double-click an event to display a pop-up with a more detailed description.

Creating a Transaction Group
This example demonstrates how to configure a transaction group, specifically a Historical Group. However, the process of creating any transaction group type is very similar, especially so in the case of a standard group. The Transaction Group Examples section contains more examples.
-
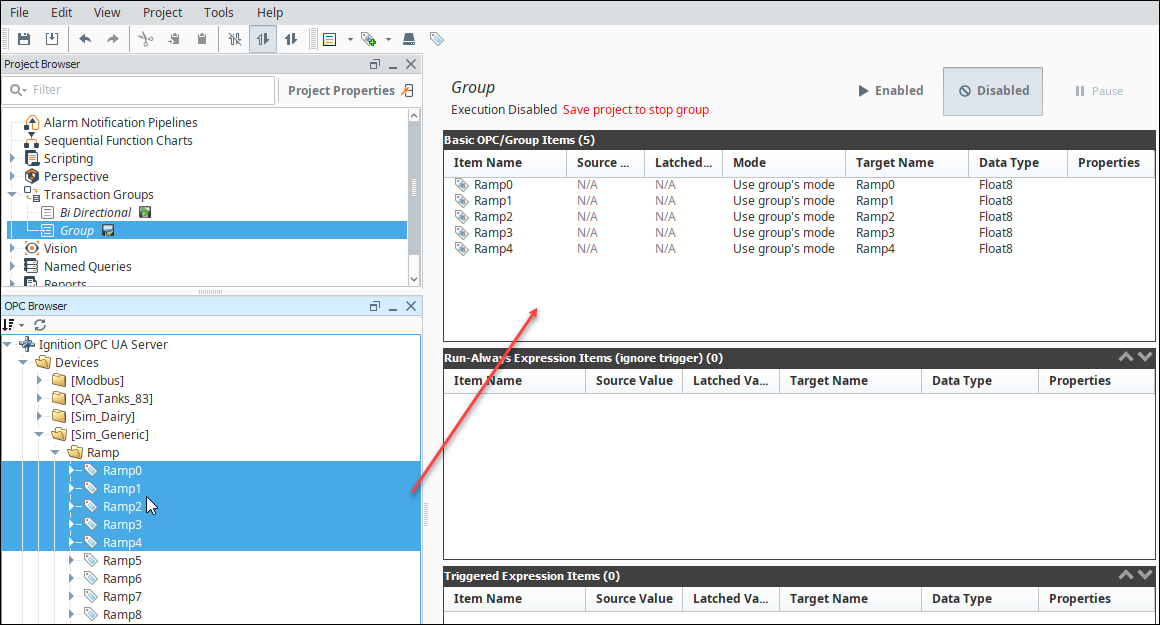
Click on the Transaction Groups in the Project Browser to switch the Designer's workspace to the Transaction Group workspace.
-
In the Project Browser, right click on Transaction Groups > New Transaction Group to make a New Historical Group. Name the group 'Group.'

-
Browse your OPC device and drag some OPC tags to the Basic OPC/Group Items section. The group starts out 'Disabled' by default.
-
Save your project.
-
Click the Enabled button above the item ables to enable logging.

-
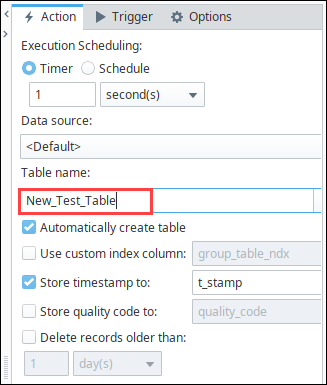
Go to the Action tab and change the Table Name. For the example, we gave it the name "New_Test_Table". At this step, your group only exists in the Designer.
-
Save your project to start the group. Your group is now running and logging data to your database connection.
-
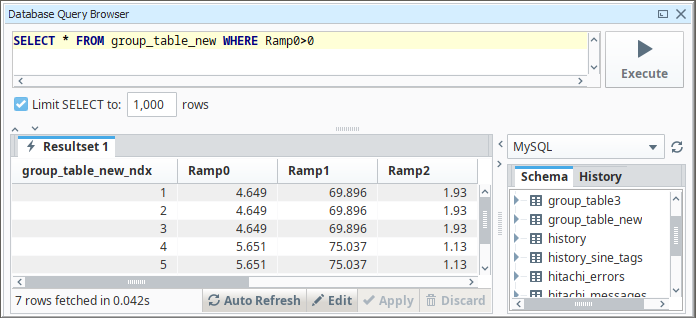
To see the data, you can use the Ignition Designer's built-in Database Query Browser. The easiest way to do this is to click on the Database (
 ) icon next to your group's Table Name field. The Query Browser is a convenient way to directly query your database connection without leaving the Ignition Designer. Of course, you can also use any query browser tools that came with your database.