Creating UDT Definition
So far, we have only dealt with simple Tags. In Ignition, you can also create Complex Tags or User Defined Types (UDTs). These types can model UDTs in certain PLCs (such as a ControlLogix) or can be completely new.
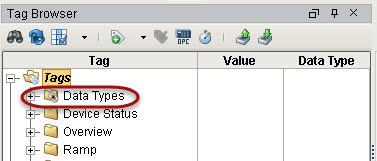
You create the UDTs in a special folder in the Tags Browser called Data Types.
UDTs (User Defined Types) can be created in the following different ways:
- Browsing OPC servers via OPC Browser
- Creating UDTs from existing Tags
- Creating UDTs manually
If your PLC supports UDTs, the easiest way to create a user defined type is from OPC.
When creating a new data type, the new definition is always placed in the Data Types folder, regardless of which folder was selected before creating the new definition.
Additionally, the Data Types Folder in the Tag Browser can only ever contain UDT definitions, and UDT definitions can only ever exist in the Data Types folder.
To Create the UDT from OPC Browser
In the example, we will use a ControlLogix which supports UDTs. We will use the second method from above, that is, creating the UDT from OPC. In our ControlLogix PLC, let's say we already have a motor UDT setup, and now we will create the UDT in Ignition.
-
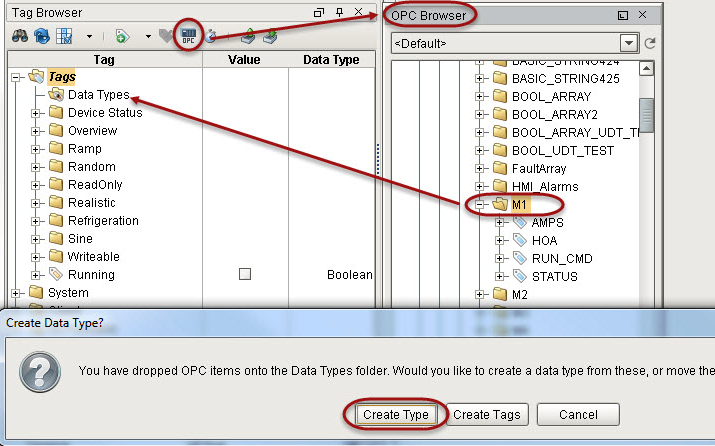
From Tags Browser, click the OPC Browse icon.
-
Under the CLX folder, go to the Global folder and find the M1 folder.
M1 represents a motor which has four Tags:
- AMPS
- HOA
- RUN_CMD
- STATUS
-
Drag the M1 folder to the Data Types folder in Tags Browser.
A window prompts you asking if you want to create a type or Tags. Click on Create Type.
-
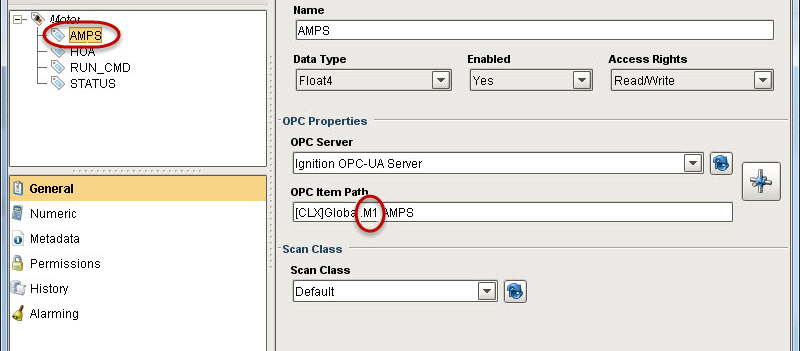
The Tag Editor window will open. Notice all four Tags; AMPS, HOA, RUN_CMD, and STATUS are automatically part of the UDT.
-
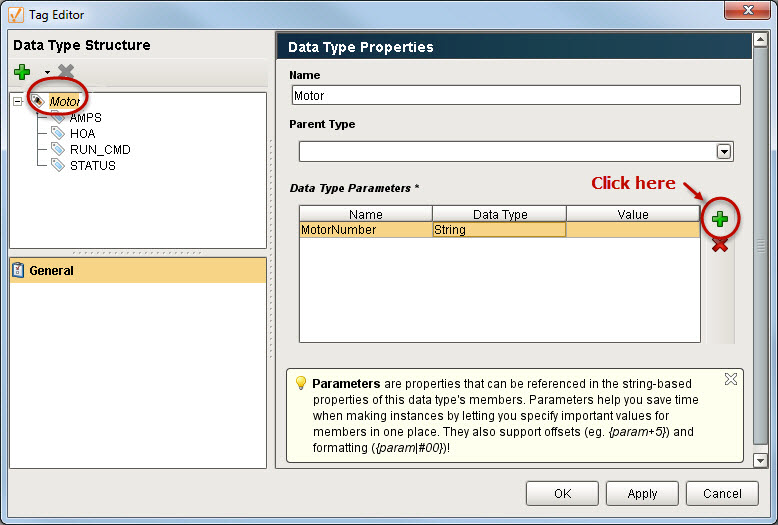
In the Tag Editor, change the name from M1 to Motor to make the type name more of a generic name.
-
Right now, each Tag is pointing to a specific address in the PLC, select the AMPS Tag to see that it is pointing to M1 in the PLC.
Because we are creating a UDT, we don't want to point to one specific set of Tags. We want each instance of the UDT to reference a different set of Tags. To do that, we need to add a parameter to the UDT. Parameters are custom properties on data types. You can use the parameters inside the type or instance definition to create parameterized data templates.
For example, if a data type consists of three OPC Tags that only differ by a number in the path, you can use a parameter for the “base address," allowing instances to be created with only one setting.
-
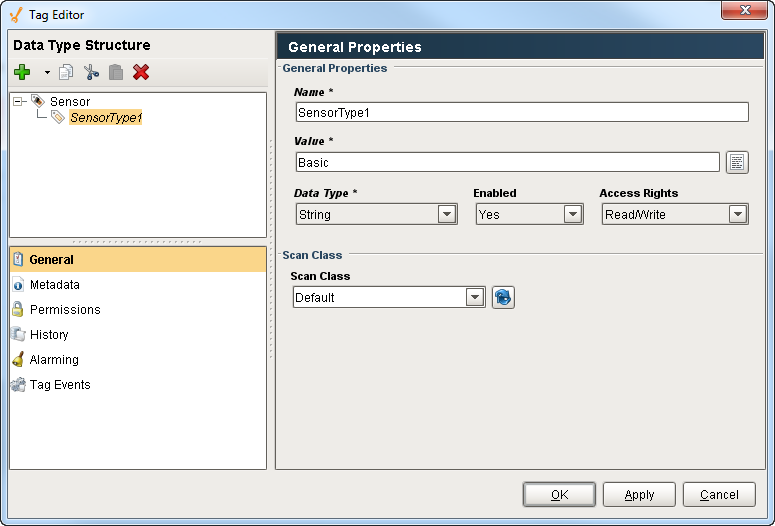
In the Tag Editor, select the Motor data type and add a new parameter by clicking the green + button and setting the following:
- Name: MotorNumber
- Data Type: String
Click OK.
-
Now for each Tag, we can substitute the motor number with the MotorNumber parameter.
Open the Tag Editor again, select the AMPS Tag. In the OPC Item Path, put your cursor at the end of M1 and press Ctrl-Space (or the Down arrow key) to bring up the list of parameters, click MotorNumber to add a reference
{MotorNumber}into the OPC Item path. Don't forget to delete the '1' from M1 before moving to the next Tag.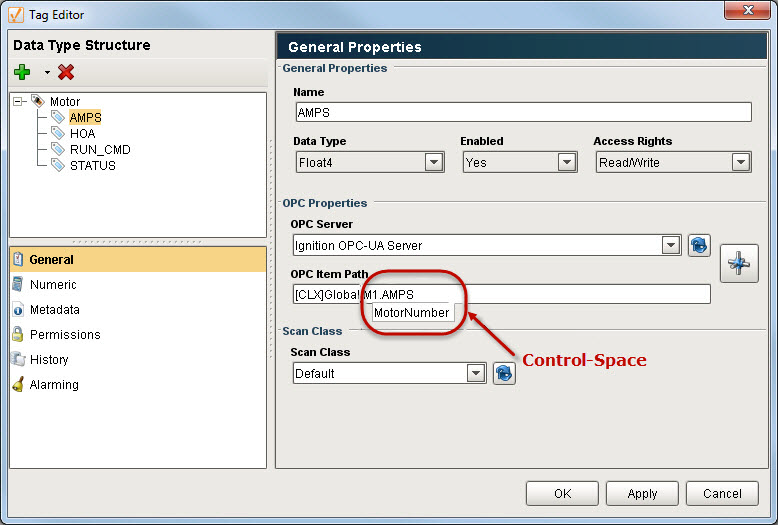
-
Repeat Step 8 for the HOA, RUN_CMD, and STATUS Tags.
The OPC Item Path will then show the MotorNumber parameter for each of the Tags.
Click OK to save the UDT. -
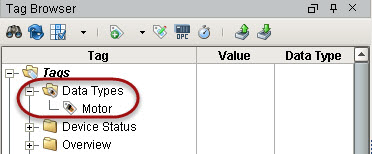
You will then see the Motor UDT in the Data Types folder.
To Create a New Data Type Manually
When creating a new data type manually, you have to specify the Name of the data type, parameters, and members or Tags that are going to be part of the structure of your new data type.
-
Select the Tags folder in the Tag Browser.
-
Click the Tag icon on the Tag Browser toolbar. The Tag creation menu will open.
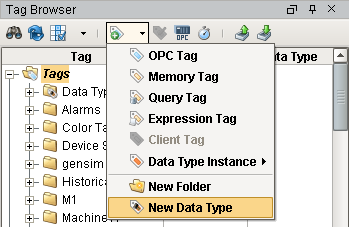
-
Select New Data Type from the menu. The Tag Editor window will open.
When editing complex Tags, the Tag Editor window appears a bit differently. The member tree structure is presented in the upper left. By selecting a member, the Tag property categories are displayed below the member area, and the editor for the selected category appears to the right.
To Extend Other Types
User Defined Types can extend other UDTs to add additional members, or override default values. The Parent Type property (with the main/top UDT member selected) can be modified by selecting another UDT from the dropdown. This will add all members of the selected UDT to this UDT, and you can add additional Tags or change default properties. Note: the Parent Type can only be selected when the Tag is first created. After that, it is not possible to modify the Parent Type property.
To Add Members to a Data Type
Simply click the green + icon at the toolbar above the member tree. Data types can contain standard Tags like OPC and DB Tags, as well as folders and instances of other complex types.
To Add Parameters
Parameters, which can be used for property expansion in member Tags, can be added by selecting the data type in the member tree. If a data type contains other complex types in it, there may be various points in the tree with custom parameters. While a data type can override the parameter values inherited from a parent, new parameters can only be added to the root node of the new data type.
Configuring Member Properties
The Tags inside of data types are configured much like normal Tags. However, in this case, the values can be thought of more as "default values", which will be used unless other values are specified when the instance is created. Most of the values configured in the data type can be modified later in subtypes or instances. Furthermore, unlike normal Tags, in the context of a data type many properties (generaly the string based properties) can reference the custom attributes of the type in order to build parameterized Tags.
Attribute Referencing and Parameterized Types
As mentioned above, many properties in the member Tag configuration can reference the parameters available in the data type. When instances are created, these references are replaced with the values defined for the type. Parameter references also support basic offsets and numerical formatting, providing a great deal of flexibility. To reference a parameter, use the syntax {ParameterName}, or use Ctrl-Space to display a list of available parameters to choose from.
To offset a value, use the form {ParameterName+offset}.
To format a value, use the form {ParameterName|format}. The format pattern is the same as that used for the numberFormat expression function. In short, "0" can be used to require a digit, and "#" can be used for optional digits. ie: ##0
Example
For this example, we'll assume that we're parameterizing the OPC Item Path, and that the data type has an integer attribute named BaseAddress defined. We'll pretend the OPC Server provides Tags named like DataPoint1.
Standard Referencing
OPC Item Path: DataPoint{BaseAddress}
Offset
Imagine that our data type had three fields, and these were laid out sequentially in the device. Instead of specifying each address for each Tag, we can simply offset from the base address:
Member 1: DataPoint{BaseAddress+0}
Member 2: DataPoint{BaseAddress+1}
Member 3: DataPoint{BaseAddress+2}
Formatting (with Offset)
Continuing from the example above, imagine that our OPC server actually provided addresses in the form DataPoint001, in order to stay consistent up to "DataPoint999". This can be accommodated
using number formatting in the reference:
Member 1: DataPoint{BaseAddress+0|000}
Member 2: DataPoint{BaseAddress+1|000}
Member 3: DataPoint{BaseAddress+2|000}
This format of three zeros means "three required digits". If our instance has a base address of 98, the resulting paths will be DataPoint098, DataPoint099, DataPoint100.
Properties that can be Parameterized
The following Tag properties can reference parameters:
- Value (for string data type only)
- OPC Server
- OPC Item Path
- Tooltip
- Documentation
- Expression/SQL Query
- Bindable Alarm Properties (Note: you can bind a property directly to the parameter, or use parameters in the binding expression, or directly in string property values)
Using parameters in expressions is a little different than using properties in an expression. These parameters are pre-processed, meaning they are evaluated before the expression is run. So if they are a string and you want to concatenate them, you must have them inside quotes.
| Data Type | Value | Expression | Result |
|---|---|---|---|
| number | 2 | {motorNumber}+2 | 4 |
| string | M2 | {motorName}+" Title" | ERROR |
| string | M2 | "{motorName} Title" | "M2 Title" |
Overriding Properties
Subtypes and instances can override the properties defined in parent types. To do this, simply select the override control (the small grey ball) next to the property to override in the member editor. Conversely, to remove the override, simply unselect the control.
Custom parameters can be overridden as well, but it is not required to specify that the value is an override. Simply provide a new value for the property. For inherited parameters, the delete button next to the parameter table will simply remove the override. The parameter can only truly be delete from the type that defines it.
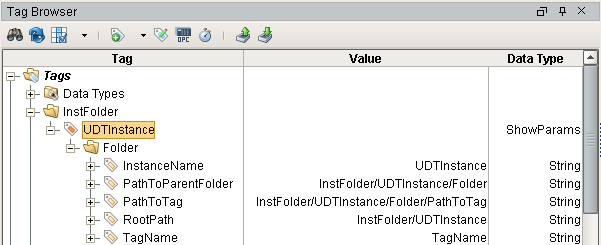
Pre-Defined Parameters
UDTs have a few parameters already defined to make things easier for you. They give you access to the name and various paths associated with a UDT member Tag. These parameters can be accessed from anywhere in a Tag that a normal parameter can be used. Each of these parameters uses that Tag it is in as a starting point for it's path.
| Parameter Name | Description |
|---|---|
{InstanceName} | The name of the UDT Instance that this Tag is inside. |
{PathToParentFolder} | The full path to the folder that this Tag is in. |
{PathToTag} | The full path to the Tag using this parameter. |
{TagName} | The name of the Tag that is using this parameter. |