Configuring Sync Services
Data Synchronization
Synchronization allows you to sync your historian data, audit records, and alarm journal entries from the Edge Gateway to a Standard Ignition Gateway, allowing you to save past the internal data limit. The Edge Gateway will still only see the 35 days of Tag History and 7 days of Alarm Journal and Audit Log data that it can hold, but it will allow you to store the data in a more permanent database that can be viewed from other Ignition systems.
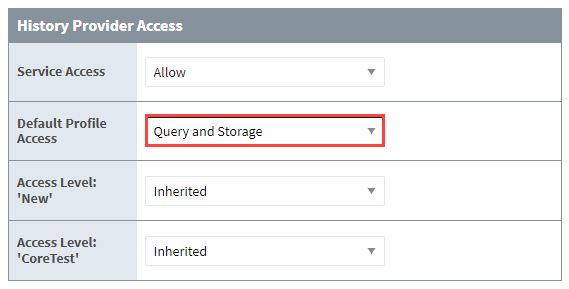
Before data can be synchronized across Gateways, your Standard Gateway's system must be configured to accept Edge storage. This can be completed by navigating to Config > Security > Service Security and select Query and Storage for the sections you will be receiving data from such as Alarm Journal Access, Audit Log Access, or History Provider Access.
Once you've allowed storage access, you can navigate back to your Edge Gateway to finish configuring your synchronization settings under Config > Data Sync > Settings page.
Prior to 8.1.8, the Sync settings can be found under Config > Enterprise Services > Settings page.
The following tables describe the synchronization settings.
Main Settings
| Property | Description |
|---|---|
| Remote Gateway Name | The gateway to target for remote synchronization. |
Remote History Sync Enabled Settings
| Property | Description |
|---|---|
| Remote History Provider Name | The remote history provider to sync data to. |
| Remote History Sync Enabled | Whether to send local tag history data to the remote system. The remote system must have the Tag Historian module installed, and allow remote storage. Default is false. |
| Max Batch Size | The maximum number of data points that will be sent per batch to the remote gateway. |
| Sync Frequency | The frequency with which data will be sent to the remote gateway. This setting will be used in conjunction with the sync schedule, if enabled. |
| Sync Frequency Units | Units are defined as milliseconds, seconds, minutes, hours, days, weeks, months, and years. |
| Enable Schedule | If enabled, the data will only be synchronized during the times specified by the pattern provided. |
| Schedule Pattern | A comma separated list of time ranges that will determine when data will be sent over the network. Accepted formats include am/pm notations, military time, and the use of colons or periods to distinguish the hour from minutes. Minutes are not required. For example, a schedule could look like the following: 9:00-15:00, 6pm-1am, 06.30-07.30 |
Remote Audit Settings
| Property | Description |
|---|---|
| Remote Audit Profile Name | The remote audit profile to sync data to. |
| Remote Audit Sync Enabled | Whether Remote Audit Sync is enabled. Default is false. |
| Sync Frequency | The frequency with which data will be sent to the remote gateway. This setting will be used in conjunction with the sync schedule, if enabled. |
| Sync Frequency Units | Units are defined as milliseconds, seconds, minutes, hours, days, weeks, months, and years. |
| Enable Schedule | If enabled, the data will only be synchronized during the times specified by the pattern provided. |
| Schedule Pattern | A comma separated list of time ranges that will determine when data will be sent over the network. Accepted formats include am/pm notations, military time, and the use of colons or periods to distinguish the hour from minutes. Minutes are not required. For example, a schedule could look like the following: 9:00-15:00, 6pm-1am, 06.30-07.30 |
Remote Alarm Journal Settings
| Property | Description |
|---|---|
| Remote Alarm Journal Name | The remote alarm journal to sync data to. |
| Remote Journal Sync Enabled | Whether Remote Alarm Journal settings are enabled. Default is false. |
| Sync Frequency | The frequency with which data will be sent to the remote gateway. This setting will be used in conjunction with the sync schedule, if enabled. |
| Sync Frequency Units | Units are defined as milliseconds, seconds, minutes, hours, days, weeks, months, and years. |
| Enable Schedule | If enabled, the data will only be synchronized during the times specified by the pattern provided. |
| Schedule Pattern | A comma separated list of time ranges that will determine when data will be sent over the network. Accepted formats include am/pm notations, military time, and the use of colons or periods to distinguish the hour from minutes. Minutes are not required. For example, a schedule could look like the following: 9:00-15:00, 6pm-1am, 06.30-07.30 |
Sync is unique in that if the connection to the remote Ignition Gateway is severed, the Edge Gateway will use its 35 days of storage as a Store and Forward buffer, allowing you to store up to 35 days of data before data is lost. Once the connection is restored, the Edge Gateway will send data over based on the max batch size and data frequency until all previous data is sent.
Remote Tag Provider
The processes below describe how to set up your remote Tag Provider and allow writing to tags on your Edge server from your Central server. You’ll notice during setup that there are many options to customize your remote Tag Provider and security services beyond enabling Read/Write capabilities. See the Tag Providers and Security Zones pages for complete configuration information. Before attempting to create a remote Tag Provider, make sure you have a valid Gateway Network connection.
To expose Edge remote tags to your central Gateway:
- Navigate on your central Gateway Config > Tags > Realtime.
- Click Create new Realtime Tag Provider.
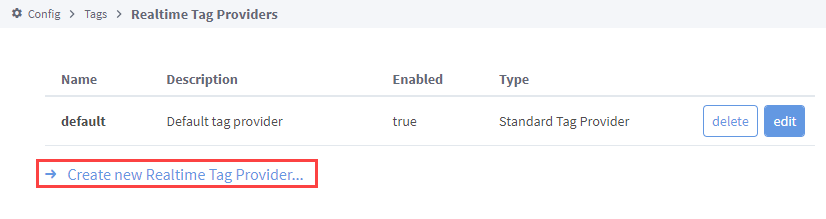
- Select Remote Tag Provider (Gateway Network).
- Click Next.
- Select your Edge Gateway.
- Click Next.
- Customize your tag provider settings as desired.
- Click Create New Realtime Tag Provider.
Now that you’ve created your remote Tag Provider, you can access your central Gateway’s Designer and see your new remote Tag Provider. You can read your tags, but still need to configure security before you can write to them. If you try to write at this point, an error message will appear because the default security zone settings restrict write access to these tags.
To configure system security to allow writing to tags:
-
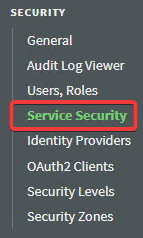
On the Edge Gateway, navigate to Config > Security > Service Security.
-
Click Edit for Edge Gateway's Security Zone.
 caution
After policies are defined on at least two zones, you'll notice Move Down and Move Up button options are displayed. Use these as needed to make sure your Security Zones are listed in the correct order. If your incoming connection falls into multiple security zones, the one it falls into first is the one that will be used.
-
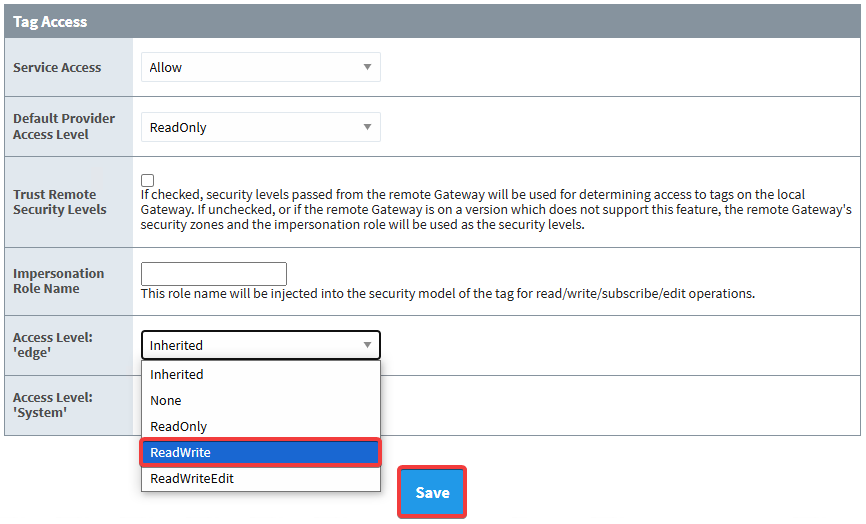
Scroll down to the Tag Access section to change your Access Level setting to Read/Write.
-
Locate the Access Level setting for your Edge Tag Provider and use the dropdown to select ReadWrite.
noteIf you want to enable ReadWrite access for all tags in this security zone, you can select ReadWrite for the Default Provider Access Level setting.
-
Click Save.
With the changes to the security zone in place, you can now write to the tags without an error message and any values entered into the tag on your central Gateway will update in the actual Tag Provider on your Edge Gateway. Follow this same procedure and select ReadWriteEdit to allow tags to be edited from a remote Designer.